BRAKE ACTUATOR REMOVAL
PROCEDURE
-
PRECAUTION
Note
After turning the ignition switch off, waiting time may be required before disconnecting the cable from the battery terminal. Therefore, make sure to read the disconnecting the cable from the battery terminal notice before proceeding with work Click here.
-
DISCONNECT CABLE FROM NEGATIVE BATTERY TERMINAL
CAUTION:
Wait at least 90 seconds after disconnecting the cable from the negative (-) battery terminal to disable the SRS system.
Note
When disconnecting the cable, some systems need to be initialized after the cable is reconnected.
-
REMOVE REAR ENGINE UNDER COVER LH
-
for 2AD-FHV:
-
for 2AD-FTV:
-
for 2AR-FE:
-
for 3ZR-FAE:
-
for 3ZR-FE:
-
for 2WW:
-
-
REMOVE AIR CLEANER CASE SUB-ASSEMBLY
-
for 2AD-FHV:
-
for 2AD-FTV:
-
for 2AR-FE:
-
for 3ZR-FAE:
-
for 3ZR-FE:
-
for 2WW:
-
-
INSTALL NO. 3 COWL TOP PANEL INSULATOR (for 2WW)
-
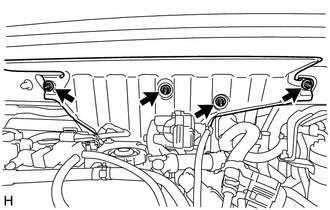
Remove the 4 nuts and No. 3 cowl top panel insulator.
-
-
REMOVE AIR CLEANER SUPPORT
-
for 2AD-FHV:
-
for 2AD-FTV:
-
-
REMOVE FUEL FILTER ASSEMBLY
-
for 2AD-FHV:
-
for 2AD-FTV:
-
for 2WW:
-
-
REMOVE AIR CLEANER BRACKET
-
for 2AD-FHV:
-
for 2AD-FTV:
-
-
REMOVE FUEL FILTER SUPPORT (for 2WW)
-
DISCONNECT ENGINE WIRE
-
except 2WW:
-

Remove the bolt and detach the 2 clamps.
-
Remove the bolt and wire harness clamp bracket.
-
-
for CVT
-
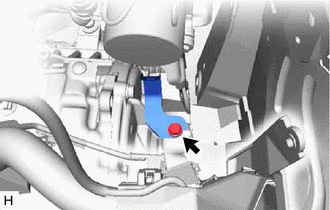
Disconnect the connector.
-
Remove the bolt and disconnect the engine wire.
-
-
-
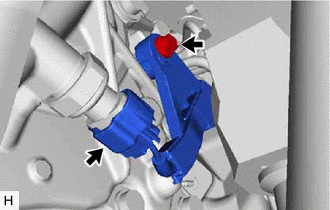
DISCONNECT TRANSMISSION CONTROL CABLE ASSEMBLY (for Automatic Transmission)
-

Remove the nut and disconnect the transmission control cable assembly from the transmission control shaft lever.
-
Remove the clip and disconnect the transmission control cable assembly from the No. 1 transmission control cable bracket.
-
-
REMOVE NO. 1 TRANSMISSION CONTROL CABLE BRACKET (for Automatic Transmission)
-
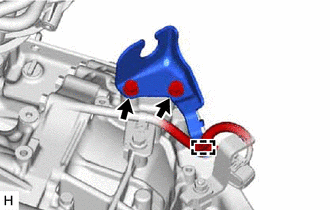
Remove the 2 bolts and No. 1 transmission control cable bracket from the automatic transaxle assembly.
-
Detach the clamp.
-
-
DRAIN BRAKE FLUID
Note
Wash off brake fluid immediately if it comes in contact with any painted surface.
-
REMOVE BRAKE ACTUATOR ASSEMBLY
-
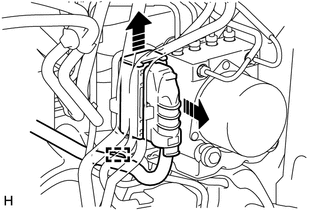
Release the lock lever and disconnect the connector from the brake actuator assembly.
Note
Be careful not to allow brake fluid to enter the removed connector.
-
Disconnect the clamp from the brake actuator bracket assembly.
-
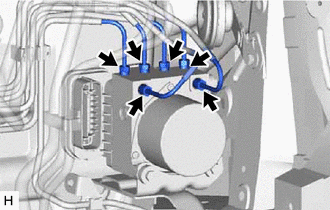
Using a union nut wrench, disconnect the 6 brake lines from the brake actuator assembly.
-

*a to Front Wheel Cylinder RH *b to Front Wheel Cylinder LH *c to Rear Wheel Cylinder RH *d to Rear Wheel Cylinder LH *e from Front Master Cylinder *f from Rear Master Cylinder Use tags or make a memo to identify the places to reconnect.
-
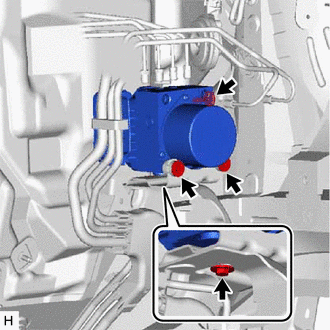
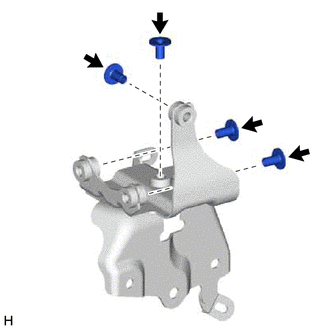
Remove the 4 bolts and brake actuator assembly from the brake actuator bracket assembly.
-
-
REMOVE BRAKE ACTUATOR BRACKET ASSEMBLY
-
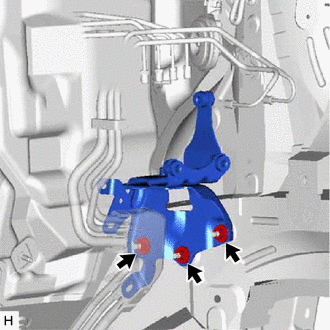
Remove the 3 nuts and brake actuator bracket assembly.
Note
Be careful not to damage the brake tubes.
-

Disconnect the 3 clamps from the brake actuator bracket assembly.
-
-
REMOVE BRAKE ACTUATOR CASE COLLAR
-
Remove the 4 brake actuator case collars from the brake actuator bolt cushion.
-
-
REMOVE BRAKE ACTUATOR BOLT CUSHION
-

Remove the 4 brake actuator bolt cushions from the brake actuator bracket assembly.
-