REAR SEAT OUTER BELT ASSEMBLY(for Fixed Seat Type) INSTALLATION

CAUTION / NOTICE / HINT
Tech Tips
-
Use the same procedure for RHD and LHD vehicles.
-
The procedure listed below is for LHD vehicles.
PROCEDURE
-
INSPECT REAR SEAT OUTER BELT ASSEMBLY
-
INSTALL REAR SEAT OUTER BELT ASSEMBLY LH
-
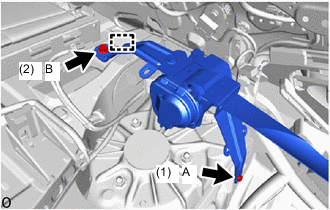
Attach the guide and temporarily install the rear seat outer belt assembly LH.
-
Install the 2 bolts in the order shown in the illustration.
- Torque:
- Bolt A
- 12.5 N*m { 127 kgf*cm, 9 ft.*lbf }
- Bolt B
- 42 N*m { 428 kgf*cm, 31 ft.*lbf }
-
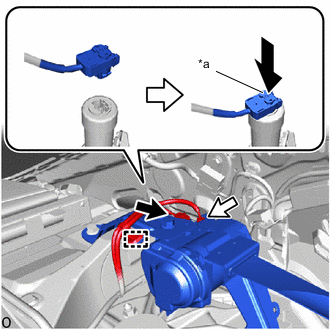
*a Locking Button 
Pretensioner Connector 
Tension Reducer Connector Connect the pretensioner connector and lock the locking button as shown in the illustration.
Note
-
When handling the pretensioner connector, take care not to damage the pretensioner wire harness.
-
Securely lock the locking button.
-
-
Connect the tension reducer connector.
-
Attach the clamp.
-
-
INSTALL REAR SEAT OUTER BELT ASSEMBLY RH
-
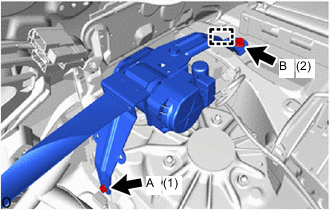
Attach the guide and temporarily install the rear seat outer belt assembly RH.
-
Install the 2 bolts in the order shown in the illustration.
- Torque:
- Bolt A
- 12.5 N*m { 127 kgf*cm, 9 ft.*lbf }
- Bolt B
- 42 N*m { 428 kgf*cm, 31 ft.*lbf }
-
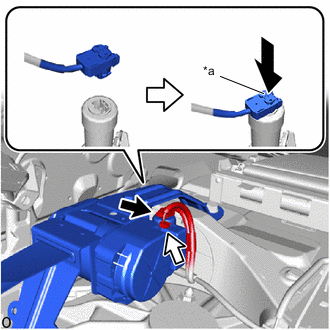
*a Locking Button Pretensioner Connector Tension Reducer Connector Connect the pretensioner connector and lock the locking button as shown in the illustration.
Note
-
When handling the pretensioner connector, take care not to damage the pretensioner wire harness.
-
Securely lock the locking button.
-
-
Connect the tension reducer connector.
-
-
INSTALL PACKAGE TRAY TRIM PANEL ASSEMBLY
-
Attach the guide in the installation direction shown in the illustration.
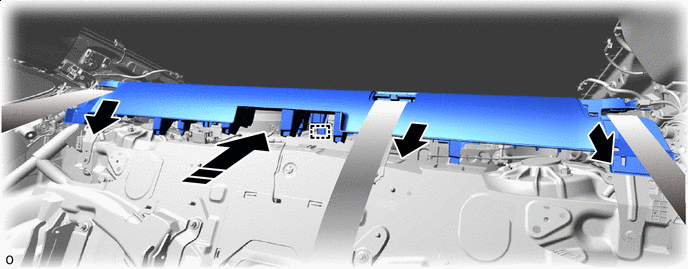

Install in this Direction - - -
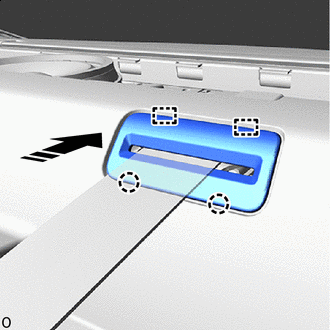
Pass the rear seat outer belt assembly LH, rear seat outer belt assembly RH and rear center seat outer belt assembly through the hole of the package tray trim panel assembly.
-
Push in the installation direction to attach the clip.
Install in this Direction - - -
Install the package tray trim panel assembly with the 2 clips.
-
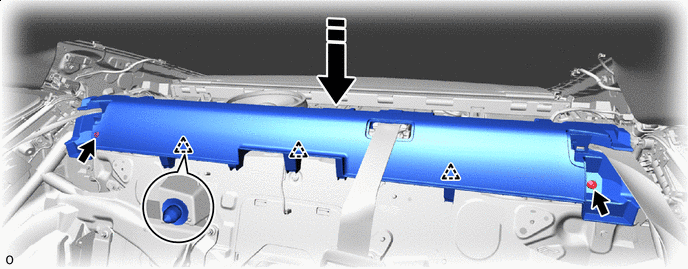
Install in this Direction Attach the guide in the installation direction shown in the illustration.
-
Attach the claw and install the shoulder guide of the rear center seat outer belt assembly.
-
-
INSTALL CENTER NO. 1 SPEAKER GRILLE SUB-ASSEMBLY
-
INSTALL INNER ROOF SIDE GARNISH ASSEMBLY LH
-
INSTALL INNER ROOF SIDE GARNISH ASSEMBLY RH
Tech Tips
Use the same procedure described for the LH side.
-
INSTALL PACKAGE TRAY TRIM SIDE COVER LH
-
INSTALL PACKAGE TRAY TRIM SIDE COVER RH
Tech Tips
Use the same procedure described for the LH side.
-
INSTALL PACKAGE TRAY TRIM GARNISH LH
-
INSTALL PACKAGE TRAY TRIM GARNISH RH
Tech Tips
Use the same procedure described for the LH side.
-
INSTALL ROOF SIDE RAIL GARNISH ASSEMBLY LH
-
INSTALL ROOF SIDE RAIL GARNISH ASSEMBLY RH
Tech Tips
Use the same procedure described for the LH side.
-
INSTALL REAR SEAT SIDE GARNISH LH
-
INSTALL REAR SEAT SIDE GARNISH RH
Tech Tips
Use the same procedure described for the LH side.
-
INSTALL REAR DOOR SCUFF PLATE LH
-
INSTALL REAR DOOR SCUFF PLATE RH
Tech Tips
Use the same procedure described for the LH side.
-
INSTALL REAR SEATBACK HOLDER
-
INSTALL REAR SEATBACK ASSEMBLY
-
INSTALL NO. 1 SEAT ARMREST CAP
-
INSTALL REAR CENTER SEAT OUTER BELT ASSEMBLY (FLOOR ANCHOR)
-
INSTALL REAR SEAT OUTER BELT ASSEMBLY LH (FLOOR ANCHOR)
-
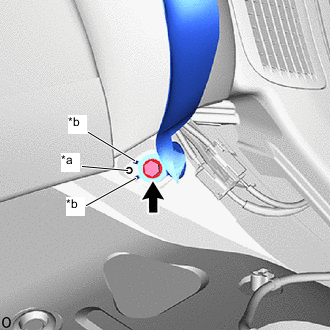
*a Body Protrusion *b Location Pin Install the floor anchor of the rear seat outer belt assembly LH with the bolt.
- Torque:
- 42 N*m { 428 kgf*cm, 31 ft.*lbf }
Note
When installing, make sure that the body protrusion comes between the location pins of the floor anchor of the rear seat outer belt assembly LH.
-
Check that the ELR locks.
-
With the rear seat outer belt assembly LH installed to the vehicle, check that the belt locks when it is pulled out quickly.
-
-
-
INSTALL REAR SEAT OUTER BELT ASSEMBLY RH (FLOOR ANCHOR)
Tech Tips
Use the same procedure described for the LH side.
-
INSTALL REAR SEAT CUSHION LOCK HOOK
-
INSTALL REAR SEAT CUSHION ASSEMBLY
-
CONNECT CABLE TO NEGATIVE BATTERY TERMINAL
Note
When disconnecting the cable, some systems need to be initialized after the cable is reconnected.
-
for 8GR-FKS:
-
for V35A-FTS:
-
-
INSTALL LUGGAGE COMPARTMENT MAT SUB-ASSEMBLY
-
INSPECT SRS WARNING LIGHT
-
INSPECT SEAT BELT WARNING SYSTEM
-
w/ Occupant Classification System:
-
w/o Occupant Classification System:
-
-
INSPECT SEAT HEATER SYSTEM (w/ Seat Heater System)