ECM REMOVAL
CAUTION / NOTICE / HINT
The necessary procedures (adjustment, calibration, initialization or registration) that must be performed after parts are removed and installed, or replaced during ECM removal/installation are shown below.
| Replaced Part or Performed Procedure | Necessary Procedure | Effect/Inoperative Function when Necessary Procedure not Performed | Link |
|---|---|---|---|
| Disconnect cable from negative battery terminal | Drive the vehicle until stop and start control is permitted (approximately 5 to 60 minutes) | Stop and start system |
|
| Memorize steering angle neutral point | LKA/LDA system | ||
| Parking support brake system* | |||
| Pre-collision system | |||
| Adaptive high beam system | |||
Lighting system (EXT) |
|||
| Variable gear ratio steering system | |||
| Parking assist monitor system | |||
| Panoramic view monitor system | |||
| Initialize rear door sunshade system | Rear door sunshade system | ||
| Initialize power trunk lid system | Power trunk lid system | ||
| ECM |
for 8GR-FKS: |
DTC P0630 is output | |
for V35A-FTS, w/ Canister Pump Module: |
DTC P063051 is output | ||
for V35A-FTS, w/o Canister Pump Module: |
|||
for V35A-FTS: |
- |
|
|
for V35A-FTS, w/o Canister Pump Module: |
|
||
| Perform code registration | Engine start | See Service Bulletin for the registration method. | |
for AGA0E: |
|
|
|
for AGA0E: |
|||
for AGA0F: |
|
|
|
for AGA0F: |
Click here Click here
Note
After turning the power switch off, waiting time may be required before disconnecting the cable from the negative (-) battery terminal. Therefore, make sure to read the disconnecting the cable from the negative (-) battery terminal notices before proceeding with work.
PROCEDURE
-
GPF DEPOSITION VALUES (w/ GPF)
Note
Before replacing the ECM, store the volumes of accumulated ash (metal oxide) and PM (Particulate Matter). After replacing the ECM, write the volumes of accumulated ash and PM to the new ECM. (w/ Gasoline Particulate Filter)
-
DISCONNECT CABLE FROM NEGATIVE BATTERY TERMINAL
Note
When disconnecting the cable, some systems need to be initialized after the cable is reconnected.
-
REMOVE COWL TOP VENTILATOR LOUVER SUB-ASSEMBLY
-
REMOVE ECM
-
for RHD:
-
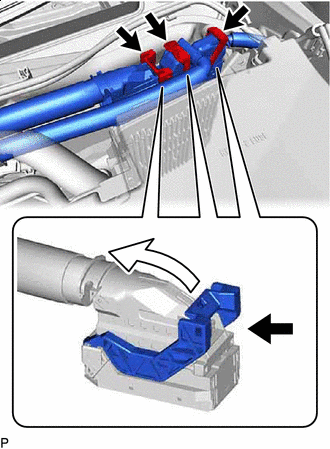

Push 
Raise Push in the locks on the 3 levers, raise the 3 levers, and disconnect the 3 ECM connectors.
Note
After disconnecting the connectors, make sure that dirt, water or other foreign matter does not contact the connecting part of the connectors.
-
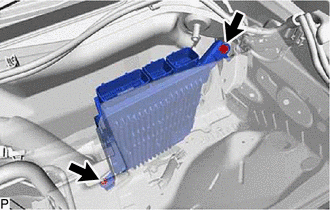
Remove the bolt and nut.
-
Remove the ECM.
Note
If the ECM has been struck or dropped, replace it.
-
-
for LHD:
-
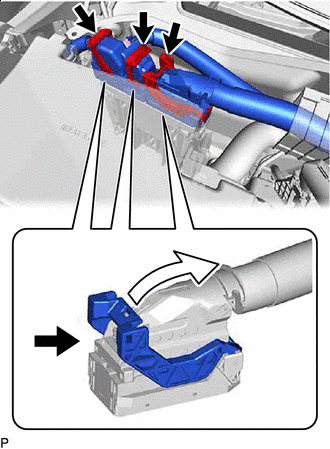
Push Raise Push in the locks on the 3 levers, raise the 3 levers, and disconnect the 3 ECM connectors.
Note
After disconnecting the connectors, make sure that dirt, water or other foreign matter does not contact the connecting part of the connectors.
-
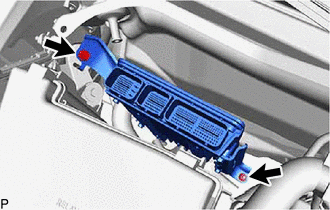
Remove the bolt and nut.
-
Remove the ECM.
Note
If the ECM has been struck or dropped, replace it.
-
-
-
REMOVE NO. 1 ECM BRACKET
-
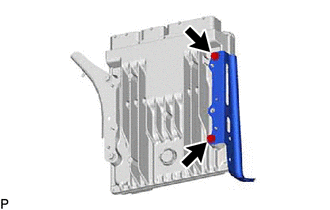
Remove the 2 screws and No. 1 ECM bracket from the ECM.
-
-
REMOVE NO. 2 ECM BRACKET
-
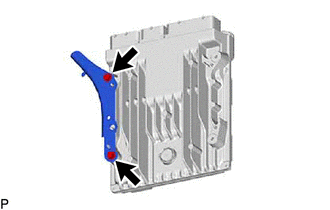
Remove the 2 screws and No. 2 ECM bracket from the ECM.
-