BRAKE ACTUATOR REMOVAL
PROCEDURE
-
PRECAUTION
Note
After turning the ignition switch off, waiting time may be required before disconnecting the cable from the negative (-) battery terminal. Therefore, make sure to read the disconnecting the cable from the negative (-) battery terminal notices before proceeding with work.
-
DISCONNECT CABLE FROM NEGATIVE BATTERY TERMINAL
Note
When disconnecting the cable, some systems need to be initialized after the cable is reconnected.
-
DRAIN BRAKE FLUID
Note
If brake fluid leaks onto any painted surface, immediately wash it off.
-
REMOVE NO. 1 ENGINE COVER (for 1NR-FE)
-
REMOVE AIR CLEANER CAP SUB-ASSEMBLY (for 1NR-FE)
-
REMOVE AIR CLEANER CASE SUB-ASSEMBLY (for 1NR-FE)
-
REMOVE NO. 2 CYLINDER HEAD COVER (for 1ZR-FAE)
-
REMOVE AIR CLEANER CAP SUB-ASSEMBLY (for 1ZR-FAE)
-
REMOVE AIR CLEANER CASE SUB-ASSEMBLY (for 1ZR-FAE)
-
REMOVE NO. 1 ENGINE COVER (for 1AD-FTV)
-
REMOVE AIR CLEANER CAP SUB-ASSEMBLY (for 1AD-FTV)
-
REMOVE AIR CLEANER CASE SUB-ASSEMBLY (for 1AD-FTV)
-
REMOVE NO. 1 ENGINE COVER (for 1ND-TV with No. 1 Engine Cover)
-
REMOVE AIR CLEANER CAP SUB-ASSEMBLY (for 1ND-TV)
-
REMOVE AIR CLEANER CASE SUB-ASSEMBLY (for 1ND-TV)
-
REMOVE FUEL FILTER ASSEMBLY (for 1AD-FTV, 1ND-TV)
for 1AD-FTV: Click here
for 1ND-TV: Click here
-
DISCONNECT WIRE HARNESS (for 1AD-FTV, 1ND-TV)
-
Disconnect the 3 wire harness clamps from the fuel filter support.
-
Disconnect the ECM connector from the ECM.
for 1AD-FTV: Click here
for 1ND-TV: Click here
-
-
REMOVE GLOW PLUG RELAY ASSEMBLY (for 1AD-FTV, 1ND-TV)
-
Remove the bolt and separate the glow plug relay assembly from the fuel filter support.
-
Disengage the wire harness clamp from the fuel filter support.
-
-
REMOVE FUEL FILTER SUPPORT (for 1AD-FTV, 1ND-TV)
-

Disengage the wire harness clamp from the fuel filter support.
-
Remove the 3 bolts and fuel filter support.
-
-
REMOVE AIR CLEANER BRACKET (for 1AD-FTV, 1ND-TV)
-
Remove the 3 bolts and air cleaner bracket.
-
-
REMOVE BRAKE ACTUATOR WITH BRACKET
-
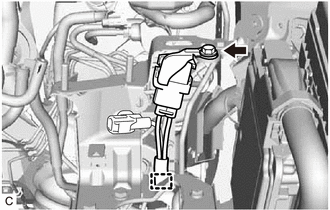
Disconnect the connector from the ECM.
for 1NR-FE: Click here
for 1ZR-FAE: Click here
-
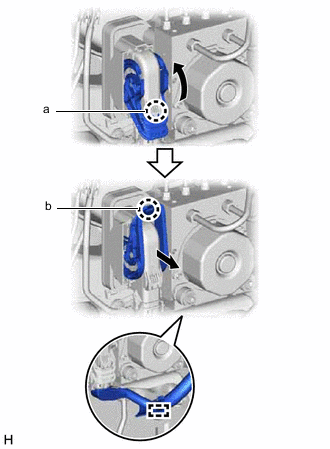
Disengage the claw (a) and raise the lock lever.
-
Engage the claw (b) and disconnect the connector from the brake actuator assembly.
Note
Be careful not to allow any brake fluid to enter the connector.
-
Disengage the clamp and separate the wire harness from the brake actuator bracket assembly.
-
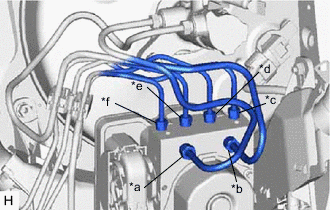
*a for LHD:
From 1st Chamber of Master Cylinder Sub-assembly
for RHD:
From 2nd Chamber of Master Cylinder Sub-assembly
*b for LHD:
From 2nd Chamber of Master Cylinder Sub-assembly
for RHD:
From 1st Chamber of Master Cylinder Sub-assembly
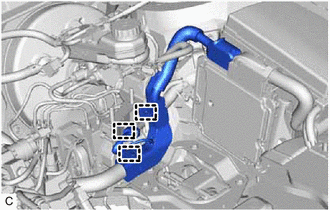
*c To Front Wheel Cylinder Assembly RH *d To Rear Wheel Cylinder Assembly LH *e To Rear Wheel Cylinder Assembly RH *f To Front Wheel Cylinder Assembly LH Using a union nut wrench, disconnect the 6 brake lines from the brake actuator assembly.
-
Use tags or make a memo to identify the places to reconnect the lines.
-
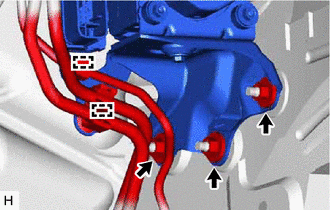
Disengage each clamp to separate the No. 2 fuel tube clamp and front No. 4 brake tube from the brake actuator bracket assembly.
Note
Do not damage the brake lines or fuel lines.
-
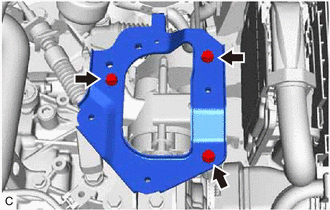
Remove the 3 nuts and brake actuator with bracket from the vehicle body.
Note
Do not damage the brake lines, fuel lines or wire harness.
-
-
REMOVE BRAKE ACTUATOR ASSEMBLY
-

Remove the bolt, 2 nuts and brake actuator assembly from the brake actuator bracket assembly.
-