PCV VALVE INSTALLATION
PROCEDURE
-
INSTALL PCV VALVE (VENTILATION VALVE SUB-ASSEMBLY)
-
Apply a light coat of engine oil to the O-ring.
-
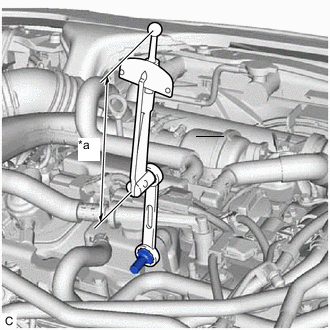
*a Torque Wrench Fulcrum Length Using a 22 mm ball joint lock nut wrench, install the PCV valve (ventilation valve sub-assembly) to the cylinder head cover sub-assembly.
Torque Specified tightening torque 5.0 N*m (51 kgf*cm, 44 in.*lbf) Note
When reusing the PCV valve (ventilation valve sub-assembly), inspect the O-ring.
Tech Tips
-
Calculate the torque wrench reading when changing the fulcrum length of the torque wrench.
-
When using a 22 mm ball joint lock nut wrench (fulcrum length of 149.75 mm (5.90 in.)) + torque wrench (fulcrum length of 185 mm (7.28 in.)): 3.0 N*m (31 kgf*cm, 27 in.*lbf)
-
-
Connect the No. 2 ventilation hose to the PCV valve (ventilation valve sub-assembly) and slide the clip to secure it.
-
-
INSTALL OUTER COWL TOP PANEL SUB-ASSEMBLY (for LHD)
-
INSTALL OUTER COWL TOP PANEL SUB-ASSEMBLY (for RHD)
-
INSTALL FRONT WIPER MOTOR AND LINK ASSEMBLY
-
INSTALL NO. 1 ENGINE COVER SUB-ASSEMBLY