REAR SEAT ASSEMBLY(for Power Seat) INSTALLATION
CAUTION / NOTICE / HINT
CAUTION:
-
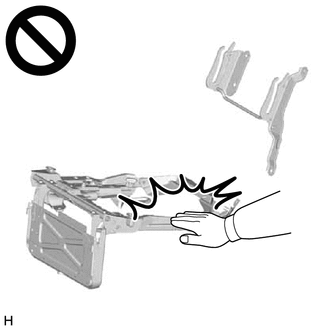
Wear protective gloves. Sharp areas on the parts may injure your hands.
-
This may result in injury.
Tech Tips
-
Use the same procedure for RHD and LHD vehicles.
-
The procedure listed below is for LHD vehicles.
-
A bolt without a torque specification is shown in the standard bolt chart.
PROCEDURE
-
INSTALL NO. 1 SEAT RECLINING ADJUSTER ASSEMBLY LH
-
Temporarily install No. 1 seat reclining adjuster assembly LH with the 4 nuts.
-
Tighten the 4 nuts in the order shown in the illustration and install the No. 1 seat reclining adjuster assembly LH.
- Torque:
- 20 N*m { 204 kgf*cm, 15 ft.*lbf }
-
-
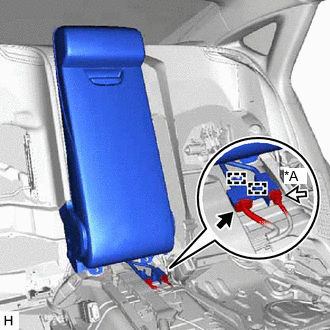
INSTALL NO. 1 SEAT RECLINING ADJUSTER ASSEMBLY RH
-
*A w/ Ottoman Temporarily install No. 1 seat reclining adjuster assembly RH with the 4 nuts.
-
Tighten the 4 nuts in the order shown in the illustration and install the No. 1 seat reclining adjuster assembly RH.
- Torque:
- 20 N*m { 204 kgf*cm, 15 ft.*lbf }
-
w/ Ottoman:
-
Connect the connector.
-
-
-
INSTALL CENTER ROOM PARTITION GARNISH ASSEMBLY
-
Attach the clip.
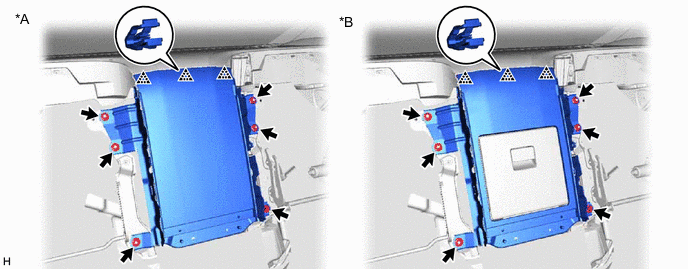
*A w/o Cool Box *B w/ Cool Box -
Install the center room partition garnish assembly with the 6 nuts.
-
-
INSTALL ROOM PARTITION BOARD ASSEMBLY LH
-
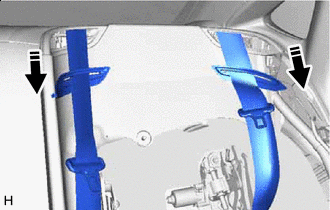

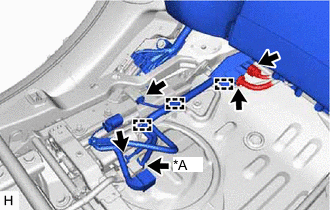
Install in this Direction Pass the rear seat outer belt assembly LH and rear center seat outer belt assembly through the room partition board assembly LH.
-
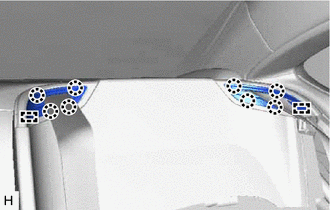
Insert the guide and attach the claw to install the belt guide of the rear seat outer belt assembly LH and rear center seat outer belt assembly.
-
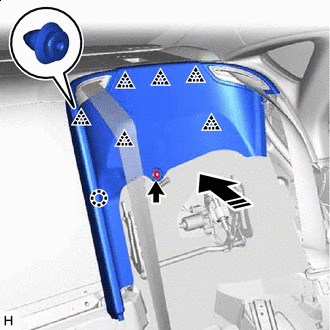
Install in this Direction Push in the installation direction shown in the illustration to attach the clip and claw.
-
Install the room partition board assembly LH with the nut.
-
-
INSTALL ROOM PARTITION BOARD ASSEMBLY RH
-

Install in this Direction Pass the rear seat outer belt assembly RH through the room partition board assembly RH.
-

Insert the guide and attach the claw to install the belt guide of the rear seat outer belt assembly RH.
-
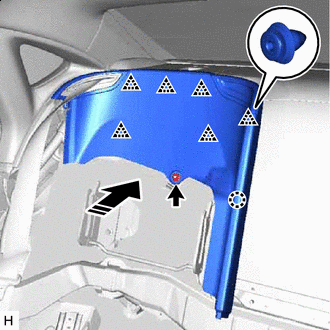
Install in this Direction Push in the installation direction shown in the illustration to attach the clip and claw.
-
Install the room partition board assembly RH with the nut.
-
-
INSTALL REAR SEAT SIDE GARNISH LH
-
INSTALL REAR SEAT SIDE GARNISH RH
Tech Tips
Use the same procedure described for the LH side.
-
INSTALL REAR DOOR SCUFF PLATE LH
-
INSTALL REAR DOOR SCUFF PLATE RH
Tech Tips
Use the same procedure described for the LH side.
-
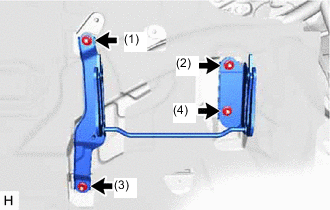
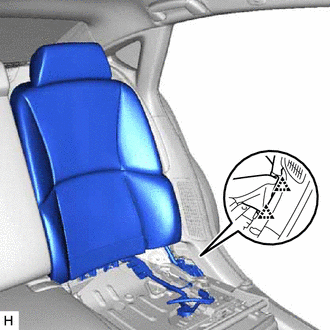
INSTALL REAR NO. 1 SEAT ADJUSTER ASSEMBLY
-
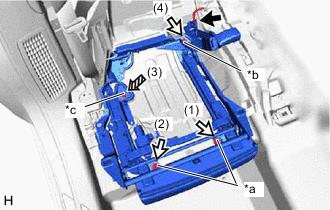
*a Bolt A *b Bolt B *c Nut 
Connector Temporarily install No. 1 rear seat adjuster assembly with the 3 bolts and nut.
-
Tighten the nuts and bolts in the order shown in the illustration and install the No. 1 rear seat adjuster assembly.
- Torque:
- Bolt A
- 20 N*m { 204 kgf*cm, 15 ft.*lbf }
- Bolt B
- 42 N*m { 428 kgf*cm, 31 ft.*lbf }
- Nut
- 20 N*m { 204 kgf*cm, 15 ft.*lbf }
-
Connect the connector.
-
-
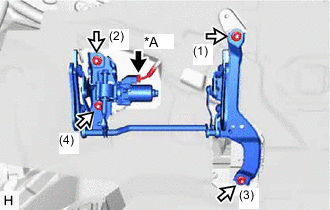
INSTALL REAR NO. 2 SEAT ADJUSTER ASSEMBLY
-
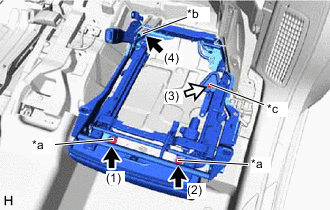
*a Bolt A *b Bolt B *c Nut Temporarily install No. 2 rear seat adjuster assembly with the 3 bolts and nut.
-
Tighten the nuts and bolts in the order shown in the illustration and install the No. 2 rear seat adjuster assembly.
- Torque:
- Bolt A
- 20 N*m { 204 kgf*cm, 15 ft.*lbf }
- Bolt B
- 42 N*m { 428 kgf*cm, 31 ft.*lbf }
- Nut
- 20 N*m { 204 kgf*cm, 15 ft.*lbf }
-
-
INSTALL REAR CENTER SEAT ARMREST ASSEMBLY
-
Install the rear seat center armrest assembly with the 2 nuts and 2 bolts.
- Torque:
- 20 N*m { 204 kgf*cm, 15 ft.*lbf }
-
Attach the clip to install the armrest cover.
-
*A w/ Rear Seat Entertainment System Attach the clamp and install the connector holder.
-
w/o Rear Seat Entertainment System:
-
Connect the connector.
-
-
w/ Rear Seat Entertainment System:
-
Connect the 2 connectors.
-
-
-
INSTALL REAR SEATBACK ASSEMBLY LH
-
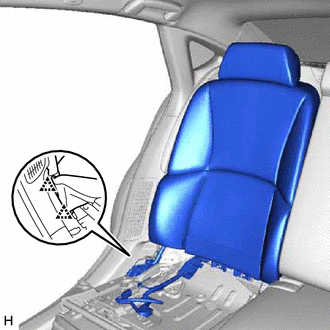
Place the rear seatback assembly LH and attach the clip.
Note
Do not damage the rear seatback assembly LH, body and body interior.
-
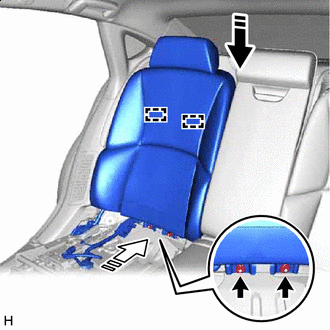
Install in this Direction (1) 
Install in this Direction (2) Push down in the installation direction (1) shown in the illustration and connect the rear seatback assembly LH to the No. 1 seat reclining adjuster assembly LH.
-
Press in the installation direction (2) shown in the illustration and connect the rear seatback assembly LH to the No. 2 rear seat adjuster assembly.
-
Install the 2 nuts.
- Torque:
- 20 N*m { 204 kgf*cm, 15 ft.*lbf }
-
Install the wire harness clamp.
-
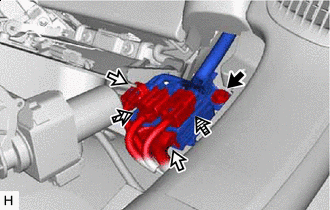

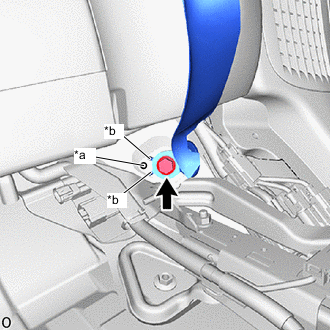
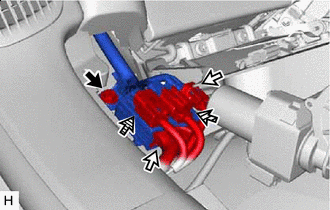
Rear Seat Airbag Assembly LH Connector 
Rear Seat Cushion Airbag Assembly LH Connector Connect the 2 connectors.
-
Connect the connector of the rear seat airbag assembly LH.
-
Before connecting the rear seat airbag assembly LH, check that the CPA is positioned as shown in the illustration.
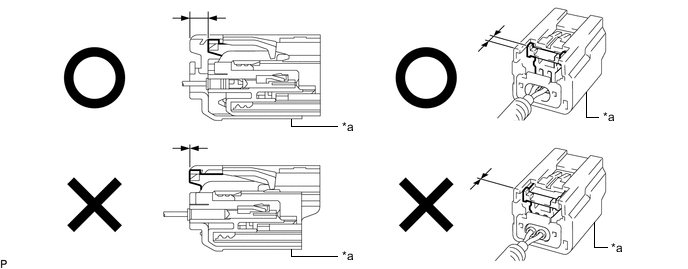
*a CPA - - -
Holding the sides of the CPA of the rear seat airbag assembly LH connector, connect the connector by engaging it until a "click" sound is heard.
Note
-
Be careful not to damage the rear seat airbag connector and wire harness.
-
When connecting the connector, push the connector straight in.
-
Do not connect the connector while holding components other than the CPA.
-
If the top of the CPA is held down when connecting the connector, the half connection prevention mechanism will not function due to deformation of the CPA. Therefore, hold the sides of the CPA.
-
-
-
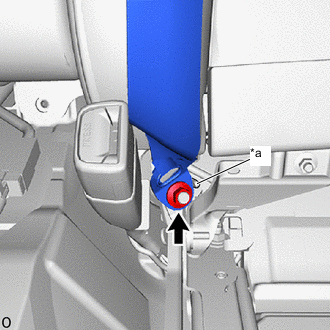
Connect the connector of the rear seat cushion airbag assembly LH.
-
Install the connector holder with the bolt.
- Torque:
- 20 N*m { 204 kgf*cm, 15 ft.*lbf }
-
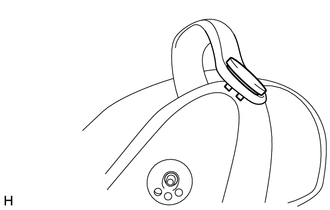
Install the cap to belt band.
-
Install in this Direction Attach the belt band.
-
*a Body Protrusion *b Location Pin Install the floor anchor of the rear seat outer belt assembly LH with the bolt.
- Torque:
- 42 N*m { 428 kgf*cm, 31 ft.*lbf }
Note
When installing, make sure that the body protrusion comes between the location pins of the floor anchor of the rear seat outer belt assembly LH.
-
*a Location Install the floor anchor of the rear center seat outer belt assembly with the nut.
- Torque:
- 42 N*m { 428 kgf*cm, 31 ft.*lbf }
Note
The floor anchor of the rear center seat outer belt assembly must not overlap the location.
-
Check ELR lock:
-
With the seat belt installed to the vehicle, check that the seat belt locks when it is pulled out quickly.
-
-
-
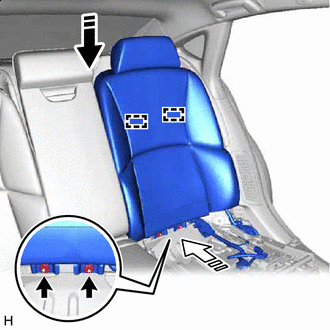
INSTALL REAR SEATBACK ASSEMBLY RH
-
Place the rear seatback assembly RH and attach the clip.
Note
Do not damage the rear seatback assembly RH, body and body interior.
-
Install in this Direction (1) Install in this Direction (2) Push down in the installation direction (1) shown in the illustration and connect the rear seatback assembly RH to the No. 1 seat reclining adjuster assembly RH.
-
Press in the installation direction (2) shown in the illustration and connect the rear seatback assembly RH to the No. 1 rear seat adjuster assembly.
-
Install the 2 nuts.
- Torque:
- 20 N*m { 204 kgf*cm, 15 ft.*lbf }
-
*A w/ Ottoman Install the wire harness clamp.
-
w/o Ottoman
-
Connect the 4 connectors.
-
-
w/ Ottoman
-
Connect the 5 connectors.
-
-
Rear Seat Airbag Assembly RH Connector Rear Seat Cushion Airbag Assembly RH Connector Connect the 2 connectors.
-
Connect the connector of the rear seat airbag assembly RH.
-
Before connecting the rear seat airbag assembly RH, check that the CPA is positioned as shown in the illustration.
*a CPA - - -
Holding the sides of the CPA of the rear seat airbag assembly RH connector, connect the connector by engaging it until a "click" sound is heard.
Note
-
Be careful not to damage the rear seat airbag connector and wire harness.
-
When connecting the connector, push the connector straight in.
-
Do not connect the connector while holding components other than the CPA.
-
If the top of the CPA is held down when connecting the connector, the half connection prevention mechanism will not function due to deformation of the CPA. Therefore, hold the sides of the CPA.
-
-
-
Connect the connector of the rear seat cushion airbag assembly RH.
-
Install the cap to belt band.
-
Install the connector holder with the bolt.
- Torque:
- 20 N*m { 204 kgf*cm, 15 ft.*lbf }
-
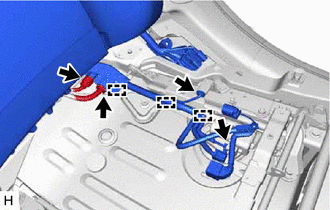
Install in this Direction Attach the belt band.
-
*a Body Protrusion *b Location Pin Install the floor anchor of the rear seat outer belt assembly RH with the bolt.
- Torque:
- 42 N*m { 428 kgf*cm, 31 ft.*lbf }
Note
When installing, make sure that the body protrusion comes between the location pins of the floor anchor of the rear seat outer belt assembly RH.
-
Check ELR lock:
-
With the seat belt installed to the vehicle, check that the seat belt locks when it is pulled out quickly.
-
-
-
INSTALL REAR SEAT CUSHION LOCK HOOK
Tech Tips
Use the same procedure for the other side.
-
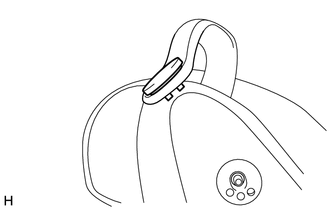
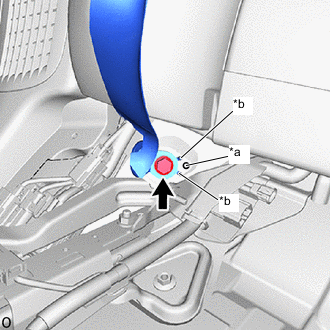
Set a new rear seat cushion lock hook.
-
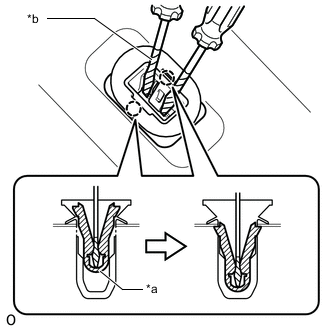
*a Sleeve *b Protective Tape Using 2 thin-bladed screwdrivers with their tips wrapped with protective tape, press the sleeve and attach the claw.
Note
Do not apply enough force to pierce the sleeve.
-
Check the installation condition.
OK The sleeve is installed properly. 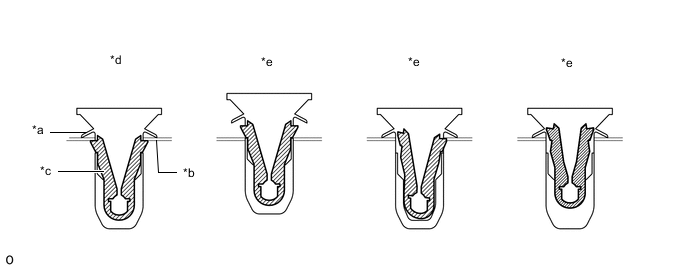
*a Body *b Vehicle *c Sleeve *d Correct *e Incorrect - -
-
-
INSTALL REAR CENTER SEAT CUSHION ASSEMBLY
-
Place the rear center seat cushion assembly in the vehicle.
Note
Do not damage the rear center seat cushion assembly, body and body interior.
-
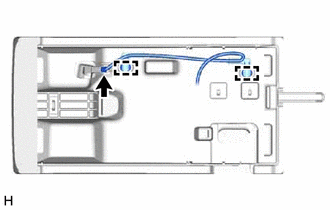
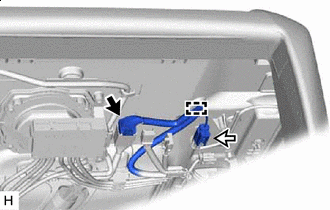
w/ Occupant Detection Sensor:
-
Attach the wire harness clamp and connect the connector.
-
-
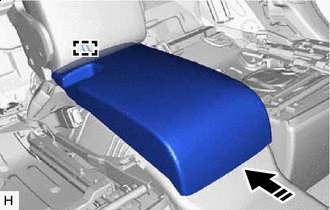
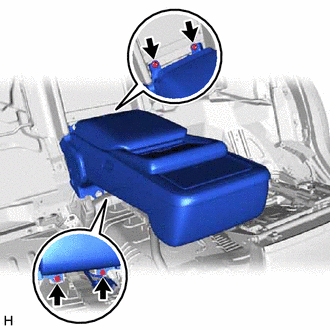
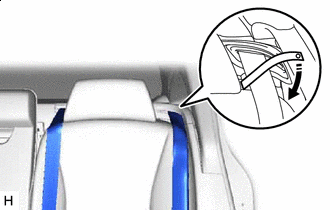
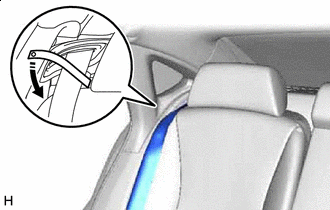
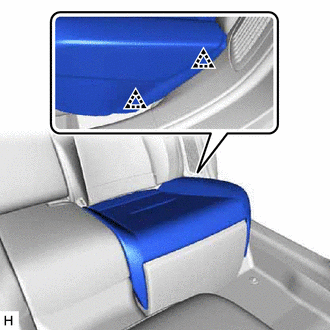
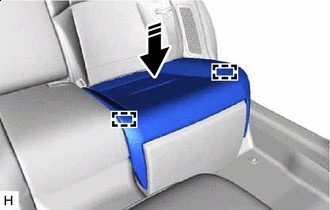
Install in this Direction Push in the installation direction shown in the illustration and attach the hook.
-
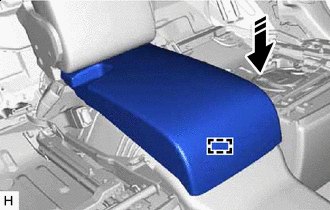
Install in this Direction Push down in the installation direction shown in the illustration to attach the hook of the rear center seat cushion assembly.
-
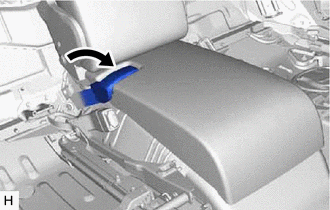
Return the rear center seat lap type belt assembly RH.
-
-
INSTALL REAR SEAT CUSHION ASSEMBLY LH
-
Place the rear seat cushion assembly LH in the vehicle.
Note
Do not damage the rear seat cushion assembly LH, body and body interior.
-
w/ Refresh Seat:
-
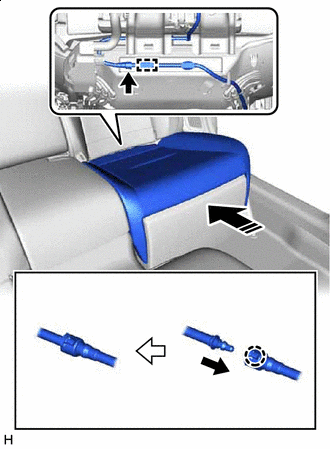
Install in this Direction Attach the claw and connect the joint.
-
Attach the tube clamp.
-
-
Attach the clip.
-

Rear Seat Cushion Airbag Assembly LH Connector Connect the connector and install the wire harness clamp.
-
Connect the connector of the rear seat cushion airbag assembly LH.
-
Before connecting the rear seat cushion airbag assembly LH, check that the CPA is positioned as shown in the illustration.
*a CPA - - -
Holding the sides of the CPA of the rear seat cushion airbag assembly LH connector, connect the connector by engaging it until a "click" sound is heard.
Note
-
Be careful not to damage the rear seat cushion airbag connector and wire harness.
-
When connecting the connector, push the connector straight in.
-
Do not connect the connector while holding components other than the CPA.
-
If the top of the CPA is held down when connecting the connector, the half connection prevention mechanism will not function due to deformation of the CPA. Therefore, hold the sides of the CPA.
-
-
-
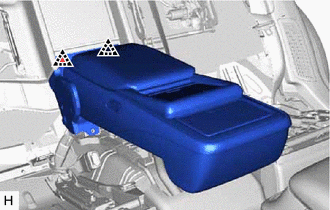
Install in this Direction Push in the removal direction shown in the illustration and attach the hooks.
Note
-
Attach each hook individually.
-
Check that the rear seat cushion lock hooks and rear seat cushion assembly LH are securely fastened.
-
-
-
INSTALL REAR SEAT CUSHION ASSEMBLY RH
Tech Tips
Use the same procedure described for the LH side.
-
CONNECT CABLE TO NEGATIVE BATTERY TERMINAL
Note
When disconnecting the cable, some systems need to be initialized after the cable is reconnected.
-
for 8GR-FKS:
-
for V35A-FTS:
-
-
INSTALL LUGGAGE COMPARTMENT MAT SUB-ASSEMBLY
-
INITIALIZATION OF SEAT ECU
-
INSPECT SRS WARNING LIGHT
-
INSPECT REAR SEAT ASSEMBLY
-
INSPECT SEAT HEATER SYSTEM
-
INSPECT CLIMATE CONTROL SEAT SYSTEM
-
INSPECT SEAT VIBRATION SYSTEM (w/ Refresh Seat)
-
INSPECT SEAT BELT WARNING SYSTEM
-
w/ Occupant Classification System:
-
w/o Occupant Classification System:
-