STARTER(w/ Stop And Start System) INSTALLATION
CAUTION / NOTICE / HINT
Note
This procedure includes the installation of small-head bolts. Refer to Small-Head Bolts of Basic Repair Hint to identify the small-head bolts.
Tech Tips
-
Use the same procedure for RHD and LHD vehicles.
-
The procedure listed below is for LHD vehicles.
PROCEDURE
-
INSTALL STARTER ASSEMBLY
-


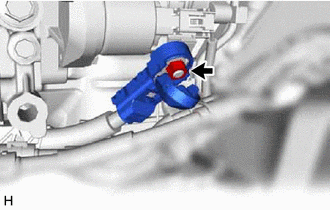
Connector 
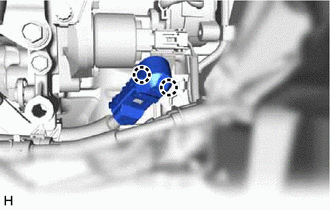
Bolt Install the starter assembly with the 2 bolts.
- Torque:
- 46 N*m { 469 kgf*cm, 34 ft.*lbf }
-
Connect the connector and attach the clamp.
-
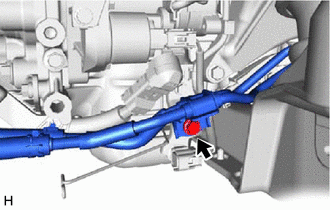
Install the No. 2 engine wire with the nut to the terminal B.
- Torque:
- 9.8 N*m { 100 kgf*cm, 87 in.*lbf }
-
Attach the claw to close the terminal cover.
-
for 2WD:
-
Install the bolt to connect the oil cooler tube.
- Torque:
- 22 N*m { 224 kgf*cm, 16 ft.*lbf }
-
-
-
INSTALL STARTER COVER
-
Bolt Nut Install the starter cover with the bolt and nut.
- Torque:
- 11.5 N*m { 117 kgf*cm, 8 ft.*lbf }
-
-
INSTALL FLYWHEEL HOUSING SIDE STAY
-
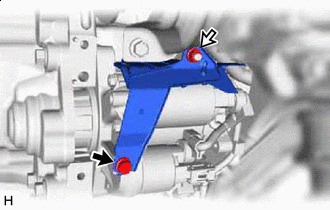
Install the flywheel housing side stay with the 2 bolts.
- Torque:
- 21 N*m { 214 kgf*cm, 15 ft.*lbf }
-
-
CONNECT NO. 2 ENGINE WIRE
-
Install the 2 bolts and connect the No. 2 engine wire.
- Torque:
- 10 N*m { 102 kgf*cm, 7 ft.*lbf }
-
-
INSTALL FRONT NO. 1 ENGINE MOUNTING BRACKET RH (for AWD)
-
INSTALL FRONT ENGINE MOUNTING INSULATOR (for AWD)
-
CONNECT FRONT FRAME ASSEMBLY (for AWD)
-
INSTALL CONVERTER ASSEMBLY RH
-
INSTALL ENGINE ASSEMBLY WITH TRANSMISSION
-
CONNECT CABLE TO NEGATIVE BATTERY TERMINAL
Note
When disconnecting the cable, some systems need to be initialized after the cable is reconnected.
-
INSTALL LUGGAGE COMPARTMENT FLOOR MAT
-
INSTALL LUGGAGE COMPARTMENT MAT SUB-ASSEMBLY