ENGINE COOLANT TEMPERATURE SENSOR INSTALLATION
CAUTION / NOTICE / HINT
Tech Tips
Perform "Inspection After Repairs" after replacing the engine coolant temperature sensor.
-
w/ Canister Pump Module:
-
w/o Canister Pump Module:
PROCEDURE
-
INSTALL ENGINE COOLANT TEMPERATURE SENSOR
Tech Tips
Perform "Inspection After Repairs" after replacing the engine coolant temperature sensor.
-
w/ Canister Pump Module:
-
w/o Canister Pump Module:
-
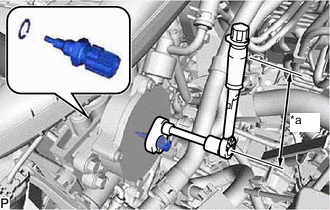
*a Torque Wrench Fulcrum Length Using a 19 mm union nut wrench, install a new gasket and engine coolant temperature sensor.
Torque Specified tightening torque 19.6 N*m (200 kgf*cm, 14 ft.*lbf) Tech Tips
-
Calculate the torque wrench reading when changing the fulcrum length of the torque wrench.
-
When using a union nut wrench (fulcrum length of 30 mm (1.18 in.)) + torque wrench (fulcrum length of 162 mm (6.38 in.)): 16.5 N*m (168 kgf*cm, 12 ft.*lbf)
-
-
Connect the ground wire with the bolt.
- Torque:
- 8.4 N*m { 86 kgf*cm, 74 in.*lbf }
-
Connect the engine coolant temperature sensor connector.
-
-
INSTALL NO. 1 AIR CLEANER HOSE
-
Install the No. 1 air cleaner hose, and then tighten the hose clamp to secure the hose.
-
Connect the PCV hose to the No. 1 air cleaner hose, and then slide the clip to secure the hose.
-
-
INSTALL AIR CLEANER CASE SUB-ASSEMBLY
-
INSTALL AIR CLEANER FILTER ELEMENT SUB-ASSEMBLY
-
INSTALL AIR CLEANER CAP SUB-ASSEMBLY
-
INSTALL BATTERY
-
INSTALL BATTERY INSULATOR
-
INSTALL BATTERY CLAMP SUB-ASSEMBLY
-
CONNECT CABLE TO POSITIVE BATTERY TERMINAL
-
CONNECT CABLE TO NEGATIVE BATTERY TERMINAL
Note
When disconnecting the cable, some systems need to be initialized after the cable is reconnected.
-
ADD ENGINE COOLANT
-
INSPECT FOR COOLANT LEAK
-
INSTALL NO. 1 ENGINE COVER SUB-ASSEMBLY