REAR SEAT SIDE AIRBAG ASSEMBLY(w/ Rear No. 2 Seat) REMOVAL

CAUTION / NOTICE / HINT
The necessary procedures (adjustment, calibration, initialization, or registration) that must be performed after parts are removed, installed, or replaced during the rear seat airbag assembly removal/installation are shown below.
| Replacement Part or Procedure | Necessary Procedure | Effect/Inoperative Function When Necessary Procedures are not Performed | Link |
|---|---|---|---|
| Disconnect cable from negative battery terminal | Memorize steering angle neutral point | LKA/LDA System | |
| Intelligent clearance sonar system*1 | |||
| Pre-crash safety system | |||
| Lighting system (EXT)
|
|||
| Adaptive high beam system | |||
| Drive the vehicle until stop and start control is permitted (approximately 15 to 60 minutes) | Stop and start system | ||
| Memorize steering angle neutral point | Parking assist monitor system (w/ Parallel parking assist function) | ||
| Parking assist monitor system (w/o Parallel parking assist function) | |||
| Panoramic view monitor system | |||
| Initialize back door lock | Power door lock control system | ||
| Reset back door close position | Power back door system |
*1: When performing learning using the GTS.
CAUTION:
-
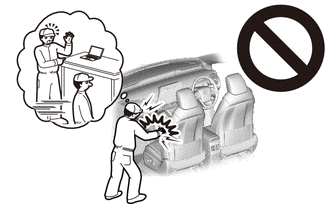
Be sure to read Precaution thoroughly before servicing.
-
Wear protective gloves. Sharp areas on the parts may injure your hands.
Note
If a rear seat airbag assembly has been deployed, replace the rear seat airbag assembly, rear seatback frame sub-assembly, separate type rear seatback pad and separate type rear seatback cover with the necessary parts in accordance with the extent of the collision damage.
for LH Side: Click here
for RH Side: Click here
PROCEDURE
-
REMOVE REAR NO. 1 SEAT ASSEMBLY LH (for LH Side)
-
REMOVE REAR NO. 1 SEAT ASSEMBLY RH (for RH Side)
-
REMOVE REAR SEAT COVER CAP
-
REMOVE NO. 1 RECLINING ADJUSTER RELEASE HANDLE
-
REMOVE REAR SEAT LOCK CONTROL LEVER SUB-ASSEMBLY (for LH Side)
-
REMOVE REAR SEAT LOCK CONTROL LEVER SUB-ASSEMBLY (for RH Side)
-
REMOVE SEPARATE TYPE REAR SEAT CUSHION COVER WITH PAD (for LH Side)
-
REMOVE SEPARATE TYPE REAR SEAT CUSHION COVER WITH PAD (for RH Side)
-
DISCONNECT REAR CENTER SEAT OUTER BELT ASSEMBLY (for RH Side)
-
REMOVE REAR SEATBACK COVER
-
REMOVE REAR SEATBACK BOARD CARPET ASSEMBLY
-
REMOVE SEAT BELT ANCHOR COVER CAP (for RH Side)
-
REMOVE REAR SEAT SHOULDER BELT COVER (for RH Side)
-
REMOVE REAR SEAT UPPER RECLINING COVER
-
REMOVE RECLINING REMOTE CONTROL LEVER SUB-ASSEMBLY
-
REMOVE SEPARATE TYPE REAR SEATBACK COVER WITH PAD (for LH Side)
-
REMOVE SEPARATE TYPE REAR SEATBACK COVER WITH PAD (for RH Side)
-
REMOVE RECLINING REMOTE CONTROL BEZEL
-
REMOVE REAR SEAT AIRBAG ASSEMBLY
CAUTION:
When storing the rear seat airbag assembly, keep the airbag deployment side facing upward.
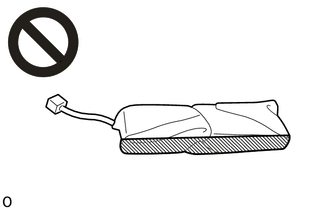

Deployment Side
-
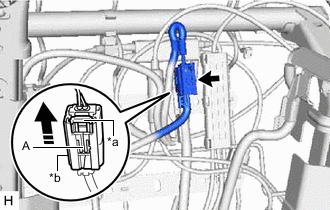
*a White Housing Lock *b Yellow CPA 
Slide Disconnect the rear seat airbag assembly connector.
Note
When disconnecting any airbag connector, take care not to damage the airbag wire harness.
-
Push down the white housing lock and slide the yellow CPA. (At this time, the connector cannot be disconnected yet.)
-
Push down the white housing lock again and disconnect the connector.
Note
Do not push down the part (A) shown in the illustration when disconnecting the connector.
-
-
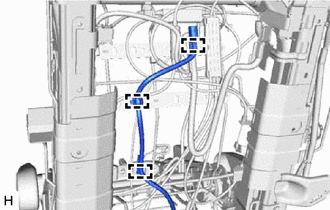
Disengage the 3 clamps.
-
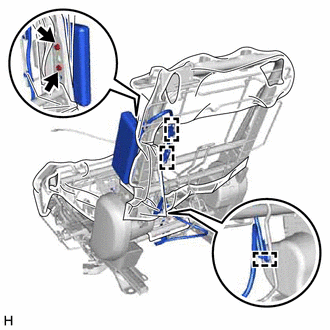
Disengage the 3 clamps and remove the 2 nuts and rear seat airbag assembly.
Note
-
Do not reuse the nuts.
-
Make sure that the rear seatback frame sub-assembly is not deformed. If it is deformed, replace it with a new one.
-
-