FRONT DOOR SPEAKER REMOVAL
Tech Tips
-
Use the same procedure for the RH and LH sides.
-
The procedure listed below is for the LH side.
-
PRECAUTION
Note
After turning the ignition switch off, waiting time may be required before disconnecting the cable from the battery terminal. Therefore, make sure to read the disconnecting the cable from the battery terminal notice before proceeding with work Click here.
-
DISCONNECT CABLE FROM NEGATIVE BATTERY TERMINAL
Note
When disconnecting the cable, some systems need to be initialized after the cable is reconnected Click here.
-
REMOVE FRONT DOOR LOWER FRAME BRACKET GARNISH LH
-
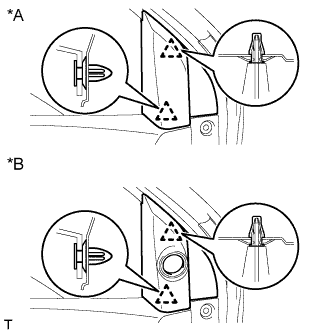
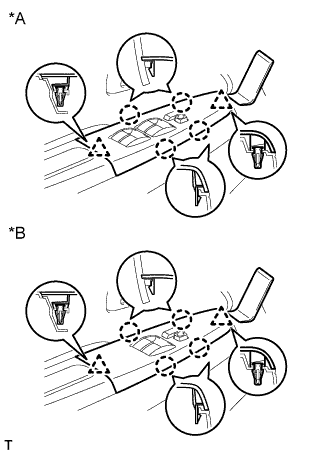
Text in Illustration *A w/o Front No. 2 Speaker *B w/ Front No. 2 Speaker Detach the 2 clips and remove the front door lower frame bracket garnish.
-
-
REMOVE FRONT NO. 2 SPEAKER ASSEMBLY
-
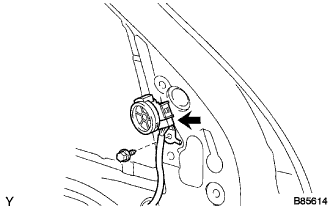
Disconnect the connector.
-
Remove the screw and speaker.
-
-
REMOVE FRONT DOOR WINDOW REGULATOR HANDLE ASSEMBLY (w/o Power Window)
-
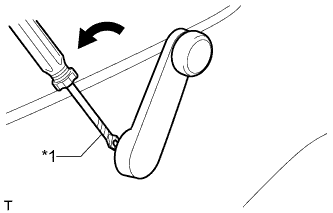
Text in Illustration *1 Protective Tape Insert a clip remover between the plate and trim board.
Tech Tips
Tape the clip remover tip before use.
-
Turn the handle counterclockwise to remove the snap ring, front door window regulator handle and plate.
-
-
REMOVE DOOR PULL HANDLE
-
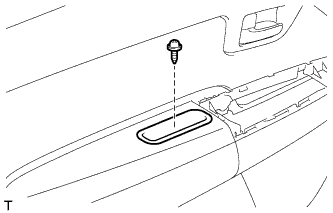
Remove the screw and door pull handle.
-
-
REMOVE POWER WINDOW REGULATOR MASTER SWITCH ASSEMBLY WITH FRONT DOOR ARMREST BASE PANEL (w/ Power Window)
-
Text in Illustration *A for Double Cab *B for Single Cab, for Extra Cab Using a moulding remover, detach the 2 clips.
-
Disconnect the 4 claws and remove the power window regulator master switch assembly with front door armrest base panel.
-
-
REMOVE FRONT DOOR TRIM BOARD SUB-ASSEMBLY LH
-
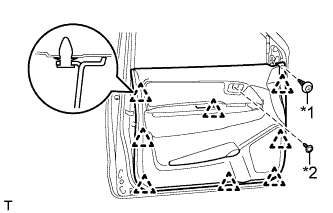
Text in Illustration *1 Clip *2 Screw for Double Cab:
-
Remove the clip and screw.
-
Detach the 8 clips and remove the front door trim board.
-
-
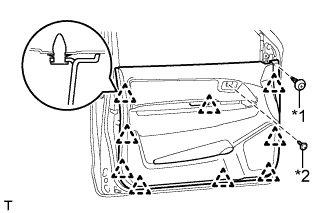
Text in Illustration *1 Clip *2 Screw for Single Cab, for Extra Cab:
-
Remove the clip and screw.
-
Detach the 9 clips and remove the front door trim board.
-
-
-
REMOVE FRONT NO. 1 SPEAKER ASSEMBLY
-
Disconnect the connector.
-
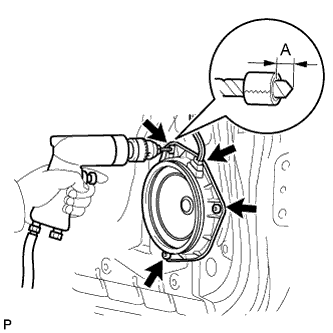
Put a 5 mm (0.197 in.) drill bit into a drill.
-
Wind tape around the drill bit approximately 5 mm (0.197 in.) from the tip of the drill as shown in the illustration.
Note
Tape the 4 mm (0.157 in.) drill bit to prevent the drill bit from going to deep.
Standard Area Specified Condition A 5 mm (0.197 in.) -
Lightly press the drill against the 3 rivets, drill off the flanges of the 3 rivets and remove the front No. 1 speaker assembly.
CAUTION:
Be careful of the drilled rivet as it may become hot.
Note
-
Pressing the drill too firmly will cause the rivet to turn and result in the rivet not being drilled through.
-
Do not pry the rivet with the drill because this may cause damage to the installation holes of the rivet or the drill bit.
-
-
Continue drilling and push out the remaining rivet fragments.
-
Using a vacuum cleaner, remove the rivet fragments and shavings from the inside of the door.
-