ГИБРИДНАЯ ТРАНСМИССИЯ УСТАНОВКА
-
INSTALL HYBRID VEHICLE TRANSMISSION ASSEMBLY
-
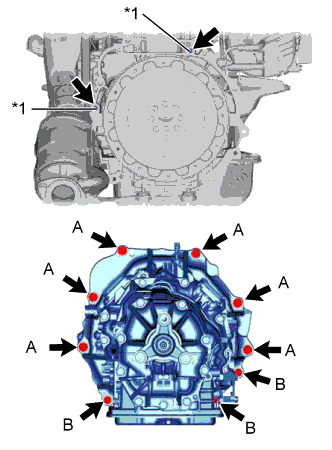
Text in Illustration *1 Knock Pin Make sure that the 2 knock pins are installed to the engine assembly.
-
Using a transmission jack, align the engine assembly and hybrid vehicle transmission assembly, fit the knock pins into the knock pin holes, and tighten the 9 bolts.
- Torque:
- Bolt (A)
- 71 N*m { 724 kgf*cm, 52 in.*lbf }
- Bolt (B)
- 37 N*m { 377 kgf*cm, 27 in.*lbf }
Note
-
Make sure to align the hybrid vehicle transmission assembly so that the input shaft of the hybrid vehicle transmission assembly will be inserted straight into the inner splines of the transmission input damper assembly.
-
Do not use excess force when installing the hybrid vehicle transmission assembly.
-
When mounting the hybrid vehicle transmission assembly to the engine assembly, make sure to securely fit the knock pins into the knock pin holes.
-
When tightening the bolts, be sure that the contact surfaces of the engine assembly and the hybrid vehicle transmission assembly are in close contact with one another.
-
Do not apply grease either to the inner splines or to the input shaft.
Tech Tips
-
Bolt (A): 50 mm (1.97 in.)
-
Bolt (B): 43 mm (1.69 in.)
Bolt Length
-
-
INSTALL OIL COOLER WITHOUT HOSE TUBE SUB-ASSEMBLY
-
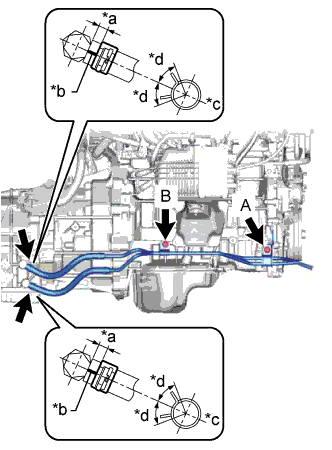
Text in Illustration *a 2 to 7 mm (0.0787 to 0.275 in.) *b Marking *c Center of the marking *d Within 45° of the center of the clip Install the oil cooler without hose tube sub-assembly to the engine assembly with the 2 bolts.
- Torque:
- 22 N*m { 224 kgf*cm, 16 ft.*lbf }
Note
Tighten the 2 bolts in the order of (A) and (B).
-
Connect the oil cooler without hose tube sub-assembly to the 2 elbows, and slide the 2 clips to secure it.
-
-
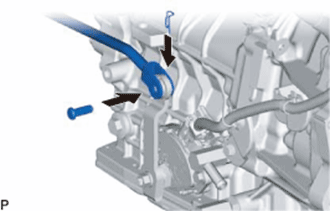
INSTALL REAR NO. 1 ENGINE MOUNTING INSULATOR
Tech Tips
Данную процедуру следует выполнять только в том случае, если требуется замена задней подушки опоры двигателя № 1.
-
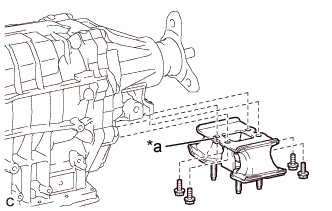
Обозначения на рисунке *a Захват Установите заднюю подушку опоры двигателя № 1 на трансмиссию гибридной системы в сборе и закрепите 4 болтами.
- Torque:
- 12 Н*м { 117 кгс*см, 8 фунт-сила-футов }
Tech Tips
Проследите за тем, чтобы захват был направлен к передней стороне автомобиля.
-
-
INSTALL REAR ENGINE MOUNTING MEMBER
Tech Tips
Данную процедуру следует выполнять только в том случае, если требуется замена задней подушки опоры двигателя № 1.
-
Установите элемент задней опоры двигателя на заднюю подушку опоры двигателя № 1, закрепив его 4 гайками.
- Torque:
- 13 Н*м { 133 кгс*см, 10 фунт-сила-футов }
-
-
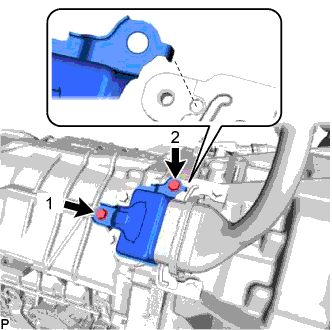
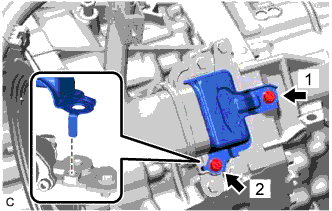
INSTALL MOTOR CABLE
Note
When installing the motor cable, make sure not to bend the motor cable base on the hybrid transmission assembly side.
-
Using an insulated tool, temporarily install the motor cable to the hybrid vehicle transmission assembly with the 2 bolts.
Note
Keep foreign matter, water, etc., away from the motor cable terminals and their installation area.
Tech Tips
When installing the motor cable, hold the motor cable by hand so that the motor cable base is not bent.
-
Using an insulated tool, tighten the 2 bolts in the order shown in the illustration.
- Torque:
- 8.0 N*m { 82 kgf*cm, 71 in.*lbf }
-
Using an insulated tool, install the motor cable to the hybrid vehicle transmission assembly with the 3 bolts.
- Torque:
- 8.0 N*m { 82 kgf*cm, 71 in.*lbf }
Note
Keep foreign matter, water, etc., away from the motor cable terminals and their installation area.
Tech Tips
When installing the motor cable, hold the motor cable by hand so that the motor cable base is not bent.
-
Engage the 2 claws to install a new terminal cap to the hybrid vehicle transmission assembly.
Note
-
Check that the terminal cap is securely installed.
-
Do not pinch the O-ring.
-
-
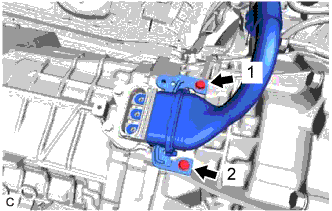
Using an insulated tool, install the connector cover to the motor cable and hybrid vehicle transmission assembly with the 2 bolts in the order shown in the illustration.
- Torque:
- 8.0 N*m { 82 kgf*cm, 71 in.*lbf }
Note
Make sure to insert the protruding part of the connector cover fully into the stopper hole and then tighten the bolts.
-
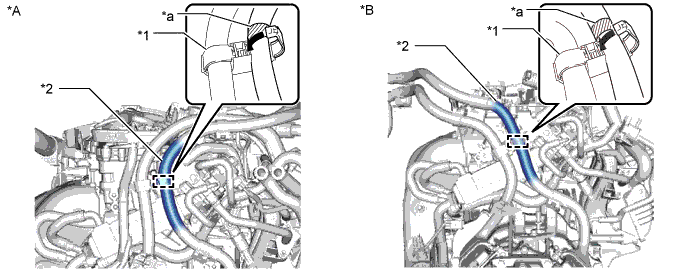
Connect the 2 clamps to the engine assembly and hybrid vehicle transmission assembly.
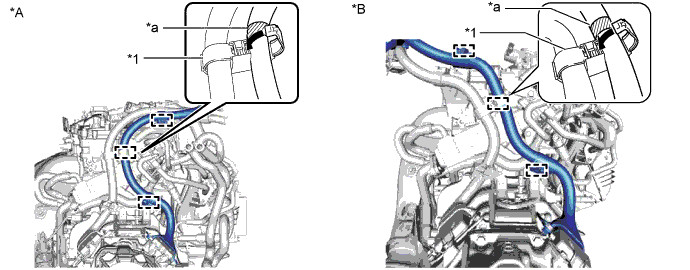
Text in Illustration *A for LHD *B for RHD *1 Wiring Harness Clamp - - *a Matchmark - - -
Engage the motor cable side lock of the wiring harness clamp to secure the motor cable as shown in the illustration.
Tech Tips
Align the wiring harness clamp with the matchmark.
-
-
INSTALL GENERATOR CABLE
Note
When installing the generator cable, make sure not to bend the generator cable base on the hybrid transmission assembly side.
-
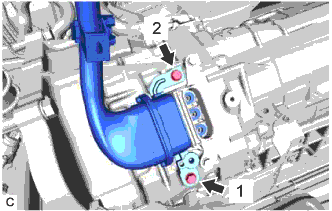
Using an insulated tool, temporarily install the generator cable to the hybrid vehicle transmission assembly with the 2 bolts.
Note
Keep foreign matter, water, etc., away from the generator cable terminals and their installation area.
Tech Tips
When installing the generator cable, hold the generator cable by hand so that the generator cable base is not bent.
-
Using an insulated tool, tighten the 2 bolts in the order shown in the illustration.
- Torque:
- 8.0 N*m { 82 kgf*cm, 71 in.*lbf }
-
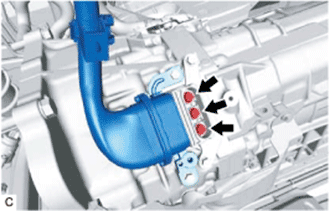
Using an insulated tool, install the generator cable to the hybrid vehicle transmission assembly with the 3 bolts.
- Torque:
- 8.0 N*m { 82 kgf*cm, 71 in.*lbf }
Note
Keep foreign matter, water, etc., away from the generator cable terminals and their installation area.
Tech Tips
When installing the generator cable, hold the generator cable by hand so that the generator cable base is not bent.
-
Engage the 2 claws to install a new terminal cap to the hybrid vehicle transmission assembly.
Note
-
Check that the terminal cap is securely installed.
-
Do not pinch the O-ring.
-
-
Using an insulated tool, install the connector cover to the generator cable and hybrid vehicle transmission assembly with the 2 bolts in the order shown in the illustration.
- Torque:
- 8.0 N*m { 82 kgf*cm, 71 in.*lbf }
Note
Make sure to insert the protruding part of the connector cover fully into the stopper hole and then tighten the bolts.
-
Connect the 3 clamps to the engine assembly and hybrid vehicle transmission assembly.
-
Connect the clamp to the generator cable.
-
Engage the motor cable side lock of the wiring harness clamp to secure the motor cable as shown in the illustration.
Text in Illustration *A for LHD *B for RHD *1 Wiring Harness Clamp *2 Motor Cable *a Matchmark - - Tech Tips
Align the wiring harness clamp with the matchmark.
-
-
INSTALL NO. 2 EARTH WIRE
-
Install the No. 2 earth wire to the hybrid vehicle transmission assembly with the bolt.
- Torque:
- 10 N*m { 102 kgf*cm, 7 ft.*lbf }
-
-
INSTALL UPPER TRANSAXLE COVER ASSEMBLY
-
Install the upper transaxle cover assembly to the hybrid vehicle transmission assembly with the bolt.
- Torque:
- 16 N*m { 163 kgf*cm, 12 ft.*lbf }
-
-
INSTALL WIRE HARNESS CLAMP BRACKET
-
Install the 2 wire harness clamp brackets to the hybrid vehicle transmission assembly with the 2 bolts.
- Torque:
- 10 N*m { 102 kgf*cm, 7 ft.*lbf }
-
Install the wire harness clamp bracket to the hybrid vehicle transmission assembly with the bolt.
- Torque:
- 13 N*m { 127 kgf*cm, 9 ft.*lbf }
-
-
CONNECT WIRE HARNESS
-
Connect the 2 clamps and wire harness to the hybrid vehicle transmission assembly.
-
Connect the shift lever position sensor connector.
-
Install the wire harness to the hybrid vehicle transmission assembly with the 3 bolts.
- Torque:
- 10 N*m { 102 kgf*cm, 7 ft.*lbf }
-
Connect the 2 clamps and wire harness to the hybrid vehicle transmission assembly.
-
Connect the motor resolver sensor connector.
-
Connect the generator resolver sensor connector.
-
-
INSTALL MOTOR HEAT INSULATOR
-
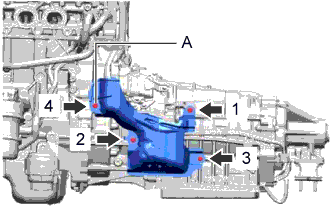
Temporarily install the motor heat insulator to the hybrid vehicle transmission assembly with the 4 bolts.
Note
Temporarily install the bolt (A) first.
-
Tighten the 4 bolts in the order shown in the illustration.
- Torque:
- 8.0 N*m { 82 kgf*cm, 71 in.*lbf }
-
-
INSTALL FLOOR SHIFT GEAR SHIFTING ROD SUB-ASSEMBLY
-
Install the floor shift gear shifting rod sub-assembly to the transmission control shaft lever with the pin.
-
Install a new clip to the pin.
-
-
INSTALL ENGINE AND TRANSMISSION
-
ADD HYBRID TRANSMISSION FLUID
-
Lift the vehicle.
Note
Set the vehicle on a lift so that the vehicle is kept level when it is lifted up (make sure that the tilt angle from the front to rear of the vehicle is within +/- 1°).
-
Remove the front suspension member brace Click here.
-
Remove the No. 2 engine under cover Click here.
-
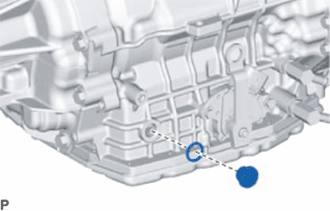
Remove the refill plug and gasket from the hybrid vehicle transmission assembly.
-
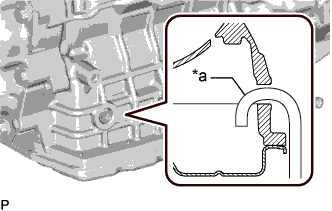
Text in Illustration *a Filler Nozzle Add hybrid transmission fluid to the refill opening plug until the fluid level reaches the bottom lip of the refill plug opening.
Note
-
Use Toyota Genuine ATF WS.
-
Be sure to fully insert the filler nozzle into the refill plug opening.
-
Be sure to add hybrid transmission fluid slowly. If hybrid transmission fluid is added quickly, the hybrid transmission fluid may hit internal parts and bounce back, resulting in fluid coming out of the refill plug opening.
-
An insufficient or excessive amount of hybrid transmission fluid may damage the hybrid vehicle transmission assembly.
-
Make sure that the hybrid transmission fluid temperature is 5°C (41°F) or more.
Reference 3.8 liters (4.0 US qts, 3.3 Imp.qts) -
-
Temporarily install the refill plug and gasket to the hybrid vehicle transmission assembly.
Tech Tips
Reuse the old gasket as the refill plug will be removed again.
-
Lower the vehicle.
-
-
ADJUST HYBRID TRANSMISSION FLUID
-
Put the engine in inspection mode Click here.
-
Idle the engine for one minute with the power switch on (READY).
Tech Tips
The oil pump will operate to circulate hybrid transmission fluid through the oil cooler system.
-
Lift the vehicle. [*1]
-
Turn the power switch off, wait for 1 minute, and then remove the refill plug and gasket from the hybrid vehicle transmission assembly. [*2]
Note
After the power switch is turned off, hybrid transmission fluid will flow back from the oil cooler system to the hybrid vehicle transmission assembly and the fluid level will rise. Make sure to perform steps [*1] to [*5] within 20 minutes.
-
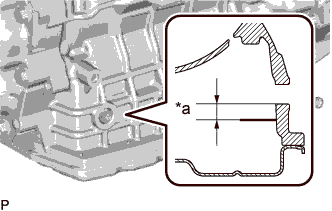
Text in Illustration *a 0 to 5 mm (0 to 0.196 in.) Add hybrid transmission fluid until the fluid level is between 0 to 5 mm (0 to 0.196 in.) from the bottom lip of the refill plug opening. [*3]
Note
-
Use Toyota Genuine ATF WS.
-
Be sure to fully insert the filler nozzle into the refill plug opening.
-
Be sure to add hybrid transmission fluid slowly. If hybrid transmission fluid is added quickly, the hybrid transmission fluid may hit internal parts and bounce back, resulting in fluid coming out of the refill plug opening.
-
An insufficient or excessive amount of hybrid transmission fluid may damage the hybrid vehicle transmission assembly.
-
Make sure that the hybrid transmission fluid temperature is 5°C (41°F) or more.
-
-
After adding hybrid transmission fluid, leave it for 30 seconds so that the fluid surface can become still again, and then check that the fluid level is between 0 to 5 mm (0 to 0.196 in.) from the bottom lip of the refill plug opening. [*4]If the fluid level is too low, add hybrid transmission fluid.
-
Install the refill plug and a new gasket to the hybrid vehicle transmission assembly. [*5]
- Torque:
- 40 N*m { 408 kgf*cm, 30 ft.*lbf }
-
Install the No. 2 engine under cover Click here.
-
Install the front suspension member brace Click here.
-
Lower the vehicle.
-