LUMBAR SUPPORT ADJUSTER ASSEMBLY (for Sports Seat Type) INSTALLATION

CAUTION:
Wear protective gloves. Sharp areas on the parts may injure your hands.
Tech Tips
-
Use the same procedure for RHD and LHD vehicles.
-
The procedure listed below is for LHD vehicles.
-
Use the same procedure for the RH and LH sides.
-
The procedure listed below is for the LH side.
-
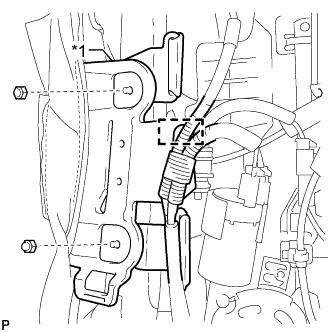
INSTALL LUMBAR SUPPORT ADJUSTER ASSEMBLY LH (for Driver Side)
-
Slide the lumbar support adjuster assembly LH downward to attach the 2 hooks and install it.
-
Install the 2 bolts.
-
Attach the 2 clips and install the 2 springs.
-
Attach the 2 cable clamps.
-
Connect the 2 connectors.
-
-
INSTALL LUMBAR SUPPORT ADJUSTER ASSEMBLY RH (for Front Passenger Side)
-
Slide the lumbar support adjuster assembly RH downward to attach the 2 hooks and install it.
-
Install the 2 bolts.
-
Attach the 2 clips and install the 2 springs.
-
Connect the connector.
-
-
INSTALL SEATBACK CLIMATE CONTROL BLOWER LH
-
Attach the hook to install the seatback climate control blower LH together with the rear air duct LH.
-
Install the 2 screws.
-
Attach the 2 claws to connect the rear air duct LH to the lumbar support adjuster assembly LH.
-
Connect the connector.
-
-
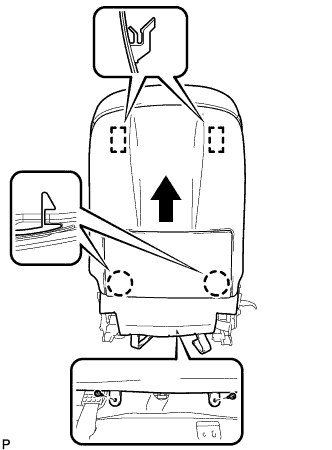
INSTALL SEATBACK COVER WITH PAD (for Driver Side)
-
Install the seatback cover with pad.
-
Text in Illustration *1 Seatback Cover Bracket Attach the seatback cover bracket with the 2 nuts.
- Torque:
- 5.5 N*m { 56 kgf*cm, 49 in.*lbf }
CAUTION:
After the seatback cover bracket is attached, make sure the seatback cover bracket is not twisted.
-
Attach the wire harness clamp.
-
Attach the 4 claws to install the 2 front seat headrest supports.
-
Attach the wire harness clamp.
-
Attach the hooks.
-
Connect the connector.
-
-
INSTALL SEATBACK COVER WITH PAD (for Front Passenger Side)
-
Install the seatback cover with pad.
-
Text in Illustration *1 Seatback Cover Bracket Attach the 2 seatback cover brackets with the 2 nuts.
- Torque:
- 5.5 N*m { 56 kgf*cm, 49 in.*lbf }
CAUTION:
After the seatback cover bracket is attached, make sure the seatback cover bracket is not twisted.
-
Attach the wire harness clamp.
-
Attach the 4 claws to install the 2 front seat headrest supports.
-
Attach the hooks.
-
Connect the connector.
-
-
INSTALL FRONT SEATBACK BOARD SUB-ASSEMBLY LH
-
Slide the front seatback board sub-assembly LH upward to attach the 2 hooks and install it.
-
Attach the 2 claws.
-
Open the lower part of the front seatback board sub-assembly LH and install the 2 screws.
-
Install the clip.
-
Attach the hook to connect the rubber band.
-
Connect the rubber band with the clip.
-
-
INSTALL FRONT SEAT ASSEMBLY
-
CHECK SRS WARNING LIGHT
-
INSPECT SEAT BELT WARNING SYSTEM
-
PERFORM INITIALIZATION (w/ Memory)
Note
Under any of the following conditions, perform initialization of the position control ECU assembly.
for LHD: Click here
for RHD: Click here
-
The position control ECU assembly is replaced.
-
The power seat motor assembly is inspected or replaced.
-
The front seat adjuster LH is inspected or replaced.
-
The lumbar support adjuster assembly LH is inspected or replaced.
-
The front seatback support LH is inspected or replaced.
-
-
INSPECT POWER SEAT CONTROL SYSTEM
for LHD: Click here
for RHD: Click here
-
INSPECT SEAT HEATER SYSTEM
-
INSPECT CLIMATE CONTROL SEAT SYSTEM
-
ENABLE AUTOAWAY/RETURN FUNCTION (w/ Memory)
-
Restore the autoaway/return function setting to the previous condition by changing the customize parameter Click here.
-