FUEL LID LOCK CONTROL CABLE ASSEMBLY REMOVAL
PROCEDURE
-
REMOVE DECK BOARD ASSEMBLY
-
REMOVE SPARE WHEEL COVER
-
REMOVE FRONT SEAT ASSEMBLY
-
REMOVE REAR SEAT ASSEMBLY (for 60/40 Split Seat Type LH Side)
-
REMOVE REAR SEAT ASSEMBLY (for 60/40 Split Seat Type RH Side)
-
REMOVE CENTER FRONT FLOOR COVER (for FrontFloor Cover Type B)
-
REMOVE FRONT FLOOR COVER RH
Remove the front floor cover RH (for Front Floor Cover Type A). Click here
Remove the front floor cover RH (for Front Floor Cover Type B). Click here
-
REMOVE FRONT FLOOR COVER LH
Remove the front floor cover LH (for Front Floor Cover Type A). Click here
Remove the front floor cover LH (for Front Floor Cover Type B). Click here
-
REMOVE REAR CONSOLE BOX ASSEMBLY
-
REMOVE FRONT DOOR SCUFF PLATE RH
-
REMOVE FRONT DOOR SCUFF PLATE LH
Tech Tips
Use the same procedure as for the RH side.
-
REMOVE COWL SIDE TRIM BOARD RH
-
REMOVE COWL SIDE TRIM BOARD LH
Tech Tips
Use the same procedure as for the RH side.
-
REMOVE REAR DOOR SCUFF PLATE RH
-
REMOVE REAR DOOR SCUFF PLATE LH
Tech Tips
Use the same procedure as for the RH side.
-
REMOVE REAR FLOOR FINISH PLATE
-
SEPARATE REAR SEAT 3 POINT TYPE OUTER BELT ASSEMBLY LH
Tech Tips
Use the same procedure as for the RH side Click here
-
SEPARATE REAR DOOR OPENING TRIM WEATHERSTRIP
-
Separate the rear door opening trim weatherstrip.
-
-
REMOVE NO. 1 LUGGAGE COMPARTMENT LIGHT ASSEMBLY
-
REMOVE DECK TRIM SIDE PANEL ASSEMBLY LH
Tech Tips
Use the same procedure as for the RH side Click here
-
REMOVE JACK COVER
-
REMOVE JACK ASSEMBLY
-
REMOVE NO. 2 FLOOR CARPET HOOK
Tech Tips
Use the same procedure for both sides.
-
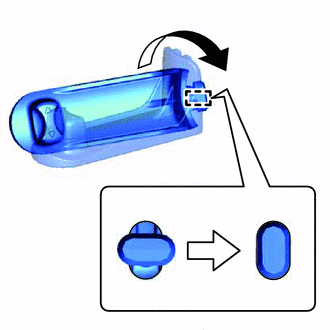
Rotate the No. 2 floor carpet hook 90° in the direction shown by the arrow in the illustration, disengage the hook, and remove the No. 2 floor carpet hook.
-
-
REMOVE FRONT FLOOR CARPET ASSEMBLY
-
Disengage the 6 clamps.
-
Remove the 2clips and front floor carpet.
-
-
REMOVE FUEL LID LOCK OPEN LEVER SUB-ASSEMBLY
-
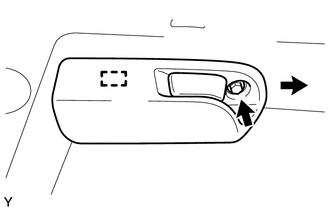
Remove the bolt.
-
Slide the fuel lid lock open lever as indicated by the arrow as shown in the illustration.
-
Disengage the guide and separate the fuel lid lock control cable.
-
-
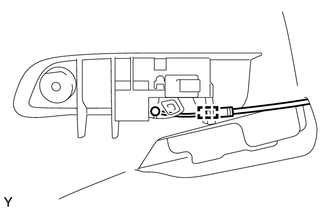
REMOVE FUEL LID LOCK CONTROL CABLE SUB-ASSEMBLY (for LHD)
-

Disengage the 2 claws and separate the fuel lid lock control cable.
-
Disengage the 4 clamps and remove the fuel lid lock control cable as shown in the illustration.

Text in Illustration *1 Fuel Lid Lock Control Cable Sub-assembly *2 Wire Harness Clamp
-
-
REMOVE FUEL LID LOCK CONTROL CABLE SUB-ASSEMBLY (for RHD)
-
Disengage the 2 claws and separate the fuel lid lock control cable.
-
Disengage the 7 clamps and remove the fuel lid lock control cable as shown in the illustration.
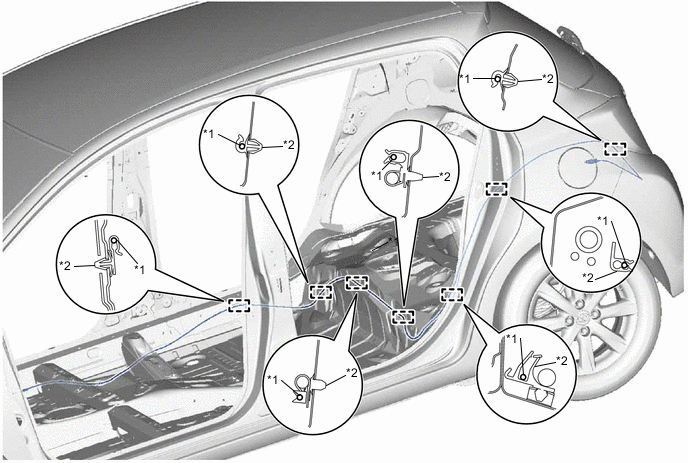
Text in Illustration *1 Fuel Lid Lock Control Cable Sub-assembly *2 Wire Harness Clamp
-
-
REMOVE FUEL FILLER OPENING LID LOCK RETAINER
-
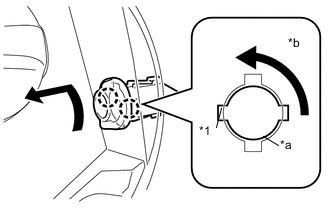
Text in Illustration *1 Claw A *a Slit *b Rotate Rotate the fuel filler opening lid lock retainer by 90° and disengage the 2 claws A from the 2 slits as shown in the illustration.
-
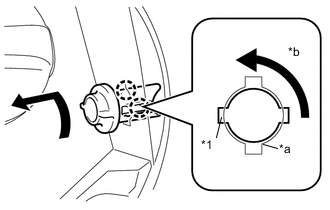
Text in Illustration *1 Claw B *a Slit *b Rotate Rotate the fuel filler opening lid lock retainer by another 90° and remove it by disengaging the 2 claws B from the 2 slits as shown in the illustration.
-