FUEL TANK REMOVAL

-
PRECAUTION (w/ Air Suspension)
Note
Be sure to read Precaution thoroughly before servicing Click here.
-
PRECAUTION (w/ Navigation System for HDD)
Note
After the power switch is turned off, the display and navigation module display (HDD navigation system) records various types of memory and settings. As a result, after turning the power switch off, make sure to wait for the time specified in the following table before disconnecting the cable from the negative (-) battery terminal.
Waiting Time before Disconnecting Cable from Negative (-) Battery Terminal Specification Waiting Time w/o Telematics transceiver 60 sec. w/ Telematics transceiver 120 sec. -
DISCHARGE FUEL SYSTEM PRESSURE
Tech Tips
-
REMOVE REAR DECK FLOOR BOX
-

Remove the 3 clips and the rear deck floor box.
-
-
DISCONNECT CABLE FROM NEGATIVE BATTERY TERMINAL
Note
When disconnecting the cable, some systems need to be initialized after the cable is reconnected Click here.
-
REMOVE CENTER EXHAUST PIPE ASSEMBLY
Tech Tips
-
REMOVE NO. 3 FRONT FLOOR HEAT INSULATOR
-
Remove the 4 nuts and No. 3 front floor heat insulator.
-
-
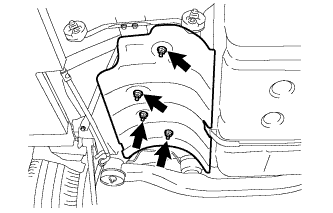
REMOVE NO. 1 FUEL TANK PROTECTOR SUB-ASSEMBLY
-

Disengage the 4 grommets.
-
Remove the screw and No. 1 fuel tank protector sub-assembly.
-
-
SEPARATE NO. 3 PARKING BRAKE CABLE ASSEMBLY
-

Remove the nut and disconnect the No. 3 parking brake cable assembly.
-
-
REMOVE FRONT CENTER FLOOR COVER
-
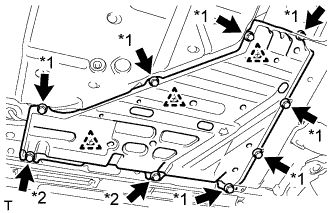
Text in Illustration *1 Bolt *2 Screw Remove the 7 bolts and 2 screws.
-
Disconnect the 3 clips and remove the front center floor cover.
-
-
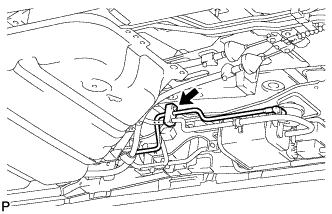
DISCONNECT FUEL TANK WIRE
-

Separate the fuel tank wire connector from the bracket.
-
Disconnect the connector.
-
-
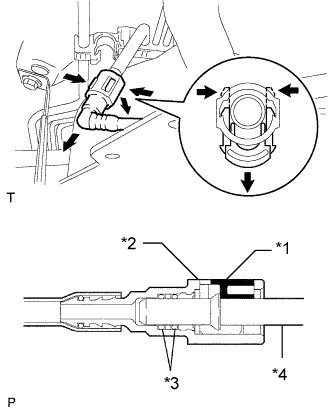
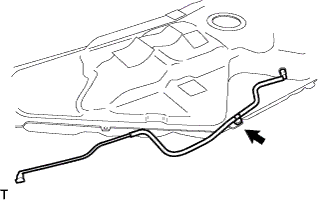
DISCONNECT FUEL TANK TO CANISTER TUBE SUB-ASSEMBLY
-

Text in Illustration *1 Retainer *2 Pipe *3 Nylon Tube *4 Fuel Tube Connector *5 O-ring Disconnect the fuel tank to canister tube sub-assembly from the charcoal canister assembly.
-
Pinch the tube connector and then pull out the fuel tank to canister tube sub-assembly.
Note
-
Check for dirt or other foreign objects around the connector before this operation. Clean the connector as necessary.
-
Be careful not to allow mud or foreign matter to scratch or come into contact with the pipe and connector that are sealed by an O-ring.
-
Do not use any tools for this operation.
-
Do not damage the disconnected pipe and connector. Prevent intrusion of foreign objects by covering the pipe and connector with a plastic bag.
-
When the pipe and connector are stuck, push and pull the connector to release. Pull out the connector carefully.
-
-
-
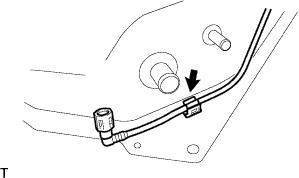
Separate the fuel tank to canister tube from the clamp.
-
-
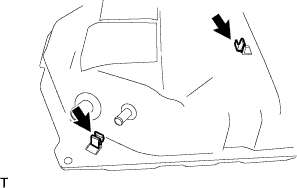
DISCONNECT FUEL TANK MAIN TUBE SUB-ASSEMBLY
-
Text in Illustration *1 Retainer *2 Fuel Tube Connector *3 O-ring *4 Pipe Pinch the tabs of the retainer to disengage the lock claws and pull the retainer down as shown in the illustration.
-
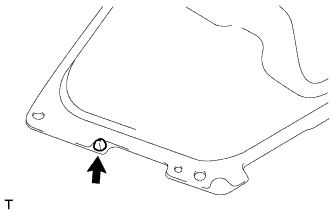
Pull out the fuel tank main tube.
Note
-
Check for dirt or other foreign objects around the connector before this operation. Clean the connector as necessary.
-
Be careful not to allow mud or foreign matter to scratch or come into contact with the pipe and connector that are sealed by O-rings.
-
Do not use any tools for this operation.
-
Do not damage the disconnected pipe and connector. Prevent intrusion of foreign objects by covering the pipe and connector with a plastic bag.
-
When the pipe and connector are stuck, push and pull the connector to release. Pull out the connector carefully.
-
-
-
DISCONNECT FUEL TANK TO FILLER PIPE HOSE
-
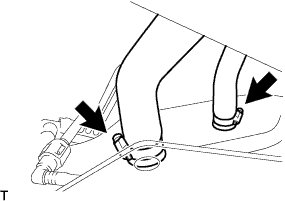
Loosen the hose clamp bolt and disconnect the fuel tank to filler pipe hose.
-
Loosen the hose clamp bolt and disconnect the fuel tank breather hose.
-
-
REMOVE FUEL TANK ASSEMBLY
-
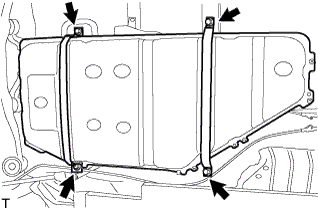
Set a engine lifter to the fuel tank.
-
Remove the 4 bolts and the 2 fuel tank bands.
-
Operate the engine lifter, and remove the fuel tank.
-
-
REMOVE FUEL SUCTION TUBE ASSEMBLY WITH PUMP AND GAUGE
-
Remove the fuel suction tube assembly with pump and gauge Click here.
-
-
DRAIN FUEL
-
REMOVE FUEL TANK WIRE
-
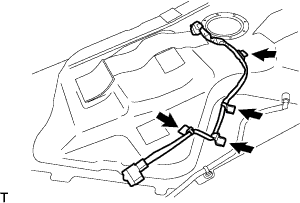
Disconnect the 4 clamps, and remove the fuel tank wire.
-
-
REMOVE FUEL TANK TO CANISTER TUBE SUB-ASSEMBLY
-
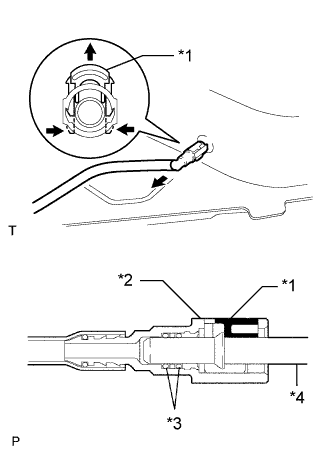
Text in Illustration *1 Retainer *2 Fuel Tube Connector *3 O-ring *4 Pipe Disconnect the fuel tank to canister tube sub-assembly.
-
Pinch the tabs of the retainer to remove the lock claws and pull it up as shown in the illustration.
-
Pull out the fuel tank to canister tube sub-assembly.
Note
-
Check for dirt or other foreign objects around the connector before this operation. Clean the connector as necessary.
-
Be careful not to allow mud or foreign matter to scratch or come into contact with the pipe and connector that are sealed by O-rings.
-
Do not use any tools for this operation.
-
Do not damage the disconnected pipe and connector. Prevent intrusion of foreign objects by covering the pipe and connector with a plastic bag.
-
When the pipe and connector are stuck, push and pull the connector to release. Pull out the connector carefully.
-
-
-
Disconnect the clamp and remove the fuel tank to canister tube sub-assembly.
-
-
REMOVE FUEL TANK MAIN TUBE SUB-ASSEMBLY
-
Remove the fuel tank main tube from the clamp.
-
-
REMOVE CLAMP
-
Remove the 2 clamps of the fuel tank main tube from the fuel tank.
-
Remove the grommet from the fuel tank.
-
-
REMOVE FUEL TANK CUSHION
-
Remove the 8 fuel tank cushions from the fuel tank.
-