REAR CRANKSHAFT OIL SEAL REMOVAL

-
DISCONNECT CABLE FROM NEGATIVE BATTERY TERMINAL
Note
-
When disconnecting the cable, some systems need to be initialized after the cable is reconnected Click here.
-
w/ Navigation System (for HDD):
After the ignition switch is turned off, the HDD navigation system requires approximately a minute to record various types of memory and settings. As a result, after turning the ignition switch off, wait a minute or more before disconnecting the cable from the negative (-) battery terminal.
-
-
REMOVE MANUAL TRANSAXLE ASSEMBLY
-
Remove the manual transaxle Click here.
-
-
REMOVE CLUTCH COVER ASSEMBLY
-
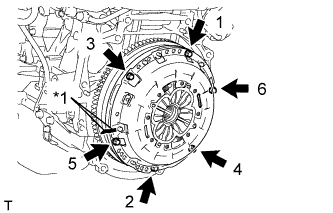
Text in Illustration *1 Matchmark Place matchmarks on the clutch cover and flywheel.
-
Loosen each set bolt 180° at a time until the spring tension is released.
Note
Be sure to uniformly loosen the bolts 180° at a time according to the order in the illustration.
-
Remove the set bolts and pull off the clutch cover to remove it.
Note
Do not drop the clutch disc.
-
-
REMOVE CLUTCH DISC ASSEMBLY
Note
Keep the lining part of the clutch disc, the pressure plate, and the surface of the flywheel away from oil and foreign matter.
-
REMOVE FLYWHEEL SUB-ASSEMBLY
-
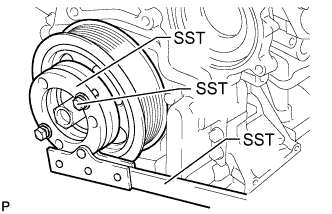
Hold the crankshaft pulley with SST.
- SST
- 09213-58014 ( 91551-80840 )
- 09330-00021
-

Using a T55 "TORX" socket wrench, remove the 8 bolts and flywheel.
-
-
REMOVE REAR CRANKSHAFT OIL SEAL
-
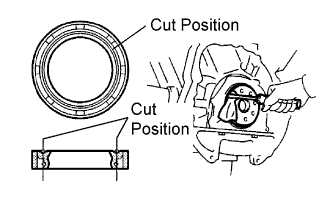
Using a knife, cut off the lip of the oil seal.
-
Using a screwdriver, pry out the oil seal.
Note
Be careful not to damage the crankshaft.
-