FRONT DOOR BELT MOULDING INSTALLATION

Tech Tips
-
Use the same procedure for the RH side and LH side.
-
The procedure listed below is for the LH side.
-
INSTALL FRONT DOOR OUTER GLASS WEATHERSTRIP
-
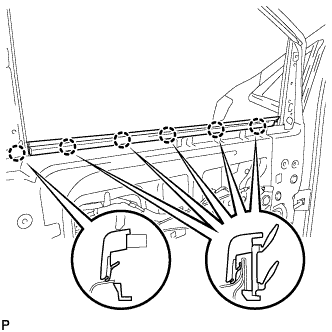
Engage the 6 claws to install the front door outer glass weatherstrip.
-
-
INSTALL FRONT DOOR WINDOW FRAME MOULDING
Tech Tips
When installing the front door window frame moulding, heat the vehicle body and front door window frame moulding using a heat light.
Heating Temperature Item Temperature Vehicle Body 40 to 60°C (104 to 140°F) Moulding 20 to 30°C (68 to 86°F) Note
Do not heat the vehicle body and front door window frame moulding excessively.
-
Clean the vehicle body surface.
-
Using a heat light, heat the vehicle body surface.
-
Remove the double-sided tape from the vehicle body.
-
Wipe off any tape adhesive residue with cleaner.
-
-
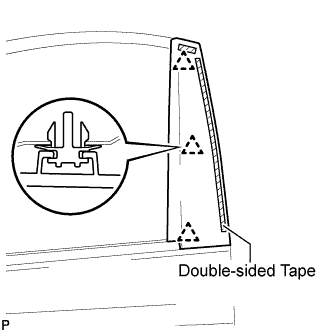
Install a new front door window frame moulding.
-
Using a heat light, heat the vehicle body and a new front door window frame moulding.
-
Remove the release paper from the face of the front door window frame moulding.
Tech Tips
After removing the release paper, keep the exposed adhesive free from foreign matter.
-
Engage the 3 clips to install the front door window frame moulding.
-
-
-
INSTALL FRONT DOOR GLASS SUB-ASSEMBLY
-
Connect the cable to the negative (-) battery terminal.
-
Connect the power window regulator motor connector.
-
Connect the power window regulator master switch assembly and move the front door glass sub-assembly so that the door glass bolts can be seen.
-
Disconnect the cable from the negative (-) battery terminal and power window regulator master switch assembly.
-
Disconnect the power window regulator motor connector.
-
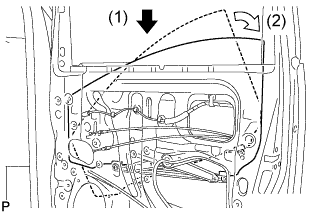
Insert the front door glass sub-assembly into the front door panel along the front door glass run as indicated by the arrows, in the order shown in the illustration.
-
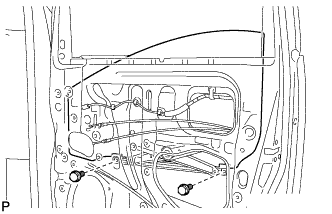
Install the front door glass sub-assembly with the 2 bolts.
- Torque:
- 7.5 N*m { 77 kgf*cm, 66 in.*lbf }
-
-
INSTALL FRONT DOOR GLASS RUN
-
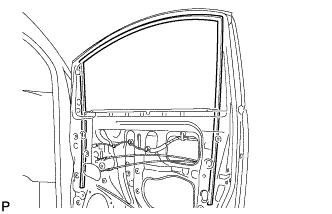
Install the front door glass run.
-
-
INSTALL FRONT DOOR SERVICE HOLE COVER
-
Apply butyl tape to the front door panel.
-
Pass the front door lock remote control cable and front door inside the locking cable through a new front door service hole cover.
-
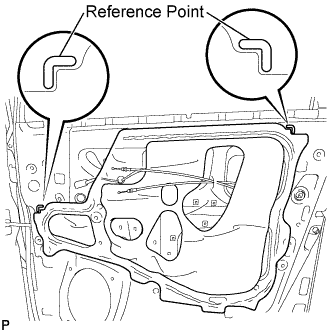
Attach the front door service hole cover according to the reference points on the front door panel.
Note
Securely install the front door service hole cover avoiding wrinkles and air bubbles.
-
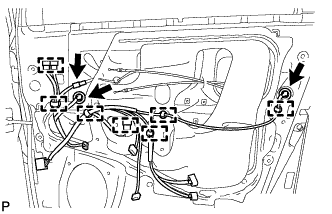
Connect each connector.
-
Engage the 7 clamps.
-
-
INSTALL DOOR TRIM BRACKET
-
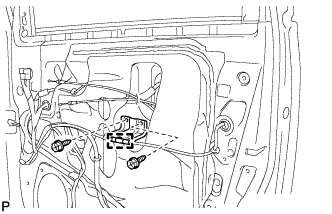
Install the door trim bracket with the 2 screws.
-
Engage the clamp to the door trim bracket.
-
-
INSTALL OUTER MIRROR CONTROL ECU ASSEMBLY (for Driver Side)
-
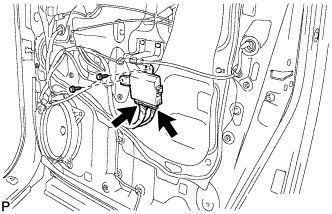
Install the outer mirror control ECU assembly with the 2 screws.
-
Connect the 2 connectors.
-
-
INSTALL OUTER REAR VIEW MIRROR ASSEMBLY WITH COVER
-
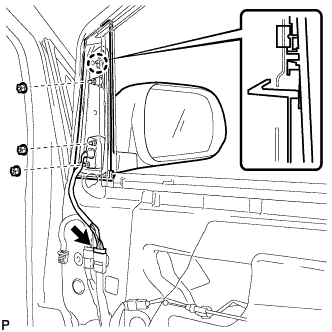
Engage the claw and install the outer rear view mirror assembly with cover.
-
Install the 3 nuts.
- Torque:
- 8.0 N*m { 82 kgf*cm, 71 in.*lbf }
-
Connect the connector.
-
-
INSTALL FRONT DOOR INSIDE HANDLE SUB-ASSEMBLY
-
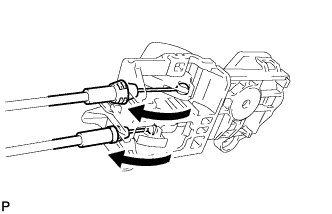
Connect the front door lock remote control cable and front door inside locking cable to the front door inside handle sub-assembly.
-
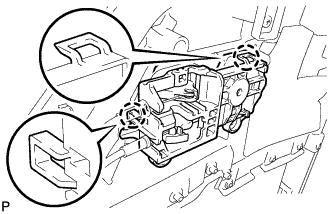
Engage the 2 claws to install the front door inside handle sub-assembly.
-
-
INSTALL FRONT DOOR TRIM BOARD SUB-ASSEMBLY
-
for Driver Side with Memory:
-
Connect the connector.
-
-
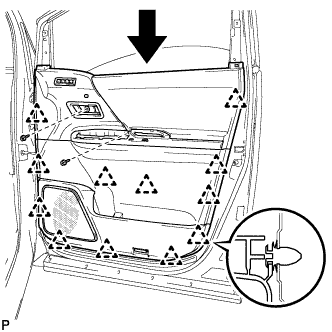
Engage the 12 clips and install the front door trim board sub-assembly to the front door panel.
-
Install the 2 screws.
-
-
INSTALL POWER WINDOW REGULATOR MASTER SWITCH ASSEMBLY WITH FRONT DOOR ARMREST BASE PANEL (for Driver Side)
-
Connect the connector.
-
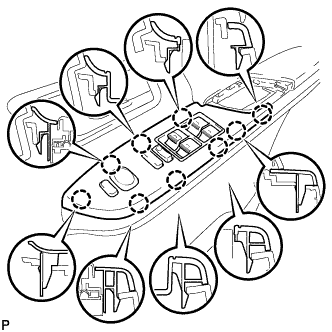
Engage the 9 claws to install the power window regulator master switch assembly with front door armrest base panel.
-
-
INSTALL POWER WINDOW REGULATOR SWITCH ASSEMBLY WITH FRONT DOOR ARMREST BASE PANEL (for Front Passenger Side)
-
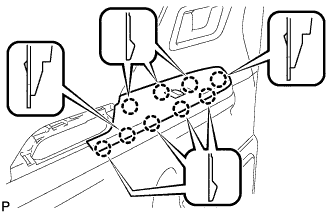
Connect the connector.
-
Engage the 9 claws to install the power window regulator switch assembly with front door armrest base panel.
-
-
INSTALL FRONT DOOR PULL HANDLE
-
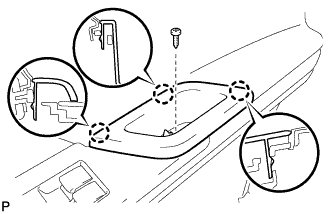
Engage the 3 claws.
-
Install the front door pull handle with the screw.
-
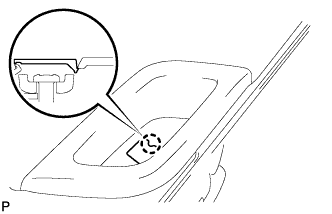
Engage the claw and close the cover.
-
-
INSTALL REFLEX REFLECTOR (w/o Courtesy Light)
-
Connect the connector.
-
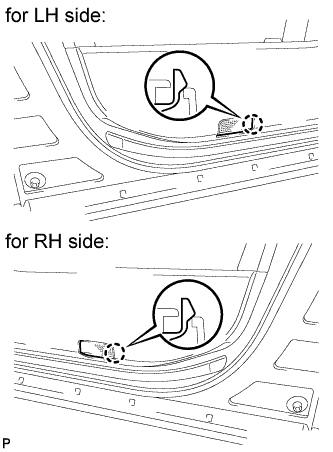
Engage the claw to install the reflex reflector.
-
-
INSTALL COURTESY LIGHT ASSEMBLY (w/ Courtesy Light)
-
Connect the connector.
-
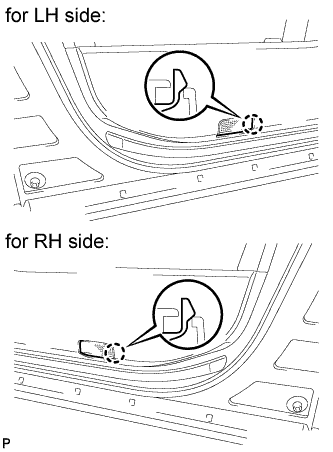
Engage the claw to install the courtesy light assembly.
-
-
INSTALL FRONT DOOR INSIDE HANDLE BEZEL PLUG
-
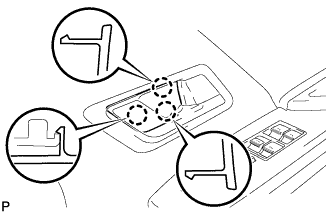
Engage the 3 claws to install the front door inside handle bezel plug.
-
-
INSTALL LOWER DOOR FRAME GARNISH
-
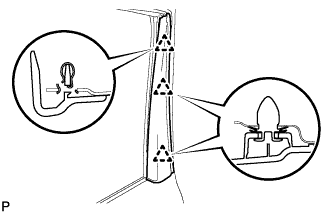
Engage the 3 clips to install the lower door frame garnish.
-
-
INSTALL FRONT DOOR LOWER FRAME BRACKET GARNISH
-
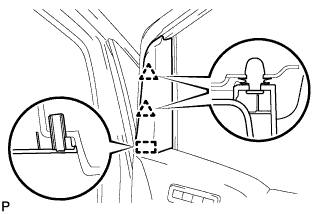
Engage the guide and 2 clips to install the front door lower frame bracket garnish.
-
-
CONNECT CABLE TO NEGATIVE BATTERY TERMINAL
Note
When disconnecting the cable, some systems need to be initialized after the cable is reconnected Click here.
-
INITIALIZE POWER WINDOW CONTROL SYSTEM