HEADLIGHT ASSEMBLY (for ALPHARD) INSTALLATION

-
INSTALL HEADLIGHT ASSEMBLY
-
Connect the each connector.
-
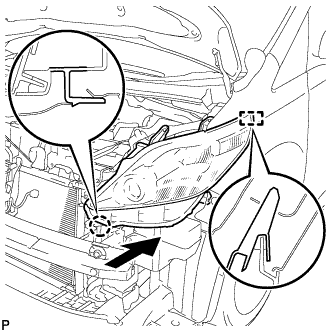
Engage the guide and claw to install the headlight assembly in the direction indicated by the arrow as shown in the illustration.
-
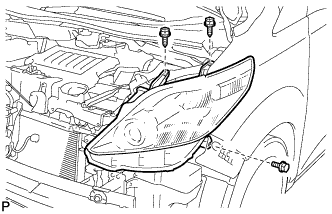
Install the bolt and 2 screws.
- Torque:
- 5.4 N*m { 55 kgf*cm, 48 in.*lbf }
-
-
INSTALL FRONT BUMPER ASSEMBLY
-
Engage the 2 guides.
-
Connect the connector.
-
w/ Headlight Cleaner System:
-
Connect the No. 1 headlight cleaner washer hose.
-
Install the front bumper extention mounting bracket. Click here
-
-
Engage the 3 claws.
Tech Tips
Use the same procedure for the RH side and LH side.
-
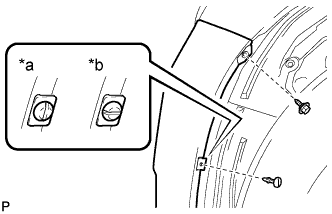
Text in Illustration *a Correct *b Incorrect Install the screw and pin hold clip.
Note
Insert the pin hold clip with the slot aligned vertically. Do not rotate the clip after inserting it. After installation, confirm that the slot is aligned vertically.
Tech Tips
Use the same procedure for the RH side and LH side.
-
Install the front bumper assembly with the 4 bolts and 7 clips.
-
-
INSTALL RADIATOR GRILLE ASSEMBLY
-
Connect the connector.
-
Engage the 8 claws.
-
Install the radiator grille assembly with the 4 screws.
-
-
INSTALL RADIATOR COVER SUB-ASSEMBLY
-
Install the radiator cover sub-assembly with the 4 clips.
-
-
CONNECT CABLE TO NEGATIVE BATTERY TERMINAL
Note
When disconnecting the cable, some systems need to be initialized after the cable is reconnected Click here.
-
ADJUST HEADLIGHT AIMING
-
ADJUST FOG LIGHT AIMING (w/ Fog Light)