SLIDE DOOR ADJUSTMENT

Note
Before adjusting the door positions of vehicles equipped with side airbags and curtain shield airbags, be sure to disconnect the cable from the negative (-) battery terminal. After adjustment, inspect the SRS warning light, side airbag system and curtain shield airbag system for normal operation. Then initialize both airbag systems.
Tech Tips
-
Use the same procedure for the RH side and LH side.
-
The following procedure is for the LH side.
-
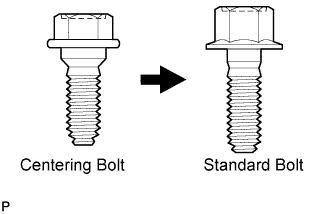
Centering bolts are used to mount the door hinge to the vehicle body and door. The door cannot be adjusted with the centering bolts installed on it. Substitute the centering bolts with standard bolts when making adjustments.
-
Specified torque for standard bolts is shown in the standard bolt chart Click here.
-
DISCONNECT CABLE FROM NEGATIVE BATTERY TERMINAL
CAUTION:
Wait at least 90 seconds after disconnecting the cable from the negative (-) battery terminal to disable the SRS system.
Note
When disconnecting the cable, some systems need to be initialized after the cable is reconnected Click here.
-
ADJUST SLIDE DOOR
-
Using SST, loosen the hinge bolts on the vehicle body and adjust the door position.
- SST
- 09812-00010
-
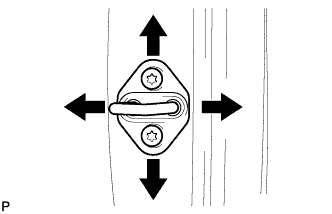
To adjust the door position vertically or horizontally at the slide door front lock striker plate assembly, loosen the bolts for the slide door down female stopper, then loosen the striker screws using a T40 "TORX" socket wrench so that the striker can move, and adjust the striker position by tapping it lightly using a brass bar and a hammer.
- Torque:
- 23 N*m { 235 kgf*cm, 17 ft.*lbf }
-
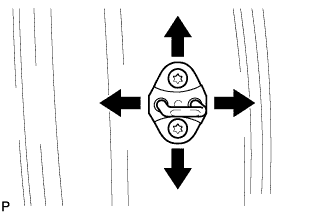
To adjust the door position vertically or horizontally at the slide door lock striker plate assembly, loosen the striker screws using a T40 "TORX" socket wrench and adjust the striker position by tapping it lightly using a brass bar and a hammer.
- Torque:
- 23 N*m { 235 kgf*cm, 17 ft.*lbf }
-
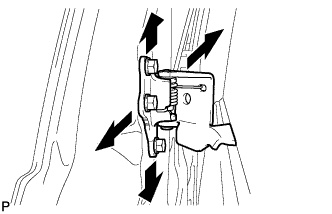
To adjust the door position in the vertical or front-to-back directions at the rear edge of the door, loosen the bolts of the slide door center hinge assembly before making an adjustment.
- Torque:
- 20 N*m { 204 kgf*cm, 15 ft.*lbf }
-
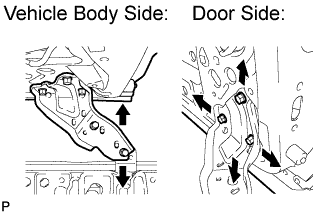
To adjust the lower door seating position on the vehicle body surface vertically or to adjust the door position in the vertical and front-to-back directions, fully close the slide door, loosen the bolt of the slide door lower roller assembly, then check and adjust the door position.
- Torque:
- Vehicle Body Side
- 19 N*m { 194 kgf*cm, 14 ft.*lbf }
- Door Side
- 20 N*m { 204 kgf*cm, 15 ft.*lbf }
Tech Tips
-
To adjust the slide door lower roller arm on the door side, remove the rear door trim board.
-
To adjust the slide door lower roller base on the vehicle body side, disengage the slide door full open stop lock assembly and temporarily install the bolts.
-
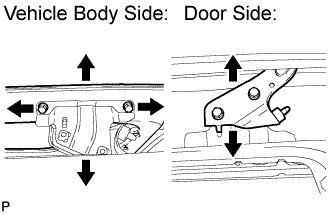
To adjust the door position in the vertical, horizontal or front-to-back direction, loosen the bolts of the slide door roller assembly before making an adjustment.
- Torque:
- Vehicle Body Side
- 13 N*m { 133 kgf*cm, 10 ft.*lbf }
- Door Side
- 30 N*m { 306 kgf*cm, 22 ft.*lbf }
-
For vehicles with the power slide door system, temporarily tighten the slide door down female stopper, fully close the slide door to settle the stopper, and then fully tighten the stopper.
-
After adjusting the door position, check the operation of the electric door lock system, slide door closer system, and power slide door system (for vehicles with the power slide door system).
Tech Tips
If something contacts the power slide door touch sensor during an automatic closing operation, the door will reverse.
-
-
CONNECT CABLE TO NEGATIVE BATTERY TERMINAL
Note
When disconnecting the cable, some systems need to be initialized after the cable is reconnected Click here.
-
INSPECT SRS WARNING LIGHT