SLIDING ROOF HOUSING INSTALLATION

-
INSTALL SLIDING ROOF WEATHERSTRIP
-
Install the sliding roof weatherstrip as follows:
-
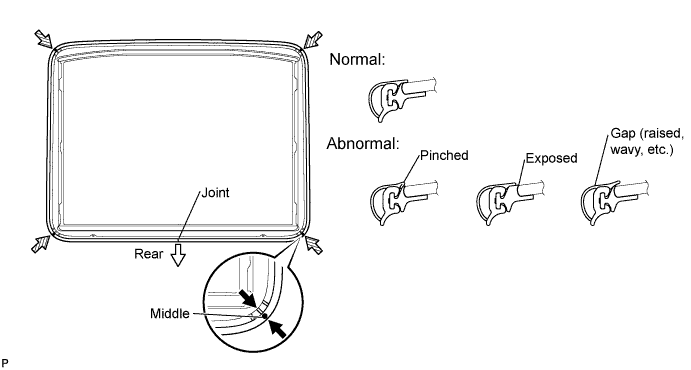
Position the joint of the weatherstrip at the rear center.
-
Align the marks on the weatherstrip with the middle marks at the corners of the sliding roof panel and install the weatherstrip.
-
Install the lip of the weatherstrip firmly.
-
-
-
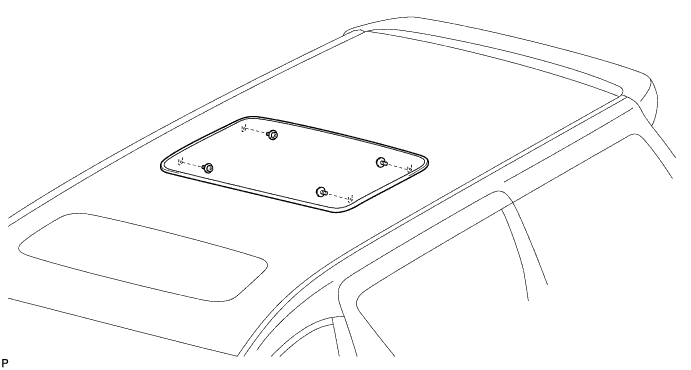
INSTALL SLIDING ROOF HOUSING SUB-ASSEMBLY
-
Install the sliding roof housing sub-assembly with the 7 nuts.
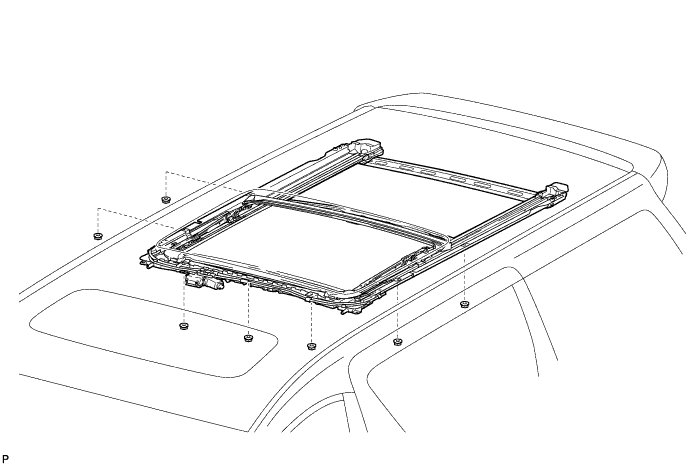
- Torque:
- 7.0 N*m { 70 kgf*cm, 62 in.*lbf }
-
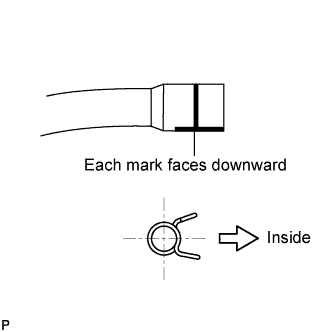
Connect the 4 sliding roof drain hoses so that each mark faces downward.
Note
Be sure to install the drain hoses properly to prevent entry of water.
-
Connect the 4 clamps.
-
-
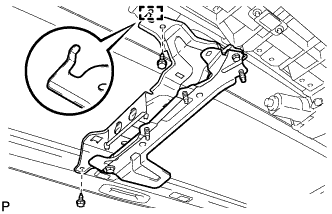
INSTALL NO. 1 SLIDING ROOF HOUSING BRACKET (for RH Side)
-
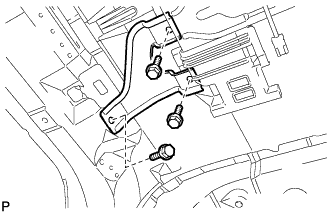
Install the No. 1 sliding roof housing bracket with the 3 bolts.
- Torque:
- 7.0 N*m { 71 kgf*cm, 62 in.*lbf }
-
-
INSTALL NO. 1 SLIDING ROOF HOUSING BRACKET (for LH Side)
Tech Tips
Use the same procedure for the RH side and LH side.
-
INSTALL REAR SLIDING ROOF GLASS SUB-ASSEMBLY
-
Using a T25 "TORX" socket wrench, temporarily install the rear sliding roof glass sub-assembly with the 4 screws.
-
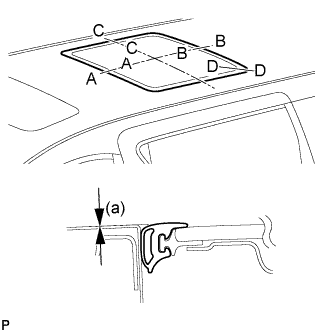
Perform a level check.
-
Check the difference in level for "a" between the roof panel and the upper surface of the weatherstrip when the sliding roof glass is fully closed.
Standard Area Measurement A - A 0 + 1.5 mm (0 + 0.0591 in.)
0 - 1.5 mm (0 - 0.0591 in.)
B - B 0 + 1.5 mm (0 + 0.0591 in.)
0 - 1.5 mm (0 - 0.0591 in.)
C - C 0 + 1.5 mm (0 + 0.0591 in.)
0 - 1.5 mm (0 - 0.0591 in.)
D - D 0 + 1.5 mm (0 + 0.0591 in.)
0 - 1.5 mm (0 - 0.0591 in.)
Tech Tips
"+" represents the condition that the glass is above the panel level. "-" represents the condition that the glass is below the panel level.
-
-

Perform a gap check.
-
Check the gap between the roof panel and roof glass.
Note
The gap must be even all around.
-
-
After adjusting the sliding roof glass, using a T25 "TORX" socket wrench, install the rear sliding roof glass sub-assembly with the 4 screws.
- Torque:
- 4.0 N*m { 41 kgf*cm, 35 in.*lbf }
-
-
INSPECT FOR WATER LEAK
-
After adjusting the rear sliding roof glass sub-assembly, check for water leaks.
-
If there are any leaks, readjust the rear sliding roof glass sub-assembly.
-
-
INSTALL SLIDING ROOF GUIDE RAIL COVER RH
-
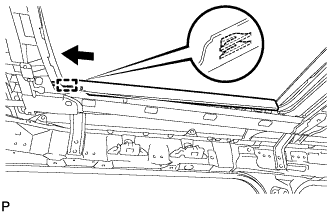
Insert the guide as shown in the illustration.
-

Engage the 2 claws to install the sliding roof guide rail cover RH.
-
-
INSTALL SLIDING ROOF GUIDE RAIL COVER LH
Tech Tips
Use the same procedure for the RH side and LH side.
-
INSTALL SLIDING ROOF SIDE GARNISH RH
-
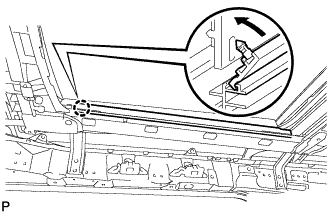
Insert the sliding roof side garnish RH into the groove of the sliding roof housing.
-
Engage the claw to install the sliding roof side garnish RH.
-
-
INSTALL SLIDING ROOF SIDE GARNISH LH
Tech Tips
Use the same procedure for the RH side and LH side.
-
INSTALL TELEVISION BRACKET (for LH Side)
-
Engage the guide and install the television bracket with the 2 screws.
-
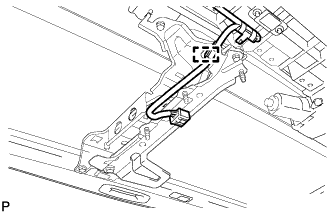
Engage the clamp.
-
-
INSTALL TELEVISION BRACKET (for RH Side)
-

Engage the guide and install the television bracket with the 2 screws and nut.
-
-
INSTALL CURTAIN SHIELD AIRBAG ASSEMBLY RH
-
Check that the engine switch is off.
-
Check that the cable is disconnected from the negative (-) battery terminal.
CAUTION:
Wait at least 90 seconds after disconnecting the cable from the negative (-) battery terminal to disable the SRS system.
-
Engage the 12 hooks to temporarily install the curtain shield airbag assembly.
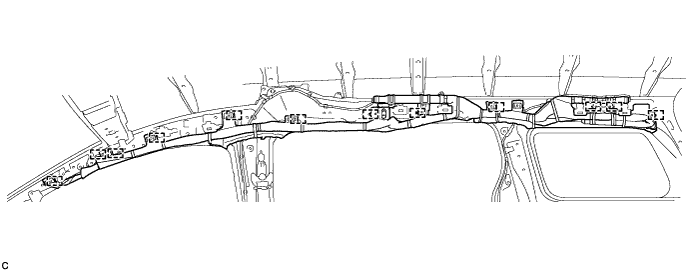
Note
Do not twist the curtain shield airbag assembly when installing it.
-
Install the 12 bolts.
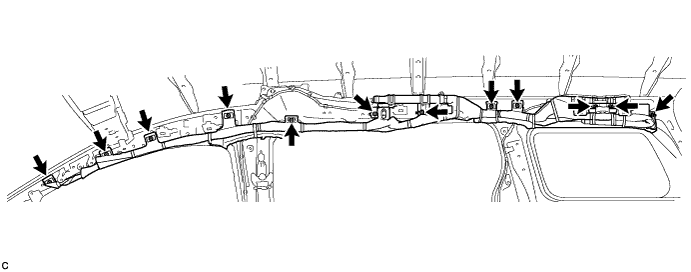
- Torque:
- 9.8 N*m { 100 kgf*cm, 87 in.*lbf }
-
Connect the 2 curtain shield airbag connectors.
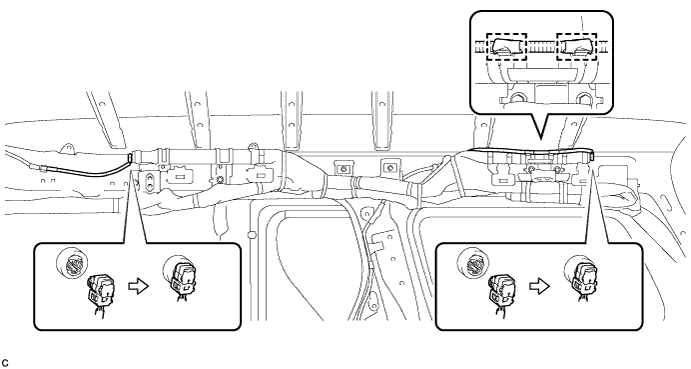
Note
When connecting any airbag connector, take care not to damage the airbag wire harness.
-
Engage the 2 wire harness clamps.
-
-
INSTALL CURTAIN SHIELD AIRBAG ASSEMBLY LH
Tech Tips
Use the same procedure for the RH side and LH side.
-
INSTALL ROOF HEADLINING ASSEMBLY
-
Install the roof headlining assembly Click here.
-
-
INSPECT SLIDING ROOF SYSTEM