-
Use the same procedure for the RH side and LH side.
-
The procedure listed below is for the LH side.
- Click here
DISCONNECT CABLE FROM NEGATIVE BATTERY TERMINAL
CAUTION:Wait at least 90 seconds after disconnecting the cable from the negative (-) battery terminal to disable the SRS system.
Note:When disconnecting the cable, some systems need to be initialized after the cable is reconnected (Click here).
- Click here
REMOVE REAR DOOR TRIM BOARD SUB-ASSEMBLY
-
Move the door inside handle knob to the lock position.
-
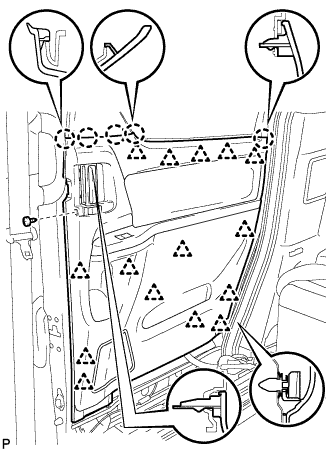
Using a T25 "TORX" socket wrench, remove the screw.
-
Using a clip remover, disengage the 15 clips and 5 claws.
-
Disconnect the connector and remove the rear door trim board sub-assembly.
-
- Click here
REMOVE SLIDE DOOR WINDOW GARNISH (w/o Navigation System for HDD)
-
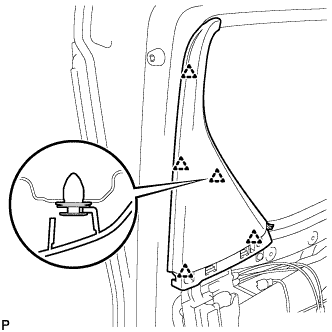
Disengage the 5 clips and remove the slide door window garnish.
-
- Click here
REMOVE SLIDE DOOR WINDOW GARNISH (w/ Navigation System for HDD)
-

Disconnect the connector.
-
Disengage the 5 clips and remove the slide door window garnish.
-
- Click here
REMOVE REAR DOOR FRONT WINDOW GUIDE
-
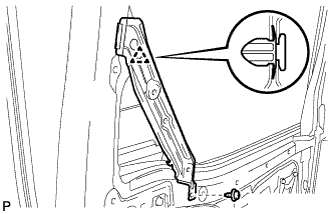
Remove the screw.
-
Disengage the clip and remove the rear door front window guide.
-
- Click here
REMOVE REAR DOOR GLASS WEATHERSTRIP INNER WITH GARNISH
-
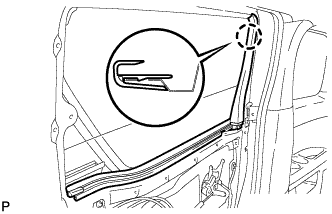
Disengage the claw and remove the rear door glass weatherstrip inner with garnish.
-
- Click here
REMOVE SLIDE DOOR LOCK REMOTE CONTROL ASSEMBLY
w/o Power Slide Door: (Click here)
w/ Power Slide Door: (Click here)
- Click here
REMOVE SLIDE DOOR LOCK RELEASE MOTOR ASSEMBLY (w/ Power Slide Door)
-
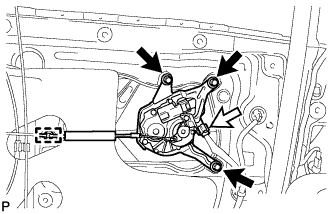
Disengage the clamp.
-
Disconnect the connector.
-
Remove the 3 screws and remove the slide door lock release motor assembly.
-
- Click here
REMOVE SLIDE DOOR CLOSER RELAY (w/ Easy Closer)
-

Disconnect the connector.
-
Remove the 2 screws and slide door closer relay.
-
- Click here
REMOVE REAR DOOR SCUFF PLATE
-
Captain type rear seat:
-
Disengage the 9 claws, 9 clips and 2 guides, and remove the rear door scuff plate RH.
-
-
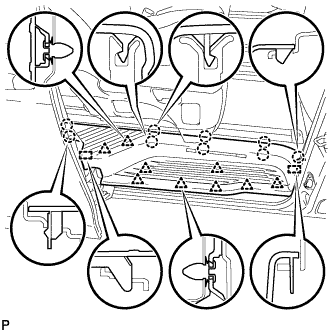
Tip-up type rear seat:
-
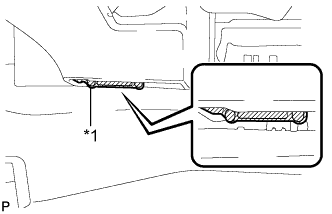
Apply protective tape to the bottom of the seat as shown in the illustration.
Table 1. Text in Illustration *1 Protective Tape -
Using the slide lever, slide the rear No. 1 seat to the rearmost position.
-
Disengage the 4 clips, 5 claws and guide on the front side of the scuff plate as shown in the illustration.
Note:To prevent damage to the scuff plate, make sure not to use excessive force when disengaging the clips, claws and guide.
-
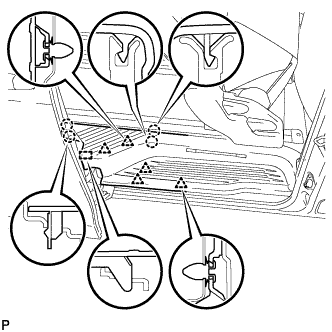
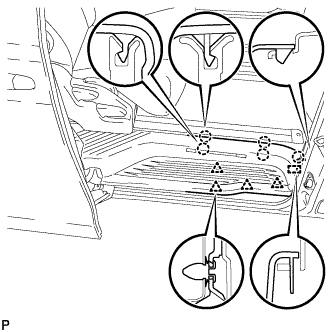
Using the reclining lever or foot-operated walk-in pedal, tip up the rear No. 1 seat and slide it to the foremost position.
-
Disengage the 5 clips, 4 claws and guide on the rear side of the scuff plate as shown in the illustration, and remove the rear door scuff plate RH.
Note:To prevent damage to the scuff plate, make sure not to use excessive force when disengaging the clips, claws and guide.
-
-
- Click here
REMOVE REAR SIDE STEP SUPPORT
-
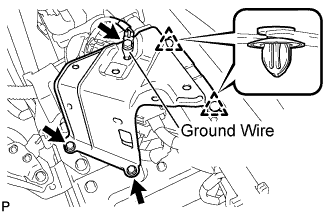
Remove the bolt and disconnect the ground wire.
-
Remove the 2 bolts.
-
Turn back the floor carpet.
-
Using a clip remover, disengage the 2 clips and remove the rear side step support.
-
- Click here
REMOVE REAR DOOR NO. 1 WIRE (w/o Power Slide Door)
-
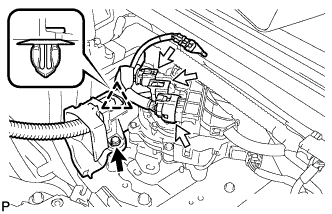
Disconnect each connector.
-
Remove the bolt.
-
Disengage the clip and disconnect the rear door No. 1 wire.
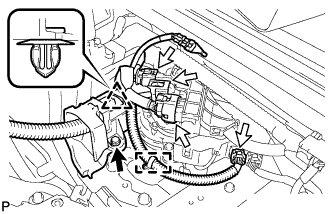
-

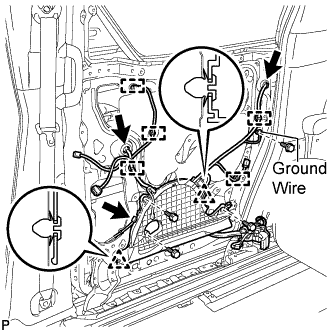
Remove the bolt and disconnect the ground wire.
-
Disconnect each connector.
-
Disengage the 5 clamps.
-
Remove the 3 bolts.
-
Disengage the 2 clips and remove the rear door No. 1 wire.
-
- Click here
REMOVE REAR DOOR NO. 1 WIRE (w/ Power Slide Door)
-
Disconnect each connector.
-
Disengage the clamp.
-
Remove the bolt.
-
Disengage the clip and disconnect the rear door No. 1 wire.
-
Remove the bolt and disconnect the ground wire.
-
Disconnect each connector.
-
Disengage the 5 clamps.
-
Remove the 3 bolts.
-
Disengage the 2 clips and remove the rear door No. 1 wire.
-
- Click here
REMOVE SLIDE DOOR SERVICE HOLE COVER
-
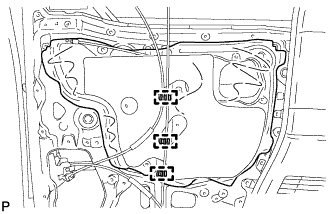
Disengage the 3 clamps.
-
Remove the slide door service hole cover.
Tip:Remove the remaining butyl tape on the door.
-
- Click here
REMOVE REAR DOOR WINDOW FRAME MOULDING
Tip:When removing the rear door window frame moulding, heat the vehicle body and rear door window frame moulding using a heat light.
Table 2. Heating Temperature Item Temperature Vehicle Body 40 to 60°C (104 to 140°F) Moulding 20 to 30°C (68 to 86°F) Note:Do not heat the vehicle body and rear door window frame moulding excessively.
-
Fully open the rear door glass.
-
Using a heat light, heat the rear door window frame moulding.
-

Using a moulding remover, remove the 3 clips and rear door window frame moulding.
-
- Click here
REMOVE REAR DOOR OUTSIDE MOULDING
-

Remove the upper part of the rear door glass run to the extent that allows removal of the rear door outside moulding.
-

Disengage the 4 clips.
-
Disengage the guide and remove the rear door outside moulding.
-
- Click here
REMOVE REAR DOOR BELT MOULDING
Tip:Use the same procedure for the RH side and LH side (Click here).
- Click here
REMOVE REAR DOOR GLASS RUN
-
Remove the rear door glass run.
-
- Click here
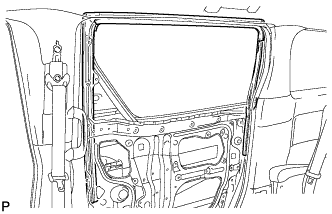
REMOVE REAR DOOR GLASS SUB-ASSEMBLY
-
Remove the 2 bolts.
Note:After the bolts are removed, do not allow the door to fall.
-
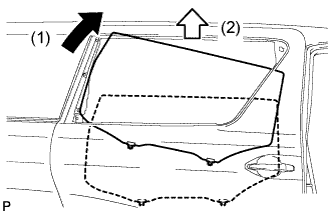
Remove the rear door glass sub-assembly as shown in the illustration.
Note:Do not damage the door glass.
-
- Click here
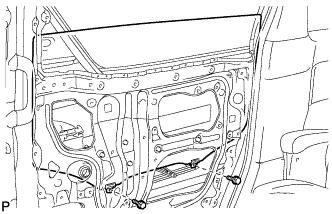
REMOVE REAR DOOR POWER WINDOW REGULATOR ASSEMBLY
-
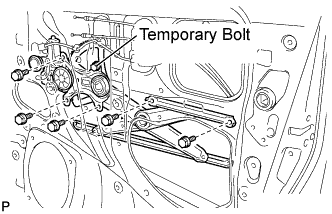
Loosen the temporary bolt.
Note:Do not remove the temporary bolt. If the temporary bolt is removed, the front door power window regulator assembly may fall and get damaged.
-
Remove the 5 bolts.
-
Remove the front door power window regulator assembly.
-
Remove the temporary bolt from the front door power window regulator assembly.
-
- Click here
REMOVE REAR POWER WINDOW REGULATOR MOTOR ASSEMBLY
-
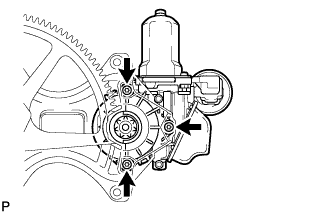
Using a T25 "TORX" driver, remove the 3 screws and the rear power window regulator motor assembly.
-