ТОПЛИВНЫЙ ФИЛЬТР ЗАМЕНА
-
DISCHARGE FUEL SYSTEM PRESSURE
-
PRECAUTION
Note
After turning the engine switch off, waiting time may be required before disconnecting the cable from the battery terminal. Therefore, make sure to read the disconnecting the cable from the battery terminal notice before proceeding with work Click here.
-
DISCONNECT CABLE FROM NEGATIVE BATTERY TERMINAL
Note
When disconnecting the cable, some systems need to be initialized after the cable is reconnected Click here.
-
REMOVE NO. 1 FUEL TUBE PROTECTOR
-
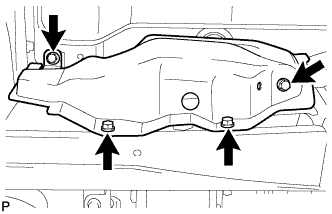
Remove the 4 bolts and No. 1 fuel tube protector.
-
-
DISCONNECT NO. 2 FUEL MAIN TUBE SUB-ASSEMBLY
-
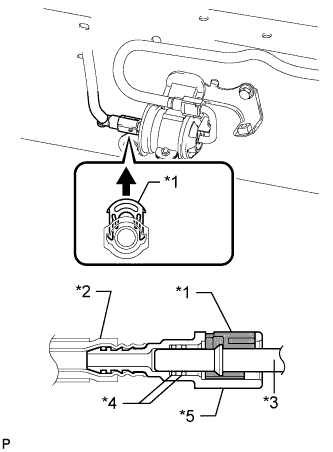
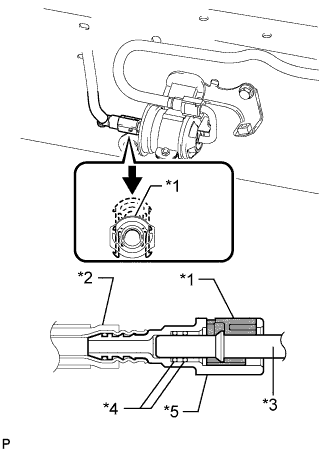
Text in Illustration *1 Retainer *2 Nylon Tube *3 Pipe *4 O-Ring *5 Connector Pull up the retainer and disconnect the No. 2 fuel main tube.
Note
-
Check for foreign matter in the pipe and around the connector. Clean if necessary. Foreign matter may damage the O-ring or cause leaks in the seal between the pipe and connector.
-
Do not use any tools to separate the pipe and connector.
-
Do not forcefully bend or twist the nylon tube.
-
Check for foreign matter on the pipe seal surface. Clean if necessary.
-
Put the pipe and connector ends in plastic bags to prevent damage and foreign matter contamination.
-
If the pipe and connector are stuck together, pinch the connector between your fingers and turn it carefully to disconnect it.
-
-
-
DISCONNECT FUEL MAIN TUBE
-
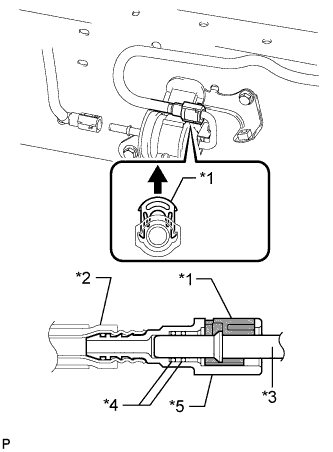
Text in Illustration *1 Retainer *2 Nylon Tube *3 Pipe *4 O-Ring *5 Connector Pull up the retainer and disconnect the fuel main tube.
Note
-
Check for foreign matter in the pipe and around the connector. Clean if necessary. Foreign matter may damage the O-ring or cause leaks in the seal between the pipe and connector.
-
Do not use any tools to separate the pipe and connector.
-
Do not forcefully bend or twist the nylon tube.
-
Check for foreign matter on the pipe seal surface. Clean if necessary.
-
Put the pipe and connector ends in plastic bags to prevent damage and foreign matter contamination.
-
If the pipe and connector are stuck together, pinch the connector between your fingers and turn it carefully to disconnect it.
-
-
-
REMOVE FUEL FILTER ASSEMBLY
-

Remove the 2 bolts and fuel filter.
-
-
INSTALL FUEL FILTER ASSEMBLY
-
Install the fuel filter with the 2 bolts.
- Torque:
- 20 N*m { 199 kgf*cm, 14 ft.*lbf }
-
-
CONNECT FUEL MAIN TUBE
-
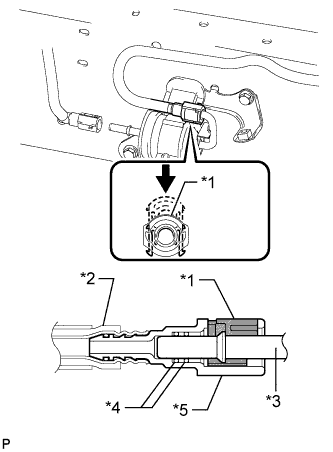
Text in Illustration *1 Retainer *2 Nylon Tube *3 Pipe *4 O-Ring *5 Connector Connect the fuel main tube and push the retainer.
Tech Tips
Push the parts together firmly until a "click" sound is heard.
Note
-
Before installing the tube connectors to the pipes, check if there is any damage or foreign matter in the connectors.
-
After the connection, check if the connectors and pipes are securely connected by trying to pull them apart.
-
-
-
CONNECT NO. 2 FUEL MAIN TUBE SUB-ASSEMBLY
-
Text in Illustration *1 Retainer *2 Nylon Tube *3 Pipe *4 O-Ring *5 Connector Connect the No. 2 fuel main tube and push the retainer.
Tech Tips
Push the parts together firmly until a "click" sound is heard.
Note
-
Before installing the tube connectors to the pipes, check if there is any damage or foreign matter in the connectors.
-
After the connection, check if the connectors and pipes are securely connected by trying to pull them apart.
-
-
-
CONNECT CABLE TO NEGATIVE BATTERY TERMINAL
Note
When disconnecting the cable, some systems need to be initialized after the cable is reconnected Click here.
-
INSPECT FOR FUEL LEAK
-
Connect the intelligent tester to the DLC3.
-
Turn the engine switch on (IG) and intelligent tester main switch on.
Note
Do not start the engine.
-
Enter the following menus: Powertrain / Engine and ECT / Active Test / Control the Fuel Pump / Speed.
-
Check that there are no fuel leaks after doing maintenance anywhere on the fuel system.
-
-
INSTALL NO. 1 FUEL TUBE PROTECTOR
-
Install the No. 1 fuel tube protector with the 4 bolts.
- Torque:
- 29 N*m { 296 kgf*cm, 21 ft.*lbf }
-