A bolt without a torque specification is shown in the standard bolt chart (Click here).
-
Click here
INSTALL SIDE TRIM BOX
-
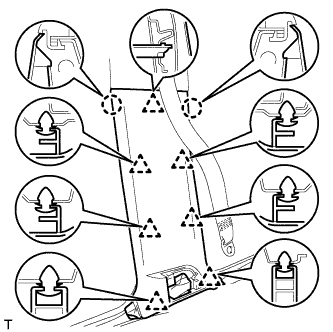
Install the side trim box with the 9 screws.
-
- Click here
INSTALL SIDE TRIM BOX COVER
-
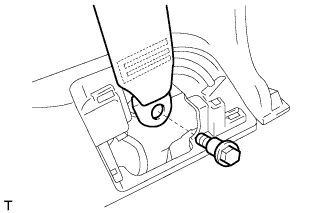
Install the side trim box cover.
-
- Click here
INSTALL QUARTER TRIM LID SUB-ASSEMBLY RH
-
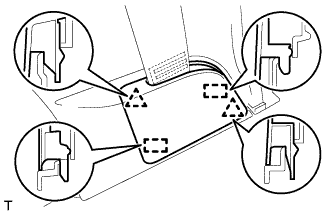
Install the quarter trim lid.
-
-
Click here
INSTALL QUARTER TRIM COVER LH (w/o Rear No. 2 Seat or w/ Rear No. 2 Seat, for Face to Face Seat Type)
-
Attach the 6 clips to install the quarter trim cover.
-
- Click here
INSTALL QUARTER TRIM COVER RH (w/o Rear No. 2 Seat or w/ Rear No. 2 Seat, for Face to Face Seat Type)
Tip:Use the same procedures described for the LH side.
-
Click here
INSTALL REAR NO. 2 SEAT COVER BEZEL (w/ Rear No. 2 Seat, except Face to Face Seat Type)
-
Attach the 6 clips to install the rear No. 2 seat cover bezel.
-
- Click here
INSTALL REAR NO. 1 SEAT COVER BEZEL (w/ Rear No. 2 Seat, except Face to Face Seat Type)
Tip:Use the same procedures described for the rear No. 2 seat cover bezel.
- Click here
INSTALL REAR SEAT LOCK CONTROL LEVER SUB-ASSEMBLY LH (w/ Rear No. 2 Seat, except Face to Face Seat Type)
-
Attach the 4 claws to install the seat lock control lever.
-
- Click here
INSTALL REAR SEAT LOCK CONTROL LEVER SUB-ASSEMBLY RH (w/ Rear No. 2 Seat, except Face to Face Seat Type)
Tip:Use the same procedures described for the LH side.
-
Click here
INSTALL NO. 2 SIDE TRIM BASE COVER LH (w/ Rear Heater)
-
Attach the 4 claws to install the cover.
-
- Click here
INSTALL NO. 2 SIDE TRIM BASE COVER RH (w/ Rear Heater)
Tip:Use the same procedures described for the LH side.
-
Click here
INSTALL NO. 1 SIDE TRIM BASE COVER LH (w/ Rear Heater)
-
Attach the 4 claws to install the cover.
-
-
Click here
INSTALL NO. 1 SIDE TRIM BASE COVER RH (w/ Rear Heater)
-
Attach the 4 claws to install the cover.
-
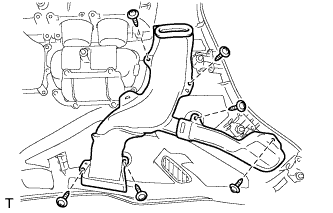
Install the duct with the 6 screws.
-
-
Click here
INSTALL TONNEAU COVER HANGER LH (w/ Tonneau Cover)
-
Install the tonneau cover hanger and rear quarter trim base with the 2 screws.
-
- Click here
INSTALL TONNEAU COVER HANGER RH (w/ Tonneau Cover)
Tip:Use the same procedures described for the LH side.
-
Click here
INSTALL TONNEAU COVER HOLDER BRACKET LH (w/ Tonneau Cover)
-
Attach the 3 claws to install the tonneau cover holder bracket.
-
Install the front quarter trim base with the 3 screws and then install the remaining 5 screws.
-
- Click here
INSTALL TONNEAU COVER HOLDER BRACKET RH (w/ Tonneau Cover)
Tip:Use the same procedures described for the LH side.
-
Click here
INSTALL NO. 2 CUP HOLDER
-
Attach the 3 claws to install the cup holder.
-
Install the 5 screws.
-
-
Click here
INSTALL NO. 1 CUP HOLDER
-
Attach the 3 claws to install the cup holder.
-
Install the 5 screws.
-
-
Click here
INSTALL QUARTER TRIM COVER SUB-ASSEMBLY LH
-
Attach the 4 claws to install the quarter trim cover.
-
Install the 7 screws.
-
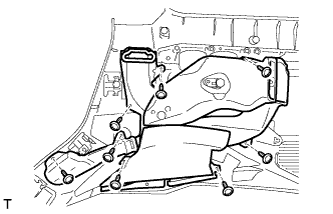
w/ Rear Heater:
Install the duct with the 8 screws.
-
-
Click here
INSTALL QUARTER TRIM COVER SUB-ASSEMBLY RH
-
Attach the 4 claws to install the quarter trim cover.
-
Install the 7 screws.
-
-
Click here
INSTALL REAR NO. 2 SEAT SHOULDER BELT HANGER LH
-
Install the hanger with 2 new spring nuts.
-
- Click here
INSTALL REAR NO. 2 SEAT SHOULDER BELT HANGER RH
Tip:Use the same procedures described for the LH side.
-
Click here
INSTALL REAR SEAT SHOULDER BELT HANGER (w/ Rear No. 2 Seat, except Face to Face Seat Type)
Tip:Use the same procedure to install the hanger on the other side.
-
Install the hanger with 2 new spring nuts.
-
-
Click here
INSTALL ROOF SIDE INNER GARNISH COVER LH (w/ Rear No. 2 Seat, except Face to Face Seat Type)
-
Attach the 7 claws to install the cover.
-
- Click here
INSTALL ROOF SIDE INNER GARNISH COVER RH (w/ Rear No. 2 Seat, except Face to Face Seat Type)
Tip:Use the same procedures described for the LH side.
-
Click here
INSTALL REAR SHOULDER BELT ANCHOR PLATE SUB-ASSEMBLY LH
-
Attach the 6 claws to install the plate.
-
- Click here
INSTALL REAR SHOULDER BELT ANCHOR PLATE SUB-ASSEMBLY RH
Tip:Use the same procedures described for the LH side.
-
Click here
INSTALL FRONT SHOULDER BELT ANCHOR PLATE SUB-ASSEMBLY LH
-
Slide the plate in the direction shown in the illustration and attach the 6 claws to install the plate.
-
- Click here
INSTALL FRONT SHOULDER BELT ANCHOR PLATE SUB-ASSEMBLY RH
Tip:Use the same procedures described for the LH side.
-
Click here
INSTALL REAR DOOR SCUFF PLATE OUTSIDE LH
-
Attach the 3 clips to install the rear door scuff plate outside.
-
- Click here
INSTALL REAR DOOR SCUFF PLATE OUTSIDE RH
Tip:Use the same procedures described for the LH side.
-
Click here
INSTALL FRONT DOOR SCUFF PLATE OUTSIDE LH
-
Attach the 4 clips to install the front door scuff plate outside.
-
- Click here
INSTALL FRONT DOOR SCUFF PLATE RH
Tip:Use the same procedures described for the LH side.
-
Click here
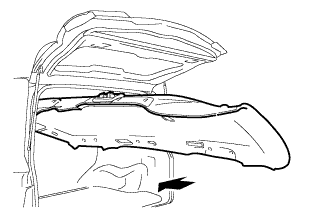
INSTALL BACK DOOR WEATHERSTRIP
-
Install the back door weatherstrip as shown in the illustration.
-
-
Click here
INSTALL REAR DOOR OPENING TRIM WEATHERSTRIP LH
-
Install the rear door opening trim weatherstrip as shown in the illustration.
-
- Click here
INSTALL REAR DOOR OPENING TRIM WEATHERSTRIP RH
Tip:Use the same procedures described for the LH side.
-
Click here
INSTALL FRONT DOOR OPENING TRIM WEATHERSTRIP LH
-
Install the front door opening trim weatherstrip as shown in the illustration.
-
- Click here
INSTALL FRONT DOOR OPENING TRIM WEATHERSTRIP RH
Tip:Use the same procedures described for the LH side.
-
Click here
INSTALL ROOF HEADLINING ASSEMBLY
Tip:
-
for Manual Seat:
When installing the roof headlining, move the front seat and rear No. 1 seat to the position shown in the illustration.
-
for Power Seat:
When installing the roof headlining, connect the cable to the negative (-) battery terminal and move the front seat and No. 1 rear seat to the position shown in the illustration.
-
for Power Seat:
After moving the seats, disconnect the cable from the negative (-) battery terminal.
-
Place the headlining in the cabin from the rear of the vehicle as shown in the illustration.
Note:Be careful not to damage the roof headlining when placing it in the cabin.
-
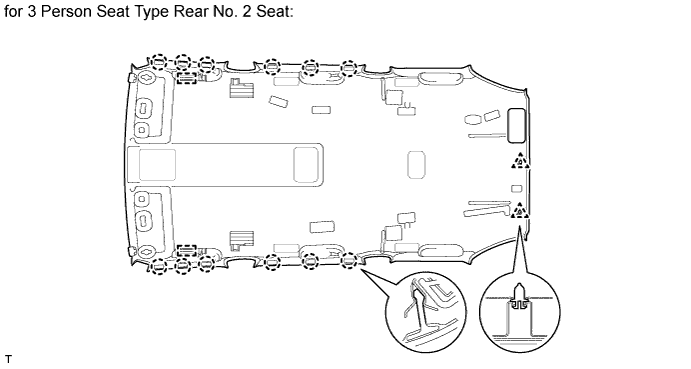
for 3 Person Seat Type Rear No. 2 Seat:
Attach the 2 guides, 12 claws and 2 clips to install the headlining.
-
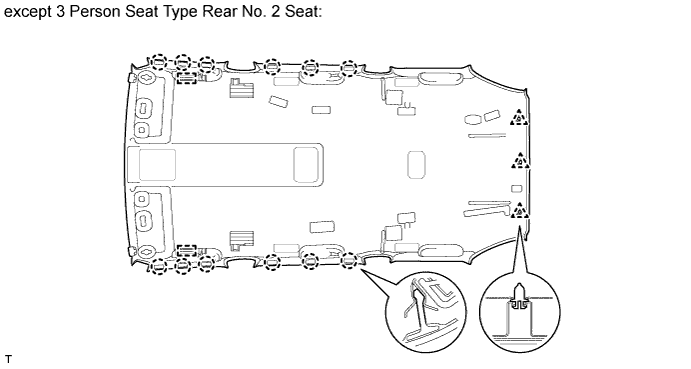
except 3 Person Seat Type Rear No. 2 Seat:
Attach the 2 guides, 12 claws and 3 clips to install the headlining.
-
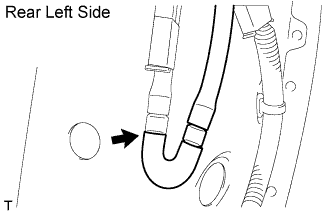
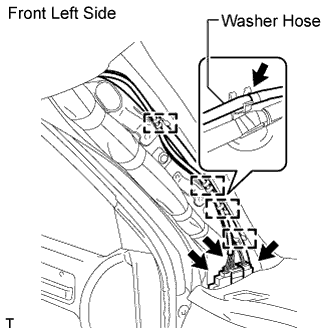
w/ Rear Wiper:
Connect the washer hose.
-
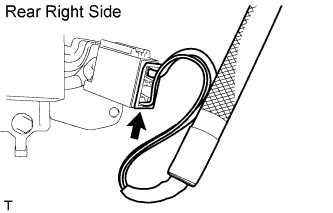
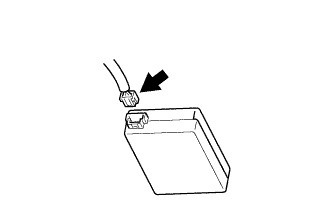
Connect the antenna cord connector.
-
Connect the antenna cord connector and attach the 2 clamps.
-
Install the bolt.
-
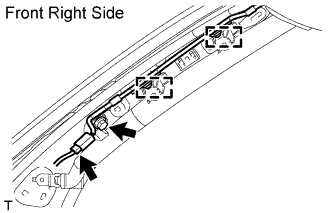
Connect the 3 roof wire connectors and 4 clamps.
-
w/ Rear Wiper:
Connect the washer hose.
-
w/ Rain Sensor:
Connect the rain sensor connector.
-
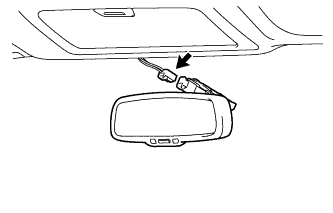
w/ EC Mirror:
Connect the inner mirror connector.
-
-
Click here
INSTALL FRONT ROOF SIDE RAIL GARNISH LH
-
Install 3 new clips to the roof side rail garnish.
-
Attach the 3 clips to install the roof side rail garnish.
-
- Click here
INSTALL FRONT ROOF SIDE RAIL GARNISH RH
Tip:Use the same procedures described for the LH side.
-
Click here
INSTALL 3RD SEAT ASSIST GRIP ASSEMBLY (w/ Rear No. 2 Seat, except Face to Face Seat Type)
Tip:Use the same procedure to install the 3rd seat assist grip on the other side.
-
Assemble the assist grip, 2 clips and 2 covers as shown in the illustration.
-
Install the assist grip.
-
-
Click here
INSTALL NO. 2 ASSIST GRIP ASSEMBLY LH
-
w/ Rear No. 2 Seat, except Face to Face Seat Type or w/o Rear No. 2 Seat:
Install the No. 2 assist grip assembly.
-
Assemble the assist grip, 2 clips and 2 covers as shown in the illustration.
-
Install the assist grip.
-
-
w/ Rear No. 2 Seat, for Face to Face Seat Type:
Install the No. 2 assist grip assembly.
-
Assemble the assist grip, 2 clips and 2 covers as shown in the illustration.
-
Install the assist grip.
-
-
- Click here
INSTALL NO. 2 ASSIST GRIP ASSEMBLY RH
Tip:Use the same procedures described for the LH side.
-
Click here
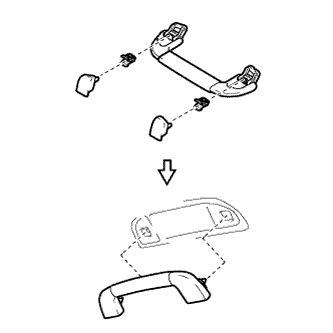
INSTALL ASSIST GRIP ASSEMBLY
Tip:Use the same procedure to install the assist grip on the other side.
-
Assemble the assist grip, 2 clips and 2 covers as shown in the illustration.
-
Install the assist grip.
-
-
Click here
INSTALL SEAT BELT ANCHOR COVER (for 3 Person Seat Type Rear No. 2 Seat)
-
Attach the 4 guides and 4 clips to install the seat belt anchor cover.
-
- Click here
INSTALL RAIN SENSOR COVER (w/ Rain Sensor)
-
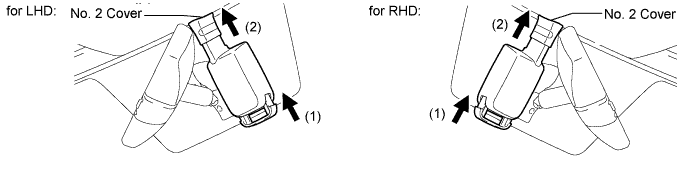
Push in the stopper in the direction of the arrow labeled (1) to install the rain sensor cover.
-
Slide the No. 2 cover in the direction of the arrow labeled (2) to fix it in place.
-
-
Click here
INSTALL INNER REAR VIEW MIRROR STAY HOLDER COVER (w/ EC Mirror)
-
Attach the 2 claws to install the cover.
-
-
Click here
INSTALL CENTER VISOR ASSEMBLY LH (w/ Sub Visor)
-
Attach the 2 clips to install the center visor.
-
- Click here
INSTALL CENTER VISOR ASSEMBLY RH (w/ Sub Visor)
Tip:Use the same procedures described for the LH side.
-
Click here
INSTALL VISOR HOLDER
Tip:Use the same procedures to install the visor holder on the other side.
-
Attach the 2 claws.
-
Push the visor holder in to install it.
-
-
Click here
INSTALL VISOR ASSEMBLY LH
-
Install the visor with the 2 screws.
-
- Click here
INSTALL VISOR ASSEMBLY RH
Tip:Use the same procedures described for the LH side.
-
Click here
INSTALL VISOR BRACKET COVER
Tip:Use the same procedure to install the visor bracket cover on the other side.
-
Attach the 4 claws to install the visor bracket cover.
-
-
Click here
INSTALL NO. 2 ROOM LIGHT ASSEMBLY
-
Install the 2 covers.
-
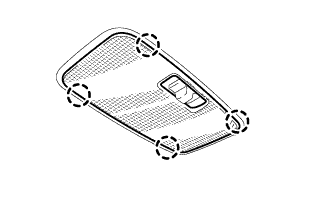
Attach the 4 claws to install the room light lens.
-
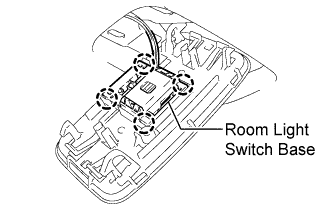
Attach the 4 claws to install the room light to the room light switch base.
-
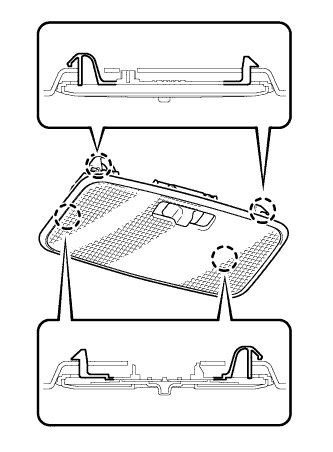
Attach the 4 claws to install the room light.
-
-
Click here
INSTALL NO. 1 ROOM LIGHT ASSEMBLY
-
w/ Map Light:
Install the No. 1 room light assembly.
-
Connect the connector.
-
Attach the 4 clips to install the room light.
-
-
w/o Map Light:
Install the No. 1 room light assembly.
-
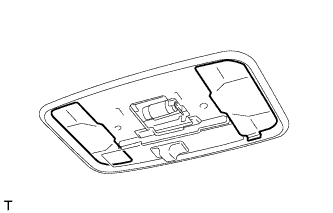
Install the 2 covers.
-
Attach the 4 claws to install the room light lens.
-
Attach the 4 claws to install the room light to the room light switch base.
-
Attach the 4 claws to install the room light.
-
-
- Click here
INSTALL MAP LIGHT ASSEMBLY (w/ Map Light)
-
Connect the connector.
-
Attach the 2 clips and 2 guides to install the map light.
-
Install the 2 screws.
-
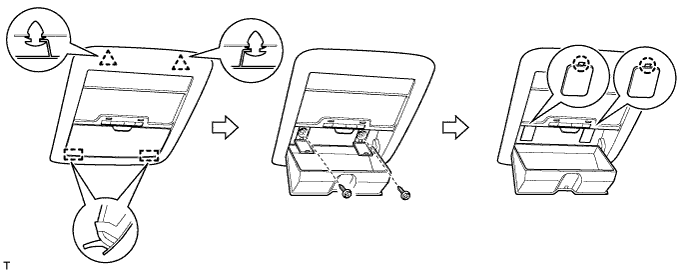
Attach the 2 claws to close the 2 covers.
-
-
Click here
INSTALL REAR UPPER PILLAR GARNISH LH
-
Attach the 5 clips to install the rear upper pillar garnish.
-
w/ Rear No. 2 Seat, except Face to Face Seat Type:
-
Install the seat belt shoulder anchor with the bolt.
42 N*m 428 kgf*cm 31 ft.*lbf -

Attach the 2 claws to close the seat belt shoulder anchor cover.
-
-
-
Click here
INSTALL REAR UPPER PILLAR GARNISH RH
-
w/o Power Back Door:
-
Attach the 5 clips to install the rear upper pillar garnish.
-
-
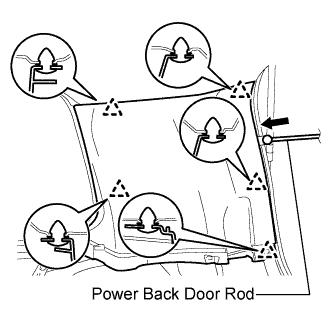
w/ Power Back Door:
-
Pass the power back door rod through the rear upper pillar garnish.
-
Attach the 5 clips to install the rear upper pillar garnish.
-
-

Install the seat belt shoulder anchor with the bolt.
42 N*m 428 kgf*cm 31 ft.*lbf -

Attach the 2 claws to close the seat belt shoulder anchor cover.
-
- Click here
INSTALL BACK DOOR SERVICE HOLE COVER RH (w/ Power Back Door)
-
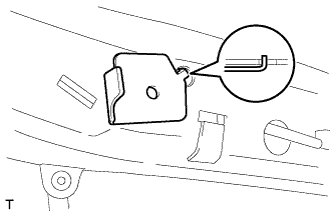
Install the back door stay plate.
-
Pass the power back door rod through the hole of the back door service hole cover RH and install the rod with the bolt.
18 N*m 184 kgf*cm 13 ft.*lbf -
Move the back door to a half-open position so that the hole in the center of the back door service hole cover RH is aligned lengthwise with the power back door rod.
-
Attach the 2 clips and install the back door service hole cover RH.
Note:If the back door is in a fully-open position, the power back door rod will interfere with the hole of the back door service hole cover, so do not perform this operation with the back door in a fully open position.
-
- Click here
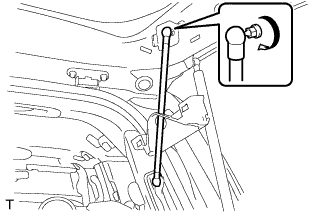
INSTALL BACK DOOR SIDE GARNISH RH (w/ Power Back Door)
-
w/o Power Back Door:
Tip:Use the same procedure described for the LH side.
-
w/ Power Back Door:
-
Attach the clip and 4 claws to install the back door side garnish RH.
-
-
- Click here
INSTALL CENTER BACK DOOR GARNISH (w/ Power Back Door)
-
Attach the 5 clips and 4 claws to install the center back door garnish.
-
-
Click here
INSTALL REAR FRONT QUARTER TRIM GARNISH LH
-
Pass the seat belt anchor through the quarter trim garnish.
-
Attach the clip and 2 guides to install the quarter trim garnish.
-
Install the screw.
-
- Click here
INSTALL REAR FRONT QUARTER TRIM GARNISH RH
Tip:Use the same procedures described for the LH side.
-
Click here
INSTALL FRONT QUARTER TRIM PANEL ASSEMBLY LH
Tip:When installing the front quarter trim panel, operate the reclining adjuster release handle and move the No. 1 rear seat to the position shown in the illustration.
-
w/ Rear No. 2 Seat, except Face to Face Seat Type:
-
w/o Rear Air Conditioning System:
Connect the rear seat lock control lever cable.
-
w/ Rear Air Conditioning System:
Connect the thermistor connector and rear seat lock control lever cable.
-
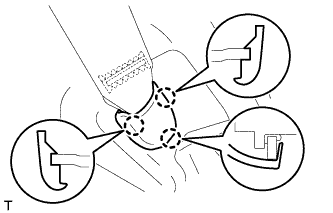
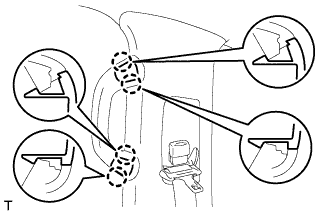
Attach the 18 clips and 2 claws to install the quarter trim panel.
-
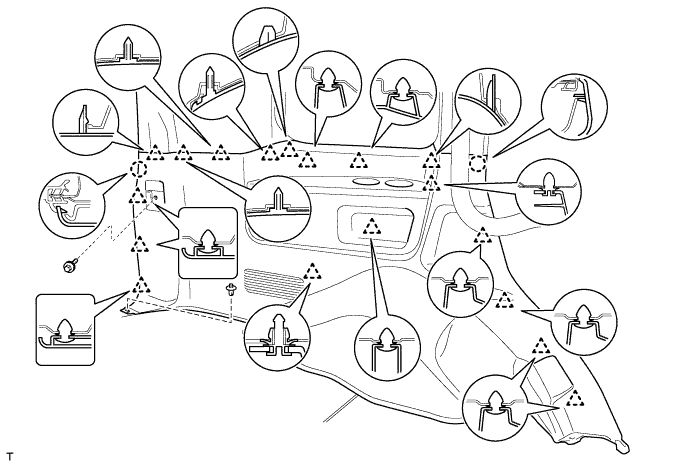
Install the clip and bolt.
12 N*m 122 kgf*cm 9 ft.*lbf
-
-
w/o Rear No. 2 Seat or w/ Rear No. 2 Seat, for Face to Face Seat Type:
-
Attach the 18 clips and 2 claws to install the quarter trim panel.
-

Install the clip.
-
-
w/ Tonneau Cover:
-
Attach the 18 clips and 2 claws to install the quarter trim panel.
-
Install the screw and clip.
-
-
w/ Rear No. 2 Seat, except Face to Face Seat Type:
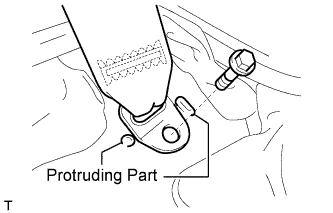
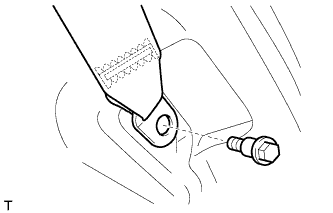
Install the rear No. 2 seat belt anchor with the bolt.
42 N*m 428 kgf*cm 31 ft.*lbf Note:Do not overlap the anchor part of the seat belt and protruding parts of the vehicle body.
-
Install the rear No. 1 seat belt anchor with the bolt.
42 N*m 428 kgf*cm 31 ft.*lbf -
Attach the 3 claws to install the cover.
-
-
Click here
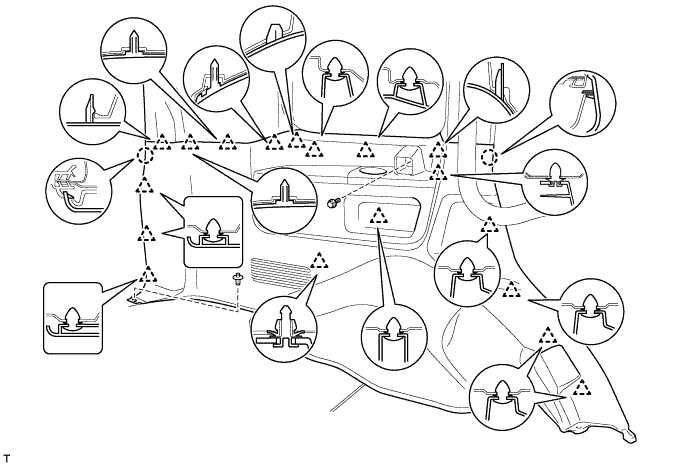
INSTALL FRONT QUARTER TRIM PANEL ASSEMBLY RH
Tip:When installing the front quarter trim panel, operate the reclining adjuster release handle and move the No. 1 rear seat to the position shown in the illustration.
-
w/ Rear No. 2 Seat, except Face to Face Seat Type:
-
w/o Rear Air Conditioning System:
Connect the rear seat lock control lever cable.
-
w/ Rear Air Conditioning System:
Connect the thermistor connector and rear seat lock control lever cable.
-
Attach the 16 clips and 2 claws to install the quarter trim panel.
-

Install the clip and bolt.
12 N*m 122 kgf*cm 9 ft.*lbf
-
-
w/o Rear No. 2 Seat or w/ Rear No. 2 Seat, for Face to Face Seat Type:
-
Attach the 16 clips and 2 claws to install the quarter trim panel.
-

Install the clip.
-
-
w/ Tonneau Cover:
-
Attach the 16 clips and 2 claws to install the quarter trim panel.
-

Install the screw and clip.
-
-

w/ Rear No. 2 Seat, except Face to Face Seat Type:
-
Install the rear No. 2 seat belt anchor with the bolt.
42 N*m 428 kgf*cm 31 ft.*lbf -

Attach the 3 claws to install the cover.
-
-

Install the rear No. 1 seat belt anchor with the bolt.
42 N*m 428 kgf*cm 31 ft.*lbf -

Attach the 3 claws to install the cover.
-
-
Click here
INSTALL REAR SEAT COVER CAP (w/ Rear No. 2 Seat, except Face to Face Seat Type)
Tip:Use the same procedure to install the rear seat cover cap on the other side.
-
Attach the 3 claws to install the rear seat cover cap.
-
-
Click here
INSTALL NO. 1 TONNEAU COVER HOLDER CAP (w/ Tonneau Cover)
Tip:Use the same procedure to install the tonneau cover holder cap on the other side.
-
Attach the 2 claws to install the tonneau cover holder cap.
-
-
Click here
INSTALL CENTER PILLAR GARNISH LH
-
Pass the seat belt anchor through the center pillar garnish.
-
Attach the 2 clips and 2 guides to install the center pillar garnish.
-
Install the bolt.
-
- Click here
INSTALL CENTER PILLAR GARNISH RH
Tip:Use the same procedures described for the LH side.
-
Click here
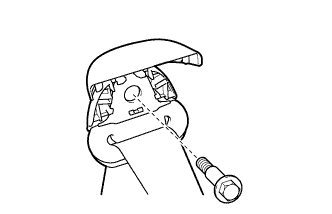
INSTALL REAR ASSIST GRIP ASSEMBLY
Tip:Use the same procedure to install the rear assist grip on the other side.
-
Attach the 2 claws to install the rear assist grip.
-
Install the 2 bolts.
-
Attach the 4 claws to install the 2 assist grip plugs.
-
- Click here
INSTALL CENTER LOWER PILLAR GARNISH LH
Tip:
-
for Manual Seat:
When installing the center lower pillar garnish, move the front seat and seatback to the foremost upright position.
-
for Power Seat:
When installing the center lower pillar garnish, connect the cable to the negative (-) battery terminal and operate the power seat switch to move the front seat and seatback to the foremost upright position.
-
for Power Seat:
After moving the front seat, disconnect the cable from the negative (-) battery terminal.
-
Attach the 2 claws and 7 clips to install the center lower pillar garnish.
-
Install the seat belt anchor with the bolt.
42 N*m 428 kgf*cm 31 ft.*lbf
-
- Click here
INSTALL CENTER LOWER PILLAR GARNISH RH
Tip:Use the same procedures described for the LH side.
- Click here
INSTALL CENTER PILLAR GARNISH COVER LH
Tip:
-
for Manual Seat:
When installing the center pillar garnish cover, move the front seat and seatback to the foremost upright position.
-
for Power Seat:
When installing the center pillar garnish cover, connect the cable to the negative (-) battery terminal and operate the power seat switch to move the front seat and seatback to the foremost upright position.
-
for Power Seat:
After moving the front seat, disconnect the cable from the negative (-) battery terminal.
-
Attach the 2 clips and 2 guides to install the cover.
-
- Click here
INSTALL CENTER PILLAR GARNISH COVER RH
Tip:Use the same procedures described for the LH side.
-
Click here
INSTALL FRONT PILLAR GARNISH LH
-
for 9, 14 Speakers:
Connect the speaker connector.
-
Attach the clip and 3 guides to install the front pillar garnish.
-
- Click here
INSTALL FRONT PILLAR GARNISH RH
Tip:Use the same procedures described for the LH side.
-
Click here
INSTALL FRONT ASSIST GRIP SUB-ASSEMBLY
Tip:Use the same procedure to install the front assist grip on the other side.
-
Attach the 2 claws to install the front assist grip.
-
Install the 2 bolts.
-

Attach the 4 claws to install the 2 assist grip plugs.
-
-
Click here
INSTALL REAR FLOOR MAT REAR SUPPORT PLATE
-
Attach the 6 clips to install the support plate.
-
-
Click here
INSTALL REAR DOOR SCUFF PLATE LH
-
Attach the 3 claws and 4 clips to install the scuff plate.
-
Install the screw.
-
- Click here
INSTALL REAR DOOR SCUFF PLATE RH
Tip:Use the same procedures described for the LH side.
-
Click here
INSTALL REAR STEP COVER
Tip:Use the same procedure to install the step cover on the other side.
-
Attach the 2 claws to install the step cover.
-
-
Click here
INSTALL FRONT DOOR SCUFF PLATE LH
-
Attach the 7 claws and 4 clips to install the scuff plate.
-
- Click here
INSTALL FRONT DOOR SCUFF PLATE RH
Tip:Use the same procedures described for the LH side.
- Click here
INSTALL REAR NO. 2 SEAT ASSEMBLY LH (except Face to Face Seat Type)
-
Install the rear No. 2 seat assembly LH (Click here).
-
- Click here
INSTALL REAR NO. 2 SEAT ASSEMBLY RH (except Face to Face Seat Type)
Tip:Use the same procedures described for the LH side.
- Click here
INSTALL REAR NO. 2 SEAT ASSEMBLY LH (for Face to Face Seat Type)
-
Install the rear No. 2 seat assembly LH (Click here).
-
- Click here
INSTALL REAR NO. 2 SEAT ASSEMBLY RH (for Face to Face Seat Type)
Tip:Use the same procedures described for the LH side.
- Click here
INSTALL TONNEAU COVER ASSEMBLY (w/ Tonneau Cover)
-
Install the tonneau cover assembly.
-
- Click here
CONNECT CABLE TO NEGATIVE BATTERY TERMINAL
Note:When disconnecting the cable, some systems need to be initialized after the cable is reconnected (Click here).