COMBINATION METER REMOVAL
PROCEDURE
-
PRECAUTION
Note
After turning the power switch off, waiting time may be required before disconnecting the cable from the negative (-) auxiliary battery terminal. Therefore, make sure to read the disconnecting the cable from the negative (-) auxiliary battery terminal notices before proceeding with work.
-
REMOVE LUGGAGE TRIM SERVICE HOLE COVER
-
DISCONNECT CABLE FROM NEGATIVE AUXILIARY BATTERY TERMINAL
-
REMOVE NO. 1 INSTRUMENT PANEL SPEAKER PANEL SUB-ASSEMBLY
-
REMOVE NO. 2 INSTRUMENT PANEL SPEAKER PANEL SUB-ASSEMBLY
Tech Tips
Use the same procedure as for the No. 1 instrument panel speaker panel sub-assembly side.
-
REMOVE FRONT NO. 2 SPEAKER ASSEMBLY
-
REMOVE NO. 1 INSTRUMENT PANEL CUSHION
-
DISCONNECT FRONT DOOR OPENING TRIM WEATHERSTRIP LH
-
DISCONNECT FRONT DOOR OPENING TRIM WEATHERSTRIP RH
Tech Tips
Use the same procedure as for the LH side.
-
REMOVE FRONT PILLAR GARNISH LH
-
REMOVE FRONT PILLAR GARNISH RH
Tech Tips
Use the same procedure as for the LH side.
-
REMOVE LOWER INSTRUMENT PANEL ASSEMBLY
-
REMOVE COMBINATION METER ASSEMBLY
-
Remove the 2 screws.
-


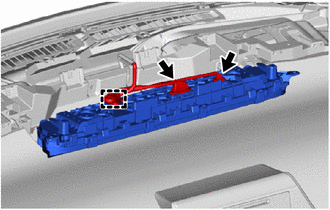
Place Hands Here 
Remove in this Direction Disengage the clips to pull the combination meter assembly as shown in the illustration.
Note
When the combination meter assembly is pulled upward, be careful that it does not contact the windshield glass and damage the glass.
-
Disengage the clamp.
-
Disconnect the 2 connectors to remove the combination meter assembly.
-