TCM REMOVAL
CAUTION / NOTICE / HINT
The necessary procedures (adjustment, calibration, initialization, or registration) that must be performed after parts are removed, installed, or replaced during the transmission control ECU assembly removal/installation are shown below.
| Replacement Part or Procedure | Necessary Procedure | Effects/Inoperative when not Performed | Link |
|---|---|---|---|
| Replacement of transmission control ECU assembly | Code registration (Immobiliser system) | Does not change to on (READY) | See Service Bulletin for the registration method. |
PROCEDURE
-
PRECAUTION
Note
After turning the power switch off, waiting time may be required before disconnecting the cable from the negative (-) auxiliary battery terminal. Therefore, make sure to read the disconnecting the cable from the negative (-) auxiliary battery terminal notices before proceeding with work.
-
REMOVE LUGGAGE TRIM SERVICE HOLE COVER
-
DISCONNECT CABLE FROM NEGATIVE AUXILIARY BATTERY TERMINAL
-
REMOVE FRONT DOOR SCUFF PLATE RH (for LHD)
-
REMOVE FRONT DOOR SCUFF PLATE LH (for RHD)
-
REMOVE NO. 2 INSTRUMENT PANEL UNDER COVER SUB-ASSEMBLY
-
REMOVE COWL SIDE TRIM BOARD RH (for LHD)
-
REMOVE COWL SIDE TRIM BOARD LH (for RHD)
-
REMOVE INTEGRATION CONTROL AND PANEL ASSEMBLY
-
REMOVE CENTER INSTRUMENT PANEL REGISTER ASSEMBLY
-
REMOVE NO. 2 INSTRUMENT PANEL REGISTER ASSEMBLY
-
SEPARATE FRONT DOOR OPENING TRIM WEATHERSTRIP RH (for LHD)
-
SEPARATE FRONT DOOR OPENING TRIM WEATHERSTRIP LH (for RHD)
-
REMOVE INSTRUMENT SIDE PANEL RH (for LHD)
-
REMOVE INSTRUMENT SIDE PANEL LH (for RHD)
-
REMOVE GLOVE COMPARTMENT DOOR ASSEMBLY
-
REMOVE TRANSMISSION CONTROL ECU ASSEMBLY (for LHD)
-
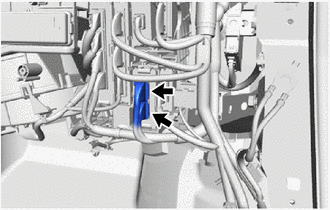
Disconnect the 2 connectors.
-
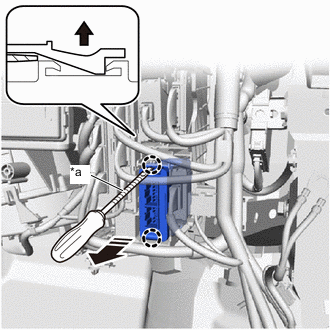
*a Protective Tape 
Lift Up 
Remove in this Direction Using a screwdriver with its tip wrapped in protective tape, disengage the 2 claws and remove the transmission control ECU assembly from the ECU integration box RH.
-
-
REMOVE TRANSMISSION CONTROL ECU ASSEMBLY (for RHD)
-
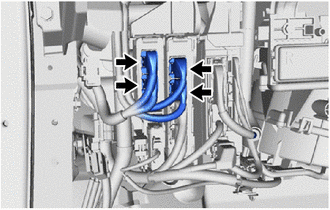
Disconnect the 4 connectors.
-
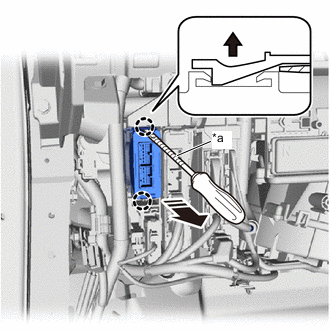
*a Protective Tape Lift Up Remove in this Direction Using a screwdriver with its tip wrapped in protective tape, disengage the 2 claws and remove the transmission control ECU assembly from the ECU integration box LH.
-