REAR CRANKSHAFT OIL SEAL REMOVAL

CAUTION / NOTICE / HINT
The necessary procedures (adjustment, calibration, initialization, or registration) that must be performed after parts are removed, installed, or replaced during the rear crankshaft oil seal removal/installation are shown below.
| Replacement Part or Procedure | Necessary Procedures | Effects/Inoperative when not Performed | Link |
|---|---|---|---|
| Replacement of ECM |
|
Engine starting |
|
| Code registration (Immobiliser system) | Engine start function | See the Service Bulletin for the registration method. | |
| Replacement of engine assembly |
|
Engine starting |
|
| Clear Crank Time Compensation Data | Engine starting |
|
|
for AC60F: |
Reset memory |
|
|
for AC60F: |
ATF thermal degradation estimate reset | The value of the Data List item "ATF Thermal Degradation Estimate" is not estimated correctly | |
w/ Automatic Headlight Beam Level Control System: |
Headlight leveling ECU assembly initialization | Headlight leveling function | |
for 4WD: |
|
VSC malfunctioning |
PROCEDURE
-
REMOVE MANUAL TRANSMISSION UNIT ASSEMBLY (for Manual Transmission)
-
for R151:
-
for RC60:
-
for RC60F:
-
-
REMOVE AUTOMATIC TRANSMISSION ASSEMBLY (for Automatic Transmission)
-
REMOVE CLUTCH COVER ASSEMBLY (for Manual Transmission)
-
for R151:
-
for RC60:
-
-
REMOVE CLUTCH DISC ASSEMBLY (for Manual Transmission)
-
for R151:
-
for RC60:
-
-
REMOVE FLYWHEEL SUB-ASSEMBLY
-
REMOVE REAR END PLATE
-
REMOVE REAR ENGINE OIL SEAL
-
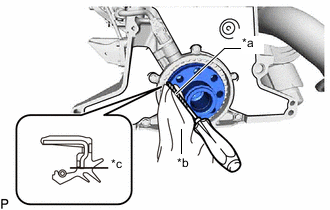
*a Protective Tape *b Cloth *c Cut Using a knife, cut off the lip of the rear engine oil seal.
-
Using a cloth and screwdriver, pry out the rear engine oil seal from the rear engine oil seal retainer.
Note
Be careful not to damage the crankshaft and rear engine oil seal retainer.
Tech Tips
-
After removal, check the crankshaft for damage. If damaged, smooth the surface with #400 sandpaper.
-
Tape the screwdriver tip before use.
-
-