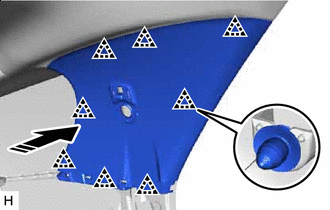
ROOF HEADLINING INSTALLATION
CAUTION / NOTICE / HINT
PROCEDURE
-
INSTALL ROOF HEADLINING ASSEMBLY
-
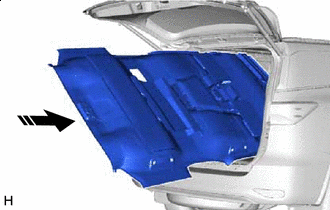

Movement Direction Insert the roof headlining assembly into the cabin from the back door.
Note
-
Check that the corners of the roof headlining assembly are not folded, twisted or otherwise deformed and that none of the mounted parts have fallen off.
-
Make sure that the roof headlining assembly does not get caught on anything as it may become bent or damaged.
-
Do not damage the roof headlining assembly or vehicle interior.
-
-

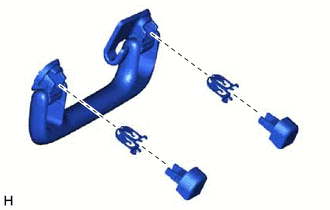
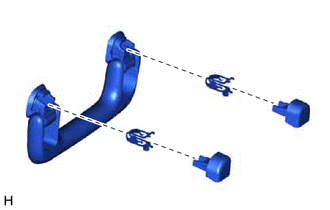
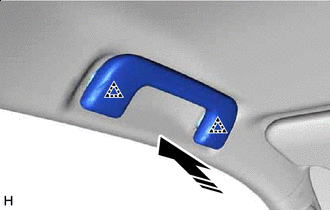
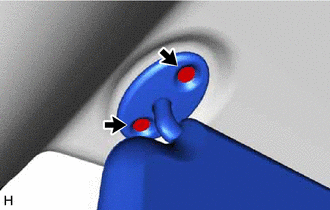
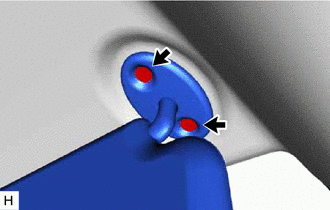
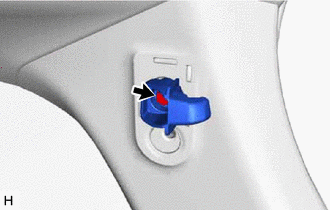
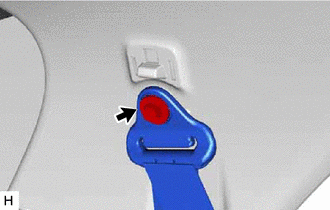
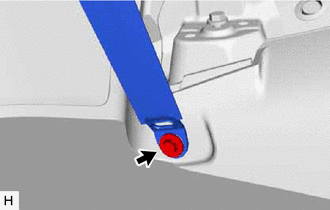
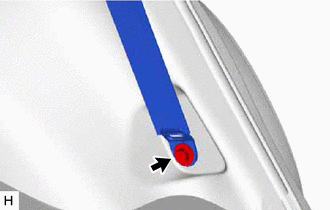
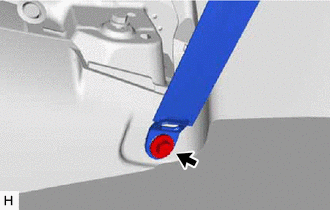
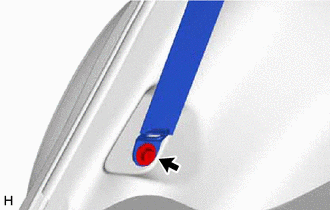
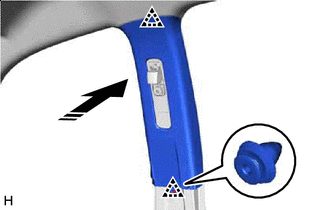
Install the visor holder as shown in the illustration.
-
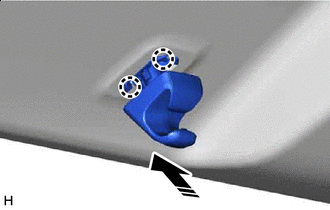
Install in this Direction Attach the claw to install the visor holder as shown in the illustration.
Tech Tips
Use the same procedure for both visor holders.
-
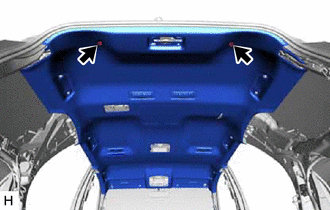
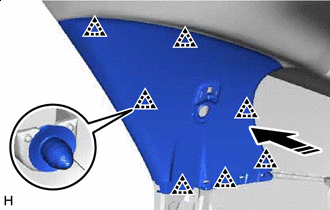
Install the roof headlining assembly with the 2 clips.
-
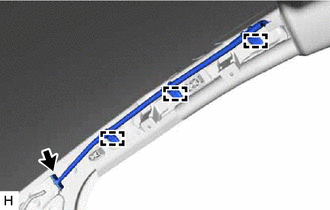
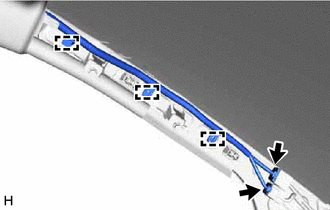
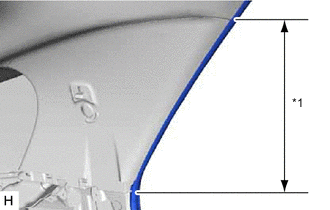
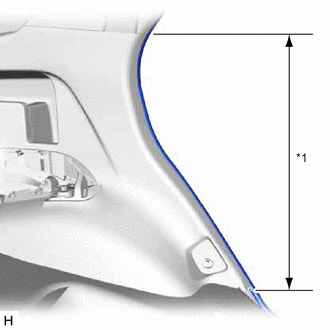
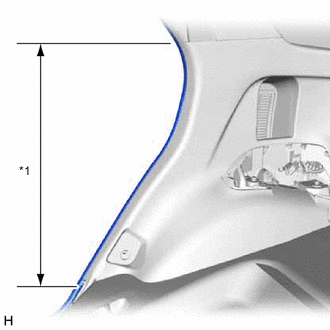
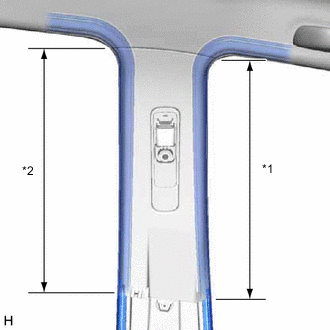
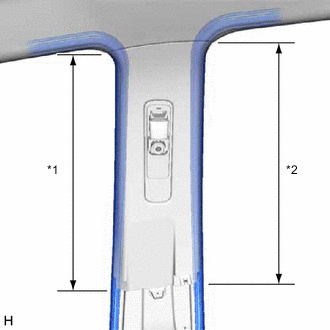
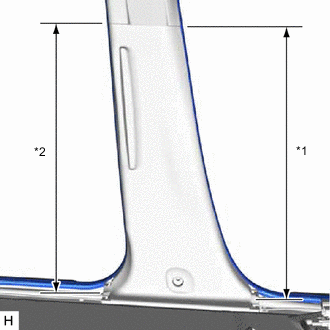
Connect the front door opening trim weatherstrip LH and rear door opening trim weatherstrip LH in the range shown in the illustration.
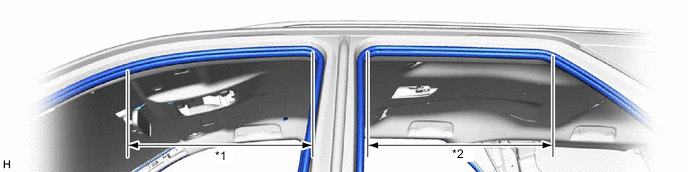
*1 Front Door Opening Trim Weatherstrip LH *2 Rear Door Opening Trim Weatherstrip LH -
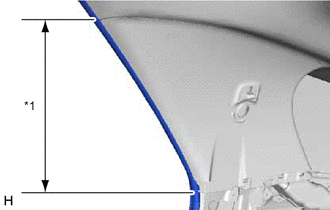
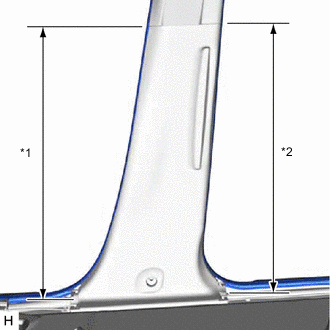
Connect the front door opening trim weatherstrip RH and rear door opening trim weatherstrip RH in the range shown in the illustration.
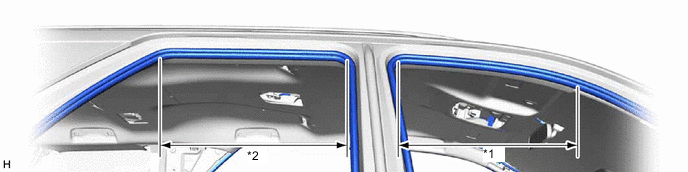
*1 Front Door Opening Trim Weatherstrip RH *2 Rear Door Opening Trim Weatherstrip RH -
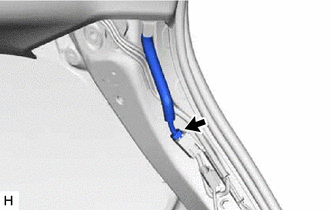
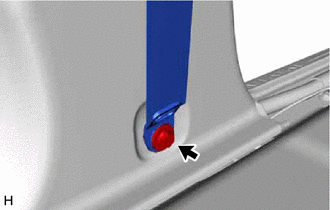
Connect the connector to the rear pillar RH.
-
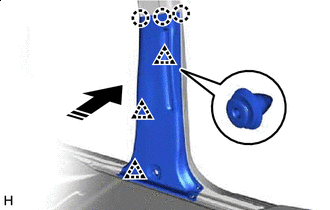
Connect the connector and attach the clamp to the front pillar RH.
-
Connect the connector and attach the clamp to the front pillar LH.
-
-
INSTALL REAR ASSIST GRIP ASSEMBLY
Tech Tips
Use the same procedure for both rear assist grip assemblies.
-
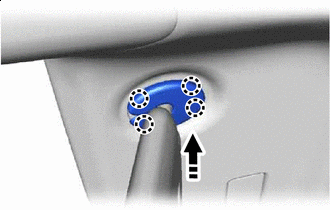
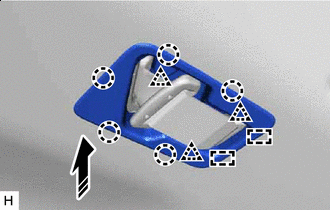
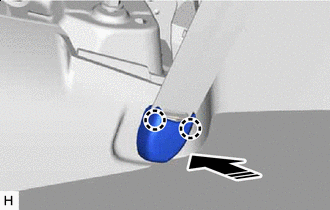
Install the 2 clips and 2 assist grip covers to the rear assist grip.
Tech Tips
Temporarily install the assist grip covers.
-

Install in this Direction Attach the clip.
-
Push in the assist grip covers to install the rear assist grip assembly.
-
-
INSTALL ASSIST GRIP SUB-ASSEMBLY
Tech Tips
Use the same procedure for all assist grip sub-assemblies.
-
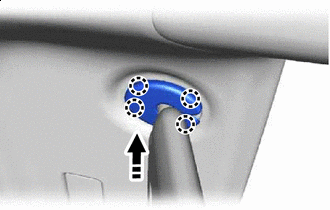
Install the 2 clips and 2 assist grip covers to the assist grip.
Tech Tips
Temporarily install the assist grip covers.
-
Install in this Direction Attach the clip.
-
Push in the assist grip covers to install the assist grip sub-assembly.
-
-
INSTALL VISOR ASSEMBLY LH
-
Install the visor assembly LH with the 2 screws.
Tech Tips
When installing the visor assembly LH, make sure that the arrow on the back side of the visor bracket faces the front of the vehicle.
-
Connect the visor assembly LH to the visor holder.
-
-
INSTALL VISOR ASSEMBLY RH
-
Install the visor assembly RH with the 2 screws.
Tech Tips
When installing the visor assembly RH, make sure that the arrow on the back side of the visor bracket faces the front of the vehicle.
-
Connect the visor assembly RH to the visor holder.
-
-
INSTALL VISOR BRACKET COVER LH
-
Install in this Direction Attach the claw to install the visor bracket cover LH as shown in the illustration.
-
-
INSTALL VISOR BRACKET COVER RH
-
Install in this Direction Attach the claw to install the visor bracket cover RH as shown in the illustration.
-
-
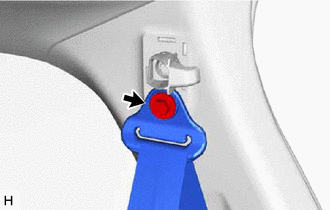
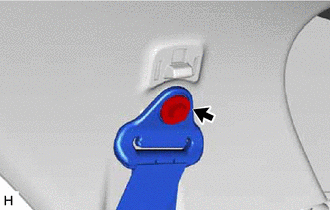
INSTALL REAR SEAT BELT COVER
-
Install in this Direction Attach the guide.
-
Attach the clip and claw to install the rear seat belt cover as shown in the illustration.
-
-
INSTALL NO. 1 ROOM LIGHT ASSEMBLY
-
INSTALL SPOT LIGHT ASSEMBLY
-
INSTALL MAP LIGHT ASSEMBLY
-
INSTALL UPPER REAR PILLAR GARNISH LH
-
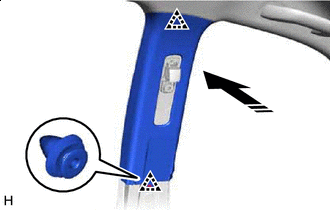
Install in this Direction Attach the clip to install the upper rear pillar garnish LH as shown in the illustration.
-
Install the rear seat hook with the bolt.
-
Connect the rear No. 2 seat outer belt assembly LH with the bolt.
- Torque:
- 42 N*m { 428 kgf*cm, 31 ft.*lbf }
-
-
INSTALL UPPER REAR PILLAR GARNISH RH
-
Install in this Direction Attach the clip to install the upper rear pillar garnish RH as shown in the illustration.
-
Install the rear seat hook with the bolt.
-
Connect the rear No. 2 seat outer belt assembly RH with the bolt.
- Torque:
- 42 N*m { 428 kgf*cm, 31 ft.*lbf }
-
-
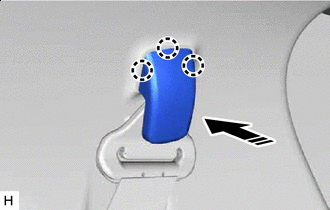
INSTALL SEAT BELT ANCHOR COVER CAP
Tech Tips
Use the same procedure for seat belt anchor cover caps.
-
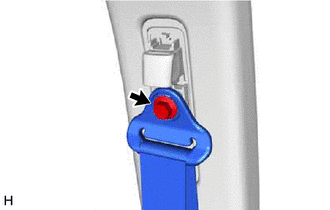
Install in this Direction Attach the claw to install the seat belt anchor cover cap as shown in the illustration.
-
-
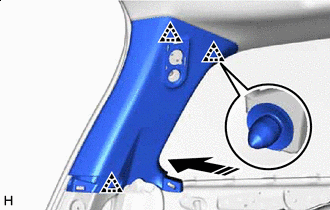
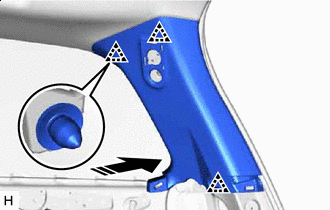
INSTALL QUARTER PILLAR GARNISH LH
-
Install in this Direction Attach the clip to install the quarter pillar garnish LH as shown in the illustration.
-
*1 Rear Door Opening Trim Weatherstrip LH Connect the rear door opening trim weatherstrip LH in the range shown in the illustration.
-
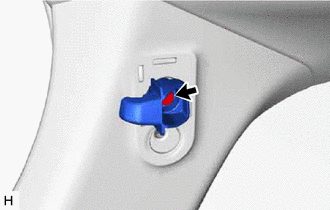
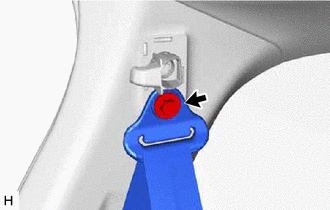
Connect the rear No. 1 seat outer belt assembly LH with the bolt.
- Torque:
- 42 N*m { 428 kgf*cm, 31 ft.*lbf }
-
-
INSTALL QUARTER PILLAR GARNISH RH
-
Install in this Direction Attach the clip to install the quarter pillar garnish RH as shown in the illustration.
-
*1 Rear Door Opening Trim Weatherstrip RH Connect the rear door opening trim weatherstrip RH in the range shown in the illustration.
-
Connect the rear No. 1 seat outer belt assembly RH with the bolt.
- Torque:
- 42 N*m { 428 kgf*cm, 31 ft.*lbf }
-
-
INSTALL SEAT BELT ANCHOR COVER CAP
Tech Tips
Use the same procedure for seat belt anchor cover caps.
-
Install in this Direction Attach the claw to install the seat belt anchor cover cap as shown in the illustration.
-
-
INSTALL QUARTER INSIDE TRIM BOARD LH
-
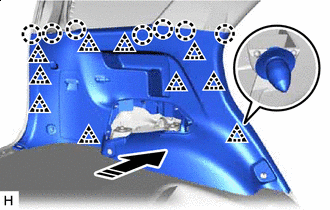
Install in this Direction Attach the clip and claw to install the quarter inside trim board LH as shown in the illustration.
-
*1 Rear Door Opening Trim Weatherstrip LH Connect the rear door opening trim weatherstrip LH in the range shown in the illustration.
-
Connect the rear No. 2 seat outer belt assembly LH with the bolt.
- Torque:
- 42 N*m { 428 kgf*cm, 31 ft.*lbf }
-
Connect the rear No. 1 seat outer belt assembly LH with the bolt.
- Torque:
- 42 N*m { 428 kgf*cm, 31 ft.*lbf }
-
-
INSTALL QUARTER INSIDE TRIM BOARD RH
-
Connect the connector.
-

Install in this Direction Attach the clip and claw to install the quarter inside trim board RH as shown in the illustration.
-
*1 Rear Door Opening Trim Weatherstrip RH Connect the rear door opening trim weatherstrip RH in the range shown in the illustration.
-
Connect the rear No. 2 seat outer belt assembly RH with the bolt.
- Torque:
- 42 N*m { 428 kgf*cm, 31 ft.*lbf }
-
Connect the rear No. 1 seat outer belt assembly RH with the bolt.
- Torque:
- 42 N*m { 428 kgf*cm, 31 ft.*lbf }
-
-
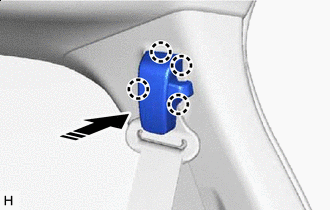
INSTALL REAR NO. 2 SEAT OUTER LAP BELT ANCHOR COVER
Tech Tips
Use the same procedure for both rear No. 2 seat outer lap belt anchor covers.
-
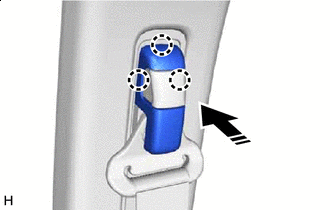
Install in this Direction Attach the claw to install the rear No. 2 seat outer lap belt anchor cover as shown in the illustration.
-
-
INSTALL REAR NO. 1 SEAT OUTER LAP BELT ANCHOR COVER
Tech Tips
Use the same procedure for both rear No. 1 seat outer lap belt anchor covers.
-

Install in this Direction Attach the claw to install the rear No. 1 seat outer lap belt anchor cover as shown in the illustration.
-
-
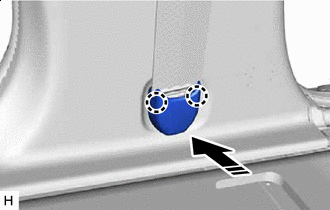
INSTALL BACK DOOR SCUFF PLATE
-
Attach the clip and claw to install the back door scuff plate as shown in the illustration.

Install in this Direction - -
-
-
INSTALL UPPER CENTER PILLAR GARNISH LH
-
Install in this Direction Attach the clip to install the upper center pillar garnish LH as shown in the illustration.
-
*1 Front Door Opening Trim Weatherstrip LH *2 Rear Door Opening Trim Weatherstrip LH Connect the front door opening trim weatherstrip LH and rear door opening trim weatherstrip LH in the range shown in the illustration.
-

Connect the front seat outer belt assembly LH with the bolt.
- Torque:
- 42 N*m { 428 kgf*cm, 31 ft.*lbf }
-
-
INSTALL UPPER CENTER PILLAR GARNISH RH
-
Install in this Direction Attach the clip to install the upper center pillar garnish RH as shown in the illustration.
-
*1 Front Door Opening Trim Weatherstrip LH *2 Rear Door Opening Trim Weatherstrip LH Connect the front door opening trim weatherstrip RH and rear door opening trim weatherstrip RH in the range shown in the illustration.
-
Connect the front seat outer belt assembly RH with the bolt.
- Torque:
- 42 N*m { 428 kgf*cm, 31 ft.*lbf }
-
-
INSTALL SEAT BELT ANCHOR COVER CAP
Tech Tips
Use the same procedure for both seat belt anchor cover caps.
-
Install in this Direction Attach the claw to install the seat belt anchor cover cap as shown in the illustration.
-
-
INSTALL LOWER CENTER PILLAR GARNISH LH
-

Install in this Direction Attach the clip and claw to install the lower center pillar garnish LH as shown in the illustration.
-
*1 Front Door Opening Trim Weatherstrip LH *2 Rear Door Opening Trim Weatherstrip LH Connect the front door opening trim weatherstrip LH and rear door opening trim weatherstrip LH in the range shown in the illustration.
-
Connect the front seat outer belt assembly LH with the bolt.
- Torque:
- 42 N*m { 428 kgf*cm, 31 ft.*lbf }
-
-
INSTALL LOWER CENTER PILLAR GARNISH RH
-
Install in this Direction Attach the clip and claw to install the lower center pillar garnish RH as shown in the illustration.
-
*1 Front Door Opening Trim Weatherstrip RH *2 Rear Door Opening Trim Weatherstrip RH Connect the front door opening trim weatherstrip RH and rear door opening trim weatherstrip RH in the range shown in the illustration.
-

Connect the front seat outer belt assembly RH with the bolt.
- Torque:
- 42 N*m { 428 kgf*cm, 31 ft.*lbf }
-
-
INSTALL LAP BELT OUTER ANCHOR COVER
Tech Tips
Use the same procedure for both outer lap belt anchor covers.
-
Install in this Direction Attach the claw to install the outer lap belt anchor cover as shown in the illustration.
-
-
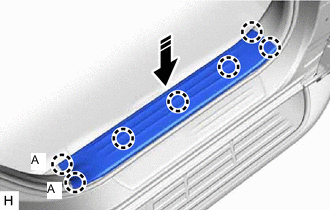
INSTALL REAR DOOR SCUFF PLATE LH
-
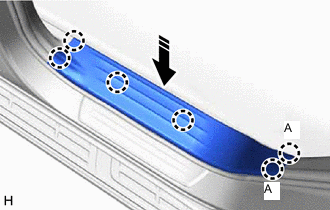
Install in this Direction Attach the claw to install the rear door scuff plate LH as shown in the illustration.
Tech Tips
Attach claw A shown in the illustration first.
-
-
INSTALL REAR DOOR SCUFF PLATE RH
-
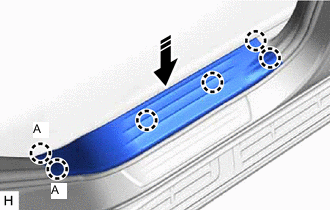
Install in this Direction Attach the claw to install the rear door scuff plate RH as shown in the illustration.
Tech Tips
Attach claw A shown in the illustration first.
-
-
INSTALL FRONT DOOR SCUFF PLATE LH
-
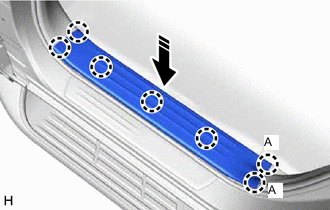
Install in this Direction Attach the claw to install the front door scuff plate LH as shown in the illustration.
Tech Tips
Attach claw A shown in the illustration first.
-
-
INSTALL FRONT DOOR SCUFF PLATE RH
-
Install in this Direction Attach the claw to install the front door scuff plate RH as shown in the illustration.
Tech Tips
Attach claw A shown in the illustration first.
-
-
INSTALL FRONT PILLAR GARNISH LH
-
INSTALL FRONT PILLAR GARNISH RH
-
INSTALL FRONT ASSIST GRIP SUB-ASSEMBLY
-
INSTALL REAR NO. 2 SEAT ASSEMBLY LH
-
INSTALL REAR NO. 2 SEAT ASSEMBLY RH
-
CONNECT CABLE TO NEGATIVE BATTERY TERMINAL
Note
When disconnecting the cable, some systems need to be initialized after the cable is reconnected.
-
CHECK SRS WARNING LIGHT