REAR SEAT OUTER BELT ASSEMBLY INSTALLATION

CAUTION / NOTICE / HINT
Tech Tips
-
Use the same procedure for RHD and LHD vehicles.
-
The procedure listed below is for LHD vehicles.
-
Use the same procedure for the RH and LH sides.
-
The procedure listed below is for the LH side.
-
A bolt without a torque specification is shown in the standard bolt chart.
PROCEDURE
-
INSTALL OUTER BELT ANCHOR BRACKET SUB-ASSEMBLY LH
-
w/ Pretensioner:
-
Attach the guide and install the outer belt anchor bracket sub-assembly LH with the 2 bolts.
- Torque:
- 42 N*m { 428 kgf*cm, 31 ft.*lbf }
-
Attach the clamp.
-
-
w/o Pretensioner:
-
Attach the guide and install the outer belt anchor bracket sub-assembly LH with the 2 bolts.
- Torque:
- 42 N*m { 428 kgf*cm, 31 ft.*lbf }
-
-
-
INSTALL REAR NO. 1 SEAT OUTER BELT ASSEMBLY LH
-
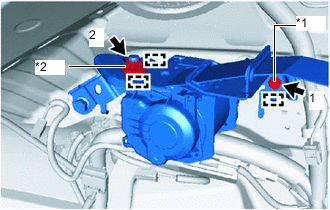
*1 Bolt *2 Nut w/ Pretensioner:
-
Attach the 3 guides and temporarily install the rear No. 1 seat outer belt assembly LH with the bolt and nut.
-
Tighten the bolt and nut in the order shown in the illustration.
- Torque:
- Bolt
- 12.5 N*m { 127 kgf*cm, 9 ft.*lbf }
- Nut
- 42 N*m { 428 kgf*cm, 31 ft.*lbf }
-
Connect the pretensioner connector.
-
-
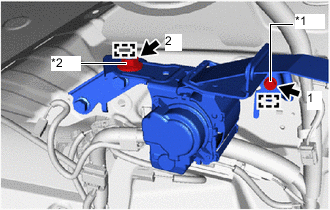
*1 Bolt *2 Nut w/o Pretensioner:
-
Attach the 2 guides and temporarily install the rear No. 1 seat outer belt assembly LH with the bolt and nut.
-
Tighten the bolt and nut in the order shown in the illustration.
- Torque:
- Bolt
- 12.5 N*m { 127 kgf*cm, 9 ft.*lbf }
- Nut
- 42 N*m { 428 kgf*cm, 31 ft.*lbf }
-
-
-
INSTALL DECK TRIM SIDE PANEL ASSEMBLY LH
-
INSTALL UPPER DECK TRIM SIDE BOARD LH
-
INSTALL NO. 1 LUGGAGE COMPARTMENT TRIM HOOK
-
INSTALL LUGGAGE HOLD BELT STRIKER ASSEMBLY
-
INSTALL ROPE HOOK ASSEMBLY
-
INSTALL REAR DOOR OPENING TRIM WEATHERSTRIP LH
-
INSTALL NO. 1 SEAT LEG ASSEMBLY
-
for Manual Seat: Click here
-
for Power Seat: Click here
-
-
INSTALL BATTERY SERVICE COVER BOARD
-
for Manual Seat: Click here
-
for Power Seat: Click here
-
-
INSTALL REAR FLOOR FINISH PLATE (w/ Spare Tire)
-
INSTALL REAR FLOOR FINISH PLATE (w/o Spare Tire)
-
INSTALL NO. 2 TOOL BOX SUB-ASSEMBLY (w/ Spare Tire)
-
INSTALL NO. 2 TOOL BOX SUB-ASSEMBLY (w/o Spare Tire)
-
INSTALL NO. 1 TOOL BOX SUB-ASSEMBLY (w/ Spare Tire)
-
INSTALL NO. 1 TOOL BOX SUB-ASSEMBLY (w/o Spare Tire)
-
INSTALL DECK FLOOR BOX LH (w/ Spare Tire)
-
INSTALL DECK FLOOR BOX LH (w/o Spare Tire)
-
INSTALL DECK FLOOR BOX RH (w/ Spare Tire)
-
INSTALL DECK FLOOR BOX RH (w/o Spare Tire)
-
INSTALL REAR DECK FLOOR BOX (w/ Spare Tire)
-
INSTALL NO. 2 DECK BOARD SUB-ASSEMBLY
-
INSTALL NO. 3 DECK BOARD SUB-ASSEMBLY
-
INSTALL DECK BOARD ASSEMBLY
-
INSTALL TONNEAU COVER ASSEMBLY
-
INSTALL REAR SEAT ASSEMBLY
-
for Manual Seat: Click here
-
for Power Seat: Click here
-
-
CONNECT CABLE TO NEGATIVE BATTERY TERMINAL
Note
When disconnecting the cable, some systems need to be initialized after the cable is reconnected.
-
INSPECT SRS WARNING LIGHT