FRONT LOWER SUSPENSION ARM INSTALLATION
CAUTION / NOTICE / HINT
Tech Tips
-
Use the same procedure for the RH side and LH side.
-
The procedure listed below is for the LH side.
PROCEDURE
-
TEMPORARILY TIGHTEN LOWER NO. 2 ARM BRACKET SUB-ASSEMBLY
-
Temporarily tighten the lower No. 2 arm bracket sub-assembly to the front lower suspension arm assembly with the nut and washer.
-
-
INSTALL FRONT LOWER BALL JOINT ASSEMBLY
-
TEMPORARILY TIGHTEN FRONT LOWER SUSPENSION ARM ASSEMBLY
-
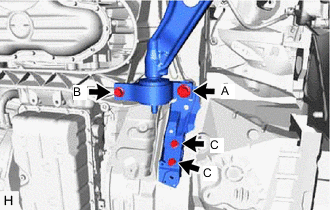
Install the front lower suspension arm assembly and strut bar bracket reinforcement with the 4 bolts and nut.
- Torque:
- Bolt (A)
- 194 N*m { 1978 kgf*cm, 143 ft.*lbf }
- Bolt (B)
- 86 N*m { 877 kgf*cm, 63 ft.*lbf }
- Bolt (C)
- 57 N*m { 581 kgf*cm, 42 ft.*lbf }
-
Temporarily tighten the front lower suspension arm assembly with the bolt, nut and washer.
Note
Insert the bolt from the front of the vehicle. Then install the washer and temporarily tighten the nut.
-
-
CONNECT FRONT LOWER BALL JOINT ASSEMBLY
-
Connect the front lower ball joint assembly to the steering knuckle with the 2 bolts.
- Torque:
- 120 N*m { 1224 kgf*cm, 89 ft.*lbf }
-
-
CONNECT TIE ROD ASSEMBLY
-
INSTALL FRONT STABILIZER LINK ASSEMBLY
-
TEMPORARILY TIGHTEN FRONT SHOCK ABSORBER WITH COIL SPRING
-
Temporarily tighten the front shock absorber with coil spring to the front lower suspension arm assembly with the bolt and nut.
Note
-
Insert the bolt from the rear of the vehicle.
-
Because the nut has its own stopper, do not turn the nut. Tighten the bolt with the nut secured.
Tech Tips
Fully tighten the bolt after stabilizing the suspension.
-
-
-
INSTALL SKID CONTROL SENSOR WIRE
-
STABILIZE SUSPENSION
-
FULLY TIGHTEN FRONT SHOCK ABSORBER WITH COIL SPRING
-
FULLY TIGHTEN FRONT LOWER SUSPENSION ARM ASSEMBLY
-
Fully tighten the bolt on the front of the front lower suspension arm assembly.
- Torque:
- 135 N*m { 1377 kgf*cm, 100 ft.*lbf }
-
Fully tighten the installation nut of the lower No. 2 arm bracket sub-assembly
- Torque:
- 113 N*m { 1152 kgf*cm, 83 ft.*lbf }
-
-
INSTALL NO. 2 ENGINE UNDER COVER (w/ No. 2 Engine Under Cover)
-
INSTALL FRONT SUSPENSION MEMBER BRACE
-
INSTALL ENGINE UNDER COVER
-
INSTALL FRONT WHEEL
- Torque:
- 103 N*m { 1050 kgf*cm, 76 ft.*lbf }
-
INSPECT AND ADJUST FRONT WHEEL ALIGNMENT