SUB RADIATOR INSTALLATION
PROCEDURE
-
INSTALL RADIATOR ASSEMBLY
-
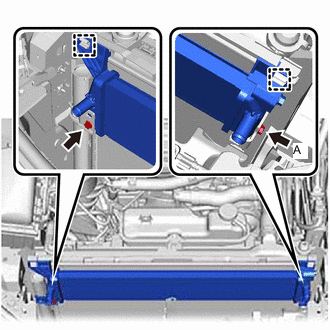
Engage the 2 clamps and install the radiator assembly.
-
Install the 2 bolts to the radiator assembly.
- Torque:
- 9.0 N*m { 92 kgf*cm, 80 in.*lbf }
Note
Using a 10 mm union nut wrench, tighten the bolt (A). Use the torque value compensation formula to calculate the torque value for use when a torque wrench is combined with a tool such as a union nut wrench.
-
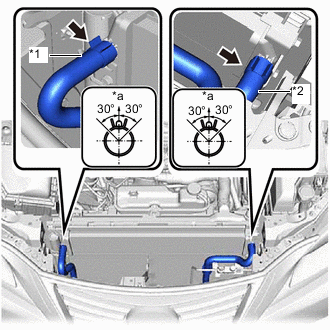
*1 Outlet Hybrid Radiator Hose *2 Inlet Hybrid Radiator Hose *a Upper Side Connect the outlet hybrid radiator hose and inlet hybrid radiator hose to the radiator assembly and slide the 2 clips to secure them.
Note
Do not remove the pieces of cloth or plastic bags from the pipes and disconnected hoses until installation.
Tech Tips
Make sure that the clip is positioned as shown in the illustration.
-
-
INSTALL UPPER RADIATOR SUPPORT SUB-ASSEMBLY
-
CONNECT ENGINE ROOM MAIN WIRE
-
INSTALL HOOD LOCK ASSEMBLY
-
CONNECT HOOD LOCK CONTROL CABLE ASSEMBLY
-
INSTALL HOOD LOCK RELEASE LEVER PROTECTOR
-
INSTALL MILLIMETER WAVE RADAR SENSOR ASSEMBLY (w/ Dynamic Radar Cruise Control System)
-
INSTALL INLET NO. 1 AIR CLEANER
-
ADD COOLANT (for Inverter)
-
INSPECT FOR COOLANT LEAK (for Inverter)
-
INSTALL COOL AIR INTAKE DUCT SEAL
-
INSTALL ENGINE UNDER COVER
-
ADJUST MILLIMETER WAVE RADAR SENSOR ASSEMBLY (w/ Dynamic Radar Cruise Control System)