HEATED OXYGEN SENSOR INSTALLATION

PROCEDURE
-
INSTALL HEATED OXYGEN SENSOR
-
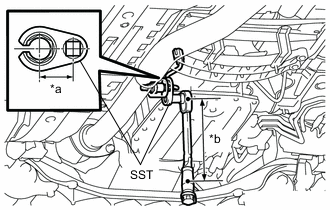
*a Length of SST
30 mm (1.18 in.)
*b Length of Torque Wrench
260 mm (10.2 in.)
Using SST, install the heated oxygen sensor to the front exhaust pipe assembly.
- SST
- 09224-00010
- Torque:
- without SST [Torque (N*m(kgf*cm, ft.*lbf))]
- 44 N*m { 449 kgf*cm, 32 ft.*lbf }
- with SST [Reading of Torque wrench (N*m(kgf*cm, ft.*lbf))]
- 39 N*m { 398 kgf*cm, 29 ft.*lbf }
Note
If a heated oxygen sensor has been struck or dropped, replace it.
Tech Tips
-
This torque value is effective when SST is parallel to the torque wrench.
-
The "with SST" torque value is effective when using SST with a fulcrum length of 30 mm (1.18 in.).
-
The "with SST" torque value is effective when using a torque wrench with a fulcrum length of 260 mm (10.2 in.).
-
If using a torque wrench with a different length, or connecting the torque wrench and SST at an angle, refer to the alternate torque values.
-
Connect the clamp.
-
Connect the heated oxygen sensor connector.
-
-
INSTALL NO. 2 ENGINE UNDER COVER (w/ No. 2 Engine Under Cover)
-
INSTALL FRONT SUSPENSION MEMBER BRACE
-
INSPECT FOR EXHAUST GAS LEAK