РАДИАТОР СНЯТИЕ
PROCEDURE
-
DISCHARGE REFRIGERANT FROM REFRIGERATION SYSTEM
-
REMOVE HEADLIGHT
-
for Halogen Headlight:
-
for LED Headlight:
-
-
PRECAUTION
Note
After turning the ignition switch off, waiting time may be required before disconnecting the cable from the battery terminal. Therefore, make sure to read the disconnecting the cable from the battery terminal notice before proceeding with work.
-
DISCONNECT CABLE FROM NEGATIVE BATTERY TERMINAL
Note
When disconnecting the cable, some systems need to be initialized after the cable is reconnected.
-
DISCONNECT CABLE FROM POSITIVE BATTERY TERMINAL
-
REMOVE NO. 2 CYLINDER HEAD COVER
-
REMOVE BATTERY CLAMP SUB-ASSEMBLY
-
REMOVE BATTERY
-
REMOVE BATTERY TRAY
-
REMOVE NO. 1 ENGINE UNDER COVER
-
REMOVE FRONT LOWER BUMPER ABSORBER
-
Remove the 4 screws and front lower bumper absorber.
-
-
REMOVE RADIATOR LOWER AIR GUIDE PLATE
-
Detach the 2 claws and remove the radiator lower air guide plate.
-
-
DRAIN ENGINE COOLANT
-
REMOVE HOOD LOCK CONTROL CABLE COVER (w/ Cover)
-
REMOVE HOOD LOCK ASSEMBLY
-
for LHD:
-
for RHD:
-
-
DISCONNECT HOOD LOCK CONTROL CABLE ASSEMBLY
-
Detach the clamp to disconnect the hood lock control cable assembly.
-
-
REMOVE FRONT BUMPER UPPER REINFORCEMENT SUB-ASSEMBLY
-
Disconnect the horn connector.
-
Remove the 3 bolts and front bumper upper reinforcement sub-assembly.
-
-
REMOVE RADIATOR UPPER AIR GUIDE PLATE
-

Remove the 6 clips and radiator upper air guide plate.
-
-
DISCONNECT DISCHARGE HOSE SUB-ASSEMBLY
-
DISCONNECT LIQUID PIPE SUB-ASSEMBLY
-
DISCONNECT WIRE HARNESS
-
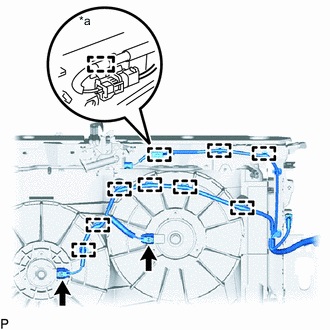
*a w/o Hood Courtesy Switch Disconnect the 2 cooling fan motor connectors.
-
Detach the 9 wire harness clamps.
-
-
REMOVE NO. 1 RADIATOR SUPPORT
-
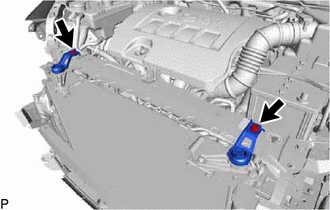
Remove the 2 bolts and 2 No. 1 radiator supports.
-
-
REMOVE UPPER RADIATOR SUPPORT
-
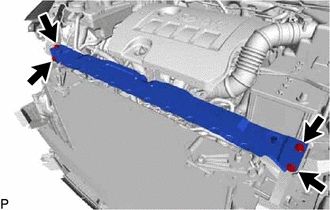
Remove the 4 bolts and upper radiator support.
-
-
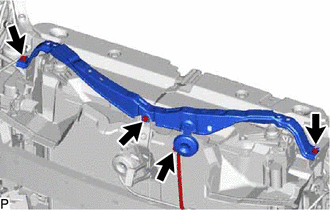
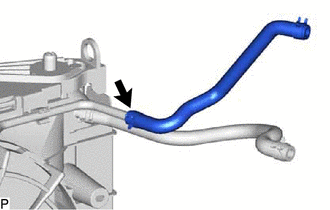
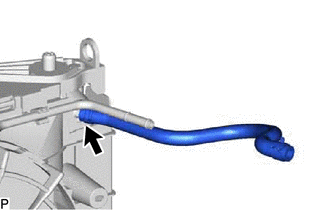
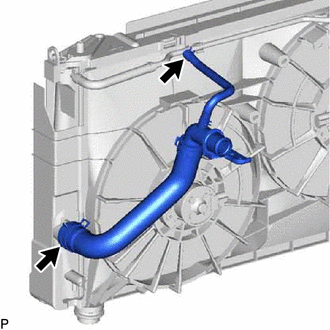
DISCONNECT RADIATOR HOSE SUB-ASSEMBLY
-
Remove the 2 bolts.
-
Slide the hose clamp and disconnect the radiator hose sub-assembly from the No. 1 radiator hose.
-
-
DISCONNECT NO. 2 RADIATOR HOSE
-
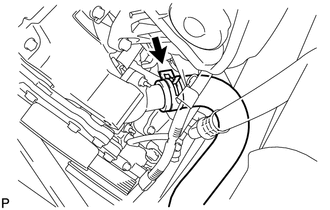
Slide the hose clamp and disconnect the No. 2 radiator hose from the water inlet housing.
-
-
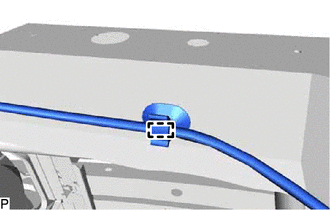
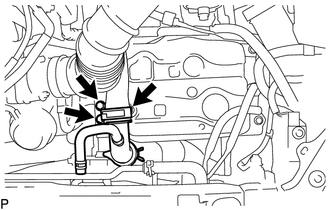
DISCONNECT NO. 1 WATER BY-PASS HOSE
-
Slide the hose clamp and disconnect the No. 1 water by-pass hose from the water by-pass pipe.
-
-
DISCONNECT NO. 2 WATER BY-PASS HOSE
-
Slide the hose clamp and disconnect the No. 2 water by-pass hose from the radiator assembly.
-
-
REMOVE RADIATOR ASSEMBLY
-
Remove the radiator assembly together with the fan shroud.
Tech Tips
After removing the radiator assembly, make sure that both lower radiator supports are attached to the fan shroud.
-
-
REMOVE RADIATOR HOSE SUB-ASSEMBLY
-
Slide the 2 hose clamps and remove the radiator hose sub-assembly from the radiator assembly and water by-pass pipe.
-
-
REMOVE NO. 2 RADIATOR HOSE
-

Slide the hose clamp and remove the No. 2 radiator hose from the radiator assembly.
-
-
REMOVE WATER BY-PASS PIPE
-
Slide the hose clamp and disconnect the water by-pass hose from the radiator assembly.
-
Detach the 3 clamps to remove the water by-pass pipe.
-
-
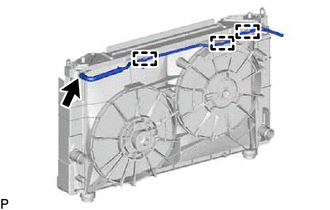
REMOVE RADIATOR LOWER SUPPORT
-
Remove the 2 radiator lower supports from the fan shroud.
-
-
REMOVE NO. 2 FAN SHROUD
-
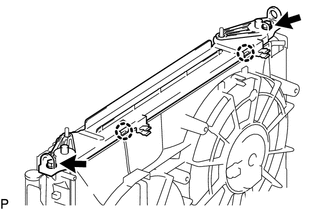
Remove the 2 bolts.
-
Detach the 2 claws and remove the No. 2 fan shroud.
-
-
REMOVE COOLER CONDENSER ASSEMBLY
-
Detach the 2 guides and remove the condenser assembly.
-
-
REMOVE FAN SHROUD WITH COOLING FAN
-
Remove the 2 bolts and fan shroud.
-