FUEL LID LOCK CONTROL CABLE ASSEMBLY(for Hatchback RHD) REMOVAL
PROCEDURE
-
REMOVE FRONT SEAT ASSEMBLY RH
-
REMOVE FRONT SEAT ASSEMBLY LH
Tech Tips
Use the same procedure as for the LH side and RH side.
-
REMOVE DECK BOARD ASSEMBLY (w/ Deck Board)
-
REMOVE REAR FLOOR MAT ASSEMBLY
-
REMOVE REAR DECK FLOOR BOX (w/ Deck Floor Box)
-
REMOVE DECK FLOOR BOX LH (w/ Deck Floor Box)
-
REMOVE PACKAGE TRAY TRIM PANEL ASSEMBLY (w/ Package Tray Trim)
-
REMOVE REAR DECK TRIM COVER
-
REMOVE REAR SEAT CUSHION ASSEMBLY
-
REMOVE REAR SEAT HEADREST ASSEMBLY
-
REMOVE REAR SEATBACK ASSEMBLY LH
-
REMOVE FRONT DOOR SCUFF PLATE RH
-
DISCONNECT FRONT DOOR OPENING TRIM WEATHERSTRIP RH
-
REMOVE REAR DOOR SCUFF PLATE RH
-
DISCONNECT REAR DOOR OPENING TRIM WEATHERSTRIP RH
-
REMOVE LAP BELT OUTER ANCHOR COVER (for RH Side)
-
DISCONNECT FRONT SEAT OUTER BELT ASSEMBLY RH
-
REMOVE CENTER PILLAR LOWER GARNISH RH
-
REMOVE FRONT DOOR SCUFF PLATE LH
Tech Tips
Use the same procedure as for the RH side.
-
DISCONNECT FRONT DOOR OPENING TRIM WEATHERSTRIP LH
Tech Tips
Use the same procedure as for the RH side.
-
REMOVE REAR DOOR SCUFF PLATE LH
Tech Tips
Use the same procedure as for the RH side.
-
DISCONNECT REAR DOOR OPENING TRIM WEATHERSTRIP LH
Tech Tips
Use the same procedure as for the RH side.
-
REMOVE LAP BELT OUTER ANCHOR COVER (for LH Side)
Tech Tips
Use the same procedure as for the RH side.
-
DISCONNECT FRONT SEAT OUTER BELT ASSEMBLY LH
Tech Tips
Use the same procedure as for the RH side.
-
REMOVE CENTER PILLAR LOWER GARNISH LH
Tech Tips
Use the same procedure as for the RH side.
-
REMOVE REAR SEATBACK HINGE SUB-ASSEMBLY LH
-
REMOVE REAR SEAT SIDE GARNISH LH
-
REMOVE NO. 2 DECK SIDE TRIM HOOK
-
REMOVE LOWER DECK TRIM SIDE BOARD LH (w/ Deck Board)
-
REMOVE DECK TRIM SIDE PANEL ASSEMBLY LH
-
REMOVE STEREO COMPONENT SPEAKER ASSEMBLY (w/ Woofer)
-
REMOVE FUEL LID LOCK OPEN LEVER SUB-ASSEMBLY
-
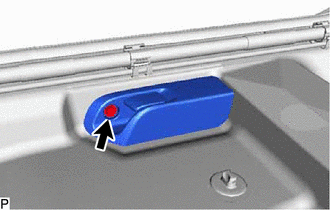
Remove the screw.
-
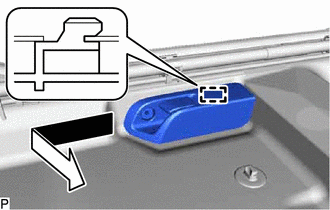
Disengage the guide and disconnect the fuel lid lock open lever sub-assembly as shown in the illustration.
-
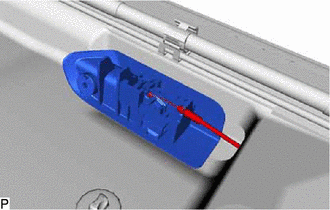
Disconnect the fuel lid lock control cable sub-assembly and remove the fuel lid lock open lever sub-assembly.
-
-
REMOVE FUEL LID LOCK CONTROL CABLE SUB-ASSEMBLY (for Rear Side)
-
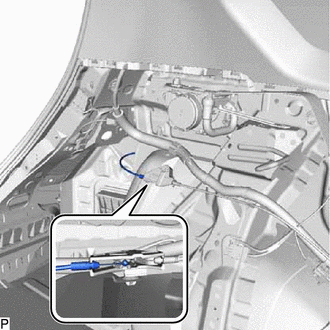
Disconnect the fuel lid lock control cable sub-assembly.
-
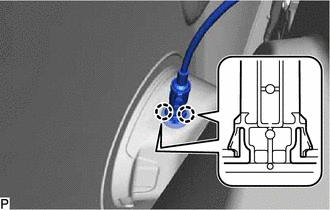
Disengage the 2 claws.
-
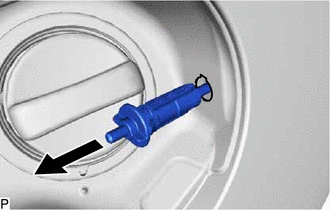
Remove the fuel lid lock control cable sub-assembly as shown in the illustration.
-
-
REMOVE FUEL LID LOCK CONTROL CABLE SUB-ASSEMBLY (for Front Side)
-
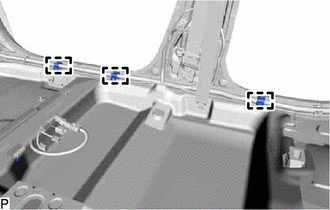
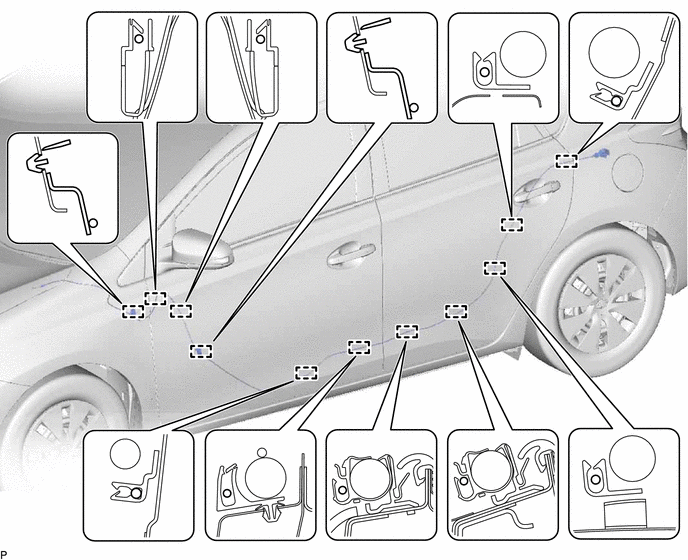
Disengage the 3 clamps.
Tech Tips
Use the same procedure as for the LH side.
-
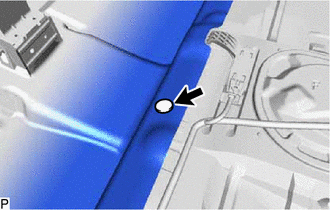
Using a clip remover, remove the clip.
-
Turn back the floor carpet so that the fuel lid lock control cable sub-assembly can be removed.
-
Disengage the 11 clamps and remove the fuel lid lock control cable sub-assembly.
-