CLUTCH ACTUATOR(for EC65A) REMOVAL
CAUTION / NOTICE / HINT
Note
-
If the clutch actuator assembly is removed from the multi-mode manual transaxle assembly, perform Learning of Multi-mode Manual Transaxle System.
-
When Learning of Multi-mode Manual Transaxle System is performed, the clutch disc assembly and clutch cover assembly have to be replaced as a set.
PROCEDURE
-
REMOVE NO. 1 ENGINE UNDER COVER (for Half Cover Type)
-
REMOVE NO. 1 ENGINE UNDER COVER (for Full Cover Type)
-
REMOVE NO. 1 ENGINE COVER (w/ No. 1 Engine Cover)
-
REMOVE AIR CLEANER CAP SUB-ASSEMBLY
-
REMOVE AIR CLEANER CASE SUB-ASSEMBLY
-
REMOVE BATTERY
-
REMOVE NO. 2 BATTERY CARRIER
-
REMOVE CLUTCH ACTUATOR ASSEMBLY
-
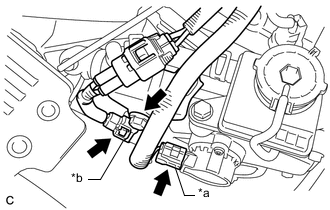
*a Clutch Stroke Sensor Connector *b Clutch Motor Assembly Connector Disconnect the clutch stroke sensor connector.
-
Disconnect the clutch motor assembly connector.
-
Remove the bolt and disconnect the wire harness from the clutch actuator assembly.
Note
Do not forcibly pull the clutch stroke sensor connector as this may damage the wire harness.
-
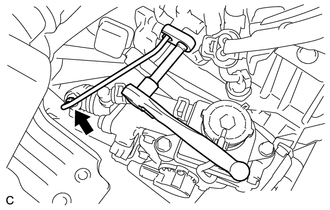
Using a 10 mm union nut wrench, remove the bleeder clutch release tube.
-
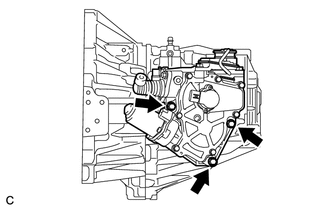
Remove the 3 bolts and clutch actuator assembly from the No. 1 clutch actuator bracket.
Note
If a component has been dropped or subjected to a strong impact, replace it.
-