ECD SYSTEM(w/ Glow Plug Controller), Diagnostic DTC:P2463
| DTC Code | DTC Name |
|---|---|
| P2463 | Diesel Particulate Filter Restriction - Soot Accumulation |
DESCRIPTION
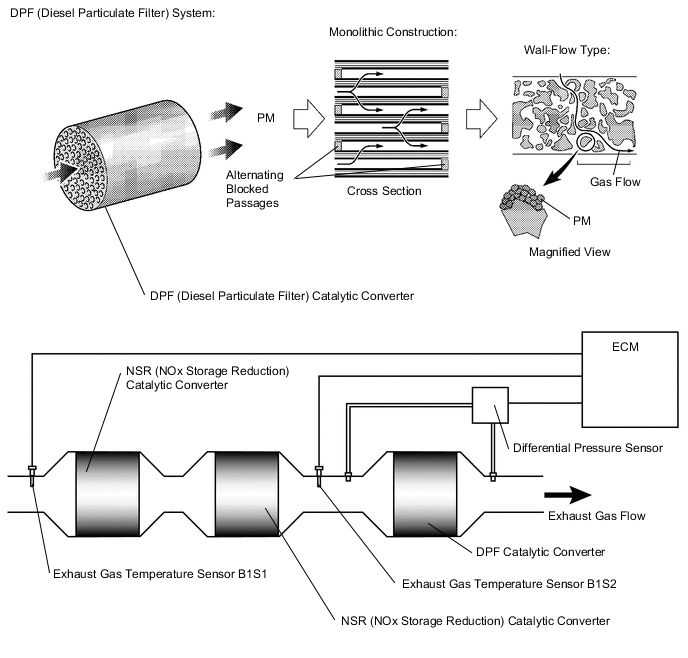
The DPF catalyst has the ability to reduce particulate matter (PM). The DPF catalyst is a monolithic type catalyst. Alternating passages in the catalyst have either their inlet or outlet blocked. This forces the exhaust gasses to flow through the walls of the passages (see illustration above). Due to the flow of the exhaust gases through micro-cavities in the passage walls, it is called a "wall-flow" type converter.
During driving with PM accumulation exceeding the threshold, when the exhaust temperature exceeds 250°C (482°F) (Ex.: 3rd gear at 65 to 100 km/h [40 to 62 mph]), PM regeneration will be performed and PM accumulation will be reduced.
While PM regeneration, post injection (injector fuel injection during the exhaust stroke) is performed, and exhaust temperature before the DPF catalytic converter increases to approximately 500 to 700°C (932 to 1292°F).
| DTC No. | Detection Item | DTC Detection Condition | Trouble Area | MIL | Memory |
|---|---|---|---|---|---|
| P2463 | Diesel Particulate Filter Restriction - Soot Accumulation | Amount of PM (Particulate Matter) is the specified value or more (1 trip detection logic) |
|
Comes on | DTC stored |
| DTC No. | DTC Detection Drive Pattern |
|---|---|
| P2463 | With warm engine, drive the vehicle with a constant vehicle speed between 65 to 100 km/h (40 to 62 mph) (3rd gear) for 5 minutes. |
Tech Tips
Due to fail-safe operation when other DTCs are stored, PM regeneration may be prohibited.
These DTCs may be stored due to the fact that PM regeneration is prohibited due to the fail-safe operation of other DTCs.
MONITOR DESCRIPTION
In order to detect an abnormality in the DPF catalytic converter, the ECM monitors the differential pressure in front of and behind the DPF catalyst.
When the differential pressure is large, the ECM determines that the DPF has become contaminated and illuminates the MIL.

Tech Tips
-
If a large amount of carbon deposits exists in the electric EGR control valve assembly, the following parts may also have deposits inside: Intake manifold, diesel throttle body assembly, DPF catalyst, other parts related to the exhaust system.
-
If the DPF catalyst has become clogged with PM (Particulate Matter) and the value of "PM Accumulation Ratio" is more than 167% at an engine speed of 4000 rpm, DTC P2463 (Diesel Particulate Filter Restriction - Soot Accumulation) may be present. If the value of "PM Accumulation Ratio" is about 167% or less at an engine speed of 4000 rpm, the catalyst is probably clogged with PM even if DTC P2463 is not present. Check the PM Accumulation Ratio by entering the following menus on the GTS: Powertrain / Engine and ECT / Data List / PM Accumulation Ratio.
CAUTION / NOTICE / HINT
Note
-
When replacing the ECM, injector assembly and/or DPF catalyst, perform ECM Initialization and Registration.
-
When cleaning the electric EGR control valve assembly or diesel throttle body assembly, use a piece of cloth soaked with cleaning solvent. Spraying solvent directly onto these parts or soaking the parts in solvent may damage the parts.
Tech Tips
-
When the ECM must be replaced, before replacing the ECM, perform the "Learning Values Save" function using the GTS. Then after installing a new ECM, perform all of the initialization and registration procedures for the "Learning Values Write" function by following the instructions shown on the GTS display.
-
Read freeze frame data using the GTS. Freeze frame data records the engine condition when malfunctions are detected. When troubleshooting, freeze frame data can help determine if the vehicle was moving or stationary, if the engine was warmed up or not, and other data from the time the malfunction occurred.
-
Before performing the repair, confirm the recent operation conditions with the customer. If the vehicle is driven primarily at low speeds or under light load, the DPF catalytic temperature does not increase, and PM will accumulate.
Under these conditions, even if the DPF catalytic converter and the engine are operating normally, the DTC might be stored.
In this case, perform PM regeneration using the GTS, check that the DTC does nor recur, and then return the vehicle to the customer.
PROCEDURE
-
CHECK ANY OTHER DTCS OUTPUT (IN ADDITION TO DTC P2463 AND P252F)
-
Connect the GTS to the DLC3.
-
Turn the ignition switch to ON.
-
Turn the GTS on.
-
Enter the following menus: Powertrain / Engine and ECT / Trouble Codes.
-
Read the DTCs.
Powertrain > Engine and ECT > Trouble CodesResult Result Proceed to DTC P2463 and/or DTC P252F is output A Except above B Tech Tips
If both P2463 and P252F are stored at the same time, proceed to A
B 
GO TO DTC CHART Click here
A 
-
-
CHECK AND REPLACE ENGINE OIL
-
Check the engine oil quality and quantity.
-
If the engine oil level exceeds the full level or the engine oil is diluted, replace the engine oil.
Note
Do not fill engine oil above the full level mark.
Tech Tips
-
Toyota recommends the use of approved "Toyota genuine motor oil". Another oil of matching quality can also be used.
Oil grade: ACEA C2
-
Using engine oil other than ACEA C2 may damage the catalytic converter.
-
ACEA C2 is best choice for prevention of increasing the DPF differential pressure.
-
-
Reset the oil maintenance indicator.
-
Start the engine and warm it up until the engine coolant temperature reaches 75 to 86°C (167 to 187°F).
-
Drive the vehicle for 2 minutes or more at an engine speed of 1800 to 3000 rpm and a vehicle speed of 15 km/h (9.3 mph) or more.
CAUTION:
When performing the confirmation driving pattern, obey all speed limits and traffic laws.
Tech Tips
Performing this drive pattern resets the engine oil level error detection and ends prohibition of PM regeneration (fail-safe operation ends).
Result Proceed to NEXT
NEXT
-
-
CHECK BLOCKAGE OF VACUUM TRANSMITTING HOSE AND VACUUM TRANSMITTING PIPES (DIFFERENTIAL PRESSURE SENSOR)
CAUTION:
Be careful of being burned by exhaust gases during the following inspection.
Note
-
Confirm the paint marks on the vacuum transmitting hoses before disconnecting them.
-
Check that the vacuum transmitting hose connections are on the correct side of the DPF catalytic converter.
-
Disconnect both vacuum transmitting hoses (upstream and downstream) on the differential pressure sensor side.
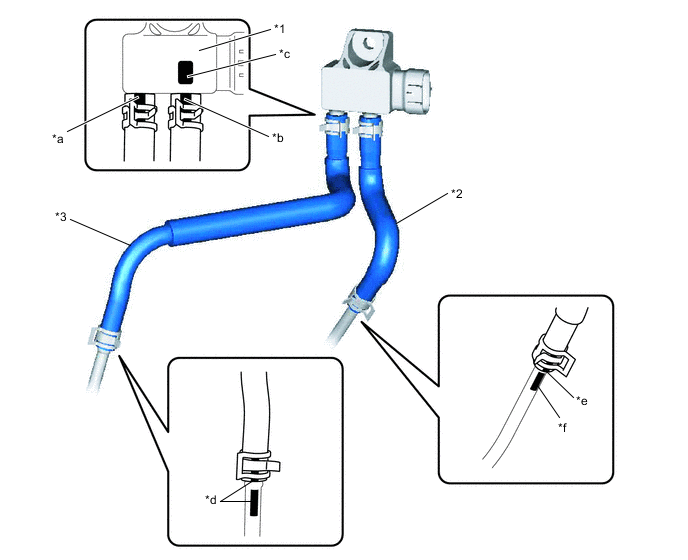
*1 Differential Pressure Sensor *2 Vacuum Transmitting Hose (for upstream) *3 No. 2 Vacuum Transmitting Hose (for downstream) - - *a Marked: White *b Marked: Red *c Marked: Red *d Marked: Yellow *e Marked: Orange *f Marked: Blue -
Start the engine.
-
Check if there is exhaust gas pulsation from both vacuum transmitting hoses while the engine is idling.
Result Result Proceed to No exhaust gas pulsation A Exhaust gas pulsation exists B
B 
GO TO STEP 5 Click here
A
-
-
REPAIR OR REPLACE VACUUM TRANSMITTING HOSE OR VACUUM TRANSMITTING PIPE
-
Repair or replace the malfunctioning parts of the vacuum transmitting hoses or the vacuum transmitting pipes.
Result Proceed to NEXT
NEXT
-
-
CHECK FOR EXHAUST GAS LEAK OR BLOCKAGE
-
Check if there is an exhaust gas leak or blockage in the exhaust system components.
Result Result Proceed to Leaks and/or blockage exists in the exhaust system A No leaks and/or blockage in the exhaust system B
B
GO TO STEP 7 Click here
A
-
-
REPAIR OR REPLACE EXHAUST GAS LEAK OR BLOCKAGE POINT
-
Repair or replace the exhaust gas leak or blockage point.
Result Proceed to NEXT
NEXT
-
-
READ VALUE USING GTS (PM ACCUMULATION RATIO)
-
Connect the GTS to the DLC3.
-
Turn the ignition switch to ON.
-
Turn the GTS on.
-
Start the engine and warm it up until the engine coolant temperature reaches 75°C (167°F) or higher.
-
Enter the following menus: Powertrain / Engine and ECT / Data List / PM Accumulation Ratio.
Powertrain > Engine and ECT > Data ListTester Display PM Accumulation Ratio -
Take a snapshot with the GTS at an engine speed of 4000 rpm without load.
-
Record the PM Accumulation Ratio at 4000 rpm.
Tech Tips
When reading the values of the Data List, confirm that PM regeneration is not activating (value of "After Injection Period" is 0) by entering the following menus: Powertrain / Engine and ECT / Data List / After Injection Period.
If PM regeneration is activating (value of "After Injection Period" is not 0), drive the vehicle until the PM regeneration is complete (value of "After Injection Period" becomes 0).
Result Proceed to NEXT
NEXT
-
-
PERFORM ACTIVE TEST USING GTS (FIRST TIME OF ACTIVATE THE DPF REJUVENATE (PM))
-
Connect the GTS to the DLC3.
-
Turn the ignition switch to ON.
-
Turn the GTS on.
-
Start the engine.
-
Clear the DTCs.
Powertrain > Engine and ECT > Clear DTCs -
Enter the following menus: Powertrain / Engine and ECT / Active Test / Activate the DPF Rejuvenate (PM) / Data List / Exhaust Temperature B1S1, Exhaust Temperature B1S2 and DPNR/DPF Status Reju(PM).
Powertrain > Engine and ECT > Active TestActive Test Display Activate the DPF Rejuvenate (PM) Data List Display Exhaust Temperature B1S1 Exhaust Temperature B1S2 DPNR/DPF Status Reju(PM) Tech Tips
After clearing DTCs, immediately enter the Active Test and then drive the vehicle.
-
Perform the Active Test and then drive the vehicle at a constant engine speed of 2000 rpm or more (shift position: 3rd gear) at a vehicle speed between 65 to 100 km/h (40 to 62 mph).
CAUTION:
When performing the confirmation driving pattern, obey all speed limits and traffic laws.
Tech Tips
While the Active Test being performed, the accelerator pedal opening angle should be kept as constant as possible.
-
Confirm that both Exhaust Temperature B1S1 and Exhaust Temperature B1S2 reach 250°C (482°F) or higher and the DPNR/DPF Status Reju(PM) turns from "Ready" to "Operate".
Tech Tips
-
If the exhaust gas temperature does not reach the specified value, drive the vehicle again with a constant engine speed of 2000 rpm or more (shift position: 3rd gear) at a vehicle speed between 65 to 100 km/h (40 to 62 mph).
-
Perform the Active Test until one of the following conditions is met:
-
DPNR/DPF Status Reju(PM) displays "Compl".
-
DPNR/DPF Status Reju(PM) turns from "Operate" to "Ready" even if the cumulative time of "Operate" exceeds 35 minutes.
-
DPNR/DPF Status Reju(PM) stays "Ready" even if both Exhaust Temperature B1S1 and Exhaust Temperature B1S2 have reached 250°C (482°F) or higher for more than 10 minutes with an engine speed of 2000 rpm or more. (PM regeneration could not operate.)
-
-
Take a snapshot with the GTS when the Exhaust Temperature B1S1 and Exhaust Temperature B1S2 rise and become stable.
-
Enter the following menus: Powertrain / Engine and ECT / Data List / DPNR/DPF Status Reju(PM).
Powertrain > Engine and ECT > Data ListTester Display DPNR/DPF Status Reju(PM) -
Confirm the DPNR/DPF Status Reju(PM).
Tech Tips
-
While performing PM regeneration, the DPNR/DPF Status Reju(PM) displays "Operate".
-
If the PM regeneration is stopped (DPNR/DPF Status Reju(PM) displays "Ready") because the exhaust gas temperature is reduced due to the driving conditions, the PM regeneration is restarted automatically (DPNR/DPF Status Reju(PM) displays "Operate") when the exhaust gas temperature is increased by driving with a high engine speed driving.
-
If the cumulative time of DPNR/DPF Status Reju(PM) at "Operate" exceeds 35 minutes, the Active Test will be canceled. In this case, the DPNR/DPF Status Reju(PM) turns to "Ready" and the Active Test / Activate the DPF Rejuvenate (PM) will be prohibited for one hour while engine running. Thus, perform the Active Test again after running the engine for one hour.
DPNR/DPF Status Reju(PM) (Reference) GTS Display Status Standby Before entering "Activate the DPF Rejuvenate (PM)" Ready Enabling condition for "Activate the DPF Rejuvenate (PM)" is not sufficient Operate
-
PM regeneration is being performed.
-
If "Activate the DPF Rejuvenate (PM)" is not finished completely, the status turns to "Ready".
For example, if the vehicle idles for more than 3 minutes while the PM regeneration is being performed, the exhaust gas temperature falls to outside of enabling condition and PM regeneration is stopped.
-
If "Activate the DPF Rejuvenate (PM)" is finished completely, the status turns to "Compl".
Compl PM regeneration is completed (Amount of PM is 0 g) -
-
Read the values of the Data List / Exhaust Temperature B1S2 in the Snapshot Review function.
Standard DPNR/DPF Status Reju(PM) is "Compl" and Exhaust Temperature B1S2 is 570°C (1058°F) or higher during PM regeneration. Result Proceed to OK NG
OK
GO TO STEP 19 Click here
NG
-
-
READ VALUE USING GTS (INJECTION FEEDBACK VAL #1 TO #4 AND INJECTION VOLUME)
-
Connect the GTS to the DLC3.
-
Turn the ignition switch to ON.
-
Turn the GTS on.
-
Start the engine and allow it to idle until the engine coolant temperature reaches 75°C (167°F) or higher.
-
Allow the engine to idle for 30 seconds or more.
Tech Tips
The shift lever should be in neutral and the A/C switch and all accessory switches should be off.
-
Enter the following menus: Powertrain / Engine and ECT / Data List / Injection Feedback Val #1 to #4 and Injection Volume.
Powertrain > Engine and ECT > Data ListTester Display Injection Volume Injection Feedback Val #1 Injection Feedback Val #2 Injection Feedback Val #3 Injection Feedback Val #4 -
Read the value.
Tech Tips
When reading the values of Data List, confirm that PM regeneration is not activating (value of "After Injection Period" is 0) by entering the following menus: Powertrain / Engine and ECT / Data List / After Injection Period.
If PM regeneration is activating (value of "After Injection Period" is not 0), drive the vehicle until the PM regeneration is complete (value of "After Injection Period" becomes 0).
Standard GTS Display Engine Condition Specified Condition Injection Volume Idling Less than 8 mm3/st
Injection Feedback Val #1
Injection Feedback Val #2
Injection Feedback Val #3
Injection Feedback Val #4
Idling Between -2.0 mm3/st and 2.0 mm3/st
Tech Tips
-
Cylinders that have a compensation value which is more than the value specified above are considered to be malfunctioning. Use the following steps to inspect and repair the cylinder.
-
If the value of Injection Volume is 8 mm3/st or more and the values of Injection Feedback Val #1 to #4 is within the threshold, replace the injector assembly for all cylinders.
In this case, there is a possibility that too much recirculated exhaust gas is entering the engine. Therefore, you should compare the Target EGR Valve Pos with the Actual EGR Valve Pos by entering the following menus using the GTS: Powertrain / Engine and ECT / Data List / Target EGR Valve Pos and Actual EGR Valve Pos.
If the difference between Target EGR Valve Pos and Actual EGR Valve Pos exceeds +/-10%, the EGR system may have a malfunctioning.
Result Proceed to OK NG -
OK
PERFORM ACTIVE TEST USING GTS (CONTROL THE EGR STEP POSITION) Click here
NG
-
-
PERFORM ACTIVE TEST USING GTS (INJECTION CUT FOR IDENTIFYING MALFUNCTIONING CYLINDER)
-
Connect the GTS to the DLC3.
-
Turn the ignition switch to ON.
-
Turn the GTS on.
-
Start the engine and allow it to idle until the engine coolant temperature reaches 75°C (167°F) or higher.
-
Enter the following menus: Powertrain / Engine and ECT / Active Test / Control the Select Cylinder Fuel Cut.
Powertrain > Engine and ECT > Active TestTester Display Control the Select Cylinder Fuel Cut -
Check the four cylinders in sequence to identify the faulty cylinder.
Tech Tips
-
DTCs may be output after this Active Test. Make sure to check for DTCs after this Active Test. If any DTCs are output, make sure to clear them.
-
If the engine idling speed does not change when an injector assembly is disabled, the cylinder being tested is malfunctioning.
Result Proceed to NEXT -
NEXT
-
-
READ VALUE USING GTS (IDENTIFYING MALFUNCTIONING PART)
-
Connect the GTS to the DLC3.
-
Turn the ignition switch to ON.
-
Turn the GTS on.
-
Exchange the injector assembly of the malfunctioning cylinder to an injector assembly of the cylinder that functions normally.
-
Start the engine and allow it to idle until the engine coolant temperature reaches 75°C (167°F) or more.
-
Enter the following menus: Powertrain / Engine and ECT / Active Test / Control the Select Cylinder Fuel Cut.
Powertrain > Engine and ECT > Active TestTester Display Control the Select Cylinder Fuel Cut -
Check the four cylinders in sequence to identify the faulty cylinder.
Tech Tips
-
DTCs may be output after this Active Test. Make sure to check for DTCs after this Active Test. If any DTCs are output, make sure to clear them.
-
If the engine idling remains normal despite cutting off the fuel injection, the cylinder is malfunctioning.
-
If the engine idle speed does not change when an injector assembly is disabled, the cylinder being tested is malfunctioning.
-
-
Confirm the malfunctioning cylinder.
Result Result Proceed to Different cylinder malfunction identified A Same cylinder malfunction identified B
B
CHECK ENGINE ASSEMBLY Click here
A
-
-
REPLACE INJECTOR ASSEMBLY
-
Replace the injector assembly of the malfunctioning cylinder.
Result Proceed to NEXT
NEXT
-
-
PERFORM REGISTRATION AND INITIALIZATION
-
Perform Registration and Initialization.
Result Proceed to NEXT
NEXT
-
-
BLEED AIR FROM FUEL SYSTEM
-
Bleed air from fuel system.
Result Proceed to NEXT
NEXT
GO TO STEP 18 Click here
-
-
CHECK ENGINE ASSEMBLY
-
Check the engine assembly to determine the cause of low compression and other factors that would cause the exhaust gas temperature to rise insufficiently.
Tech Tips
The speed of each cylinder can be measured (compression test) by using the GTS.
For the compression test, perform Active Test using GTS (Check the Cylinder Compression) and crank the engine for approximately 10 seconds. At this time, the speed of each cylinder is measured. If the speed of one cylinder is higher than the other cylinders, the compression pressure of that cylinder is determined to be lower than the other cylinders.
-
Warm up the engine.
-
Turn the ignition switch off.
-
Connect the GTS to the DLC3.
-
Turn the ignition switch to ON.
-
Turn the GTS on.
-
Enter the following menus: Powertrain / Engine and ECT / Active Test / Check the Cylinder Compression / Data List / Engine Speed of Cyl #1, Engine Speed of Cyl #2, Engine Speed of Cyl #3, Engine Speed of Cyl #4 and Av Engine Speed of All Cyl.
-
Push the snapshot button to turn the snapshot function on.
Tech Tips
Using the snapshot function, data can be recorded during the Active Test.
-
While the engine is not running, press the ON button to Change the Cylinder Compression to ON.
Tech Tips
After performing the above procedure, Check the Cylinder Compression will start. Fuel injection for all cylinders is prohibited and each cylinder engine speed measurement enters standby mode.
-
Crank the engine for about 10 seconds.
-
Monitor the engine speed (Engine Speed of Cyl #1 to #4, Av Engine Speed of All Cyl) displayed on the GTS.
Tech Tips
After approximately 10 seconds of engine cranking, the engine speed measurement of each cylinder will change to the actual engine speed.
Note
-
Do not crank the engine continuously for 20 seconds or more.
-
If Check the Cylinder Compression needs to be performed after it is turned ON and performed once, press Exit to return to the Active Test menu screen. Then perform Check the Cylinder Compression again.
-
Use a fully-charged battery.
-
-
Stop cranking the engine, and then change "Check the Cylinder Compression" to OFF after the engine stops.
Note
If the Active Test is changed to OFF while the engine is being cranked, the engine will start.
-
Push the snapshot button to turn the snapshot function off.
-
Select "Stored Data" on the GTS screen, select the recorded data and display the data as a graph.
Tech Tips
If the data is not displayed as a graph, the change of the values cannot be observed.
-
Check the change in engine speed values.
Result Proceed to NEXT -
NEXT
GO TO STEP 18 Click here
-
-
PERFORM ACTIVE TEST USING GTS (CONTROL THE EGR STEP POSITION)
-
Connect the GTS to the DLC3.
-
Turn the ignition switch to ON.
-
Turn the GTS on.
-
Enter the following menus: Powertrain / Engine and ECT / Active Test / Control the EGR Step Position / Data List / Actual EGR Valve Pos.
Powertrain > Engine and ECT > Active TestActive Test Display Control the EGR Step Position Data List Display Actual EGR Valve Pos -
When changing the Active Test value from 1 to 100%, check that Actual EGR Valve Pos smoothly changes to the set opening angle.
OK Value smoothly changes to the set opening angle. -
Check that the EGR valve is fully closed.
OK The EGR valve fully closes. 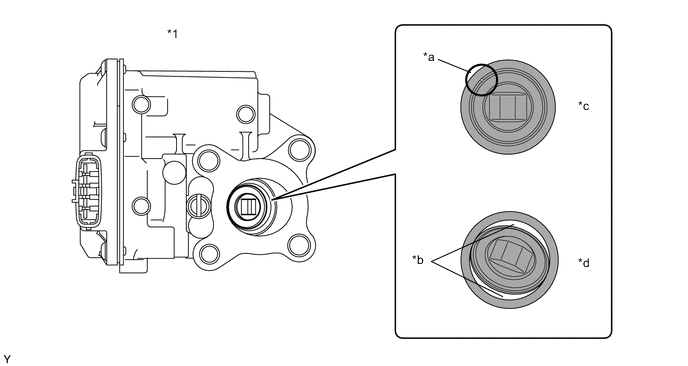
*1 Electric EGR Control Valve Assembly - - *a Part A *b Clearance *c OK *d NG Tech Tips
-
Hold the electric EGR control valve assembly to a light and confirm that the valve contacts with the valve seat securely.
-
If light leaks out from the valve, the electric EGR control valve assembly is not fully closed.
-
If the electric EGR control valve assembly cannot close fully, hesitation or poor acceleration almost certainly has occurred while driving the vehicle.
-
Light passes through part A shown in the illustration even if the valve is completely closed, this is not a malfunction.
-
-
Remove the diesel throttle body assembly, intake air connector and EGR pipe connector.
-
Remove the deposits from the parts and clean them.
Note
-
When cleaning the electric EGR control valve assembly and the diesel throttle body assembly, use a piece of cloth. Spraying the solvent directly onto these parts or soaking the parts in solvent may damage the parts.
-
Extreme care must be taken to prevent the removed deposits from falling into the engine unit during cleaning.
Tech Tips
-
Remove the intake manifold from the cylinder head when it has to be cleaned.
-
Do not leave any deposits in the electric EGR control valve assembly when cleaning the valve.
Result Proceed to OK NG -
OK
GO TO STEP 21 Click here
NG
-
-
REPLACE ELECTRIC EGR CONTROL VALVE ASSEMBLY
-
Replace the electric EGR control valve assembly.
-
Turn the ignition switch to ON.
-
Turn the ignition switch off and wait for 30 seconds or more.
Result Proceed to NEXT
NEXT
-
-
PERFORM ACTIVE TEST USING GTS (FIRST TIME OF ACTIVATE THE DPF REJUVENATE (PM))
-
Connect the GTS to the DLC3.
-
Turn the ignition switch to ON.
-
Turn the GTS on.
-
Start the engine.
-
Clear the DTCs.
Powertrain > Engine and ECT > Clear DTCs -
Enter the following menus: Powertrain / Engine and ECT / Active Test / Activate the DPF Rejuvenate (PM) / Data List / Exhaust Temperature B1S1, Exhaust Temperature B1S2 and DPNR/DPF Status Reju(PM).
Powertrain > Engine and ECT > Active TestActive Test Display Activate the DPF Rejuvenate (PM) Data List Display Exhaust Temperature B1S1 Exhaust Temperature B1S2 DPNR/DPF Status Reju(PM) Tech Tips
After clearing DTCs, immediately enter the Active Test and then drive the vehicle.
-
Perform the Active Test and then drive the vehicle at a constant engine speed of 2000 rpm or more (shift position: 3rd gear) at a vehicle speed between 65 to 100 km/h (40 to 62 mph).
CAUTION:
When performing the confirmation driving pattern, obey all speed limits and traffic laws.
Tech Tips
While the Active Test being performed, the accelerator pedal opening angle should be kept as constant as possible.
-
Confirm that both Exhaust Temperature B1S1 and Exhaust Temperature B1S2 reach 250°C (482°F) or higher and the DPNR/DPF Status Reju(PM) turns from "Ready" to "Operate".
Tech Tips
-
If the exhaust gas temperature does not reach the specified value, drive the vehicle again with a constant engine speed of 2000 rpm or more (shift position: 3rd gear) at a vehicle speed between 65 to 100 km/h (40 to 62 mph).
-
Perform the Active Test until one of the following conditions is met:
-
DPNR/DPF Status Reju(PM) displays "Compl".
-
DPNR/DPF Status Reju(PM) turns from "Operate" to "Ready" even if the cumulative time of "Operate" exceeds 35 minutes.
-
DPNR/DPF Status Reju(PM) stays "Ready" even if both Exhaust Temperature B1S1 and Exhaust Temperature B1S2 have reached 250°C (482°F) or higher for more than 10 minutes with an engine speed of 2000 rpm or more. (PM regeneration could not operate.)
-
-
Take a snapshot with the GTS when the Exhaust Temperature B1S1 and Exhaust Temperature B1S2 rise and become stable.
-
Enter the following menus: Powertrain / Engine and ECT / Data List / DPNR/DPF Status Reju(PM).
Powertrain > Engine and ECT > Data ListTester Display DPNR/DPF Status Reju(PM) -
Confirm the DPNR/DPF Status Reju(PM).
Tech Tips
-
While the performing PM regeneration, the DPNR/DPF Status Reju(PM) displays "Operate".
-
If the PM regeneration is stopped (DPNR/DPF Status Reju(PM) displays "Ready") because the exhaust gas temperature is reduced due to the driving conditions, the PM regeneration is restarted automatically (DPNR/DPF Status Reju(PM) displays "Operate") when the exhaust gas temperature is increased by driving with a high engine speed driving.
-
If the cumulative time of DPNR/DPF Status Reju(PM) at "Operate" exceeds 35 minutes, the Active Test will be canceled. In this case, the DPNR/DPF Status Reju(PM) turns to "Ready" and the Active Test / Activate the DPF Rejuvenate (PM) will be prohibited for one hour while engine running. Thus, perform the Active Test again after running the engine for one hour.
DPNR/DPF Status Reju(PM) (Reference) GTS Display Status Standby Before entering "Activate the DPF Rejuvenate (PM)" Ready Enabling condition for "Activate the DPF Rejuvenate (PM)" is not sufficient Operate
-
PM regeneration is being performed.
-
If "Activate the DPF Rejuvenate (PM)" is not finished completely, the status turns to "Ready".
For example, if the vehicle idles for more than 3 minutes while the PM regeneration is being performed, the exhaust gas temperature falls to outside of enabling condition and PM regeneration is stopped.
-
If "Activate the DPF Rejuvenate (PM)" is finished completely, the status turns to "Compl".
Compl PM regeneration is completed (Amount of PM is 0 g) -
-
Read the values of the Data List / Exhaust Temperature B1S2 in the Snapshot Review function.
Standard DPNR/DPF Status Reju(PM) is "Compl" and Exhaust Temperature B1S2 is 570°C (1058°F) or higher during PM regeneration. Result Proceed to OK NG
NG
GO TO STEP 21 Click here
OK
-
-
PERFORM ACTIVE TEST USING GTS (SECOND TIME OF ACTIVATE THE DPF REJUVENATE (PM))
-
Connect the GTS to the DLC3.
-
Turn the ignition switch to ON.
-
Turn the GTS on.
-
Start the engine.
-
Clear the DTCs.
Powertrain > Engine and ECT > Clear DTCs -
Enter the following menus: Powertrain / Engine and ECT / Active Test / Activate the DPF Rejuvenate (PM) / Data List / MAF, Exhaust Temperature B1S1, Exhaust Temperature B1S2, DPF Differential Pressure and DPNR/DPF Status Reju(PM).
Powertrain > Engine and ECT > Active TestActive Test Display Activate the DPF Rejuvenate (PM) Data List Display MAF Exhaust Temperature B1S1 Exhaust Temperature B1S2 DPF Differential Pressure DPNR/DPF Status Reju(PM) Tech Tips
After clearing DTCs, immediately enter the Active Test and then drive the vehicle.
-
Perform the Active Test and then drive the vehicle at a constant engine speed of 2500 to 3000 rpm or more (If DPF Differential Pressure judgment will be performed in the following step, then to keep the MAF at 30 gm/sec or more, use a higher engine rpm range than normal) (shift position: 3rd gear) at a vehicle speed between 65 to 100 km/h (40 to 62 mph).
CAUTION:
When performing the confirmation driving pattern, obey all speed limits and traffic laws.
Tech Tips
While the Active Test being performed, the accelerator pedal opening angle should be kept as constant as possible.
-
Confirm that both Exhaust Temperature B1S1 and Exhaust Temperature B1S2 reach 250°C (482°F) or higher and the DPNR/DPF Status Reju(PM) turns from "Ready" to "Operate".
Tech Tips
-
If the exhaust gas temperature does not reach the specified value, drive the vehicle again with a constant engine speed of 2500 to 3000 rpm or more (shift position: 3rd gear) at a vehicle speed between 65 to 100 km/h (40 to 62 mph).
-
Perform the Active Test until the DPNR/DPF Status Reju(PM) displays "Compl".
-
-
Take a snapshot with the GTS when the Exhaust Temperature B1S1 and Exhaust Temperature B1S2 rise and become stable.
Result Proceed to NEXT
NEXT
-
-
READ VALUE USING GTS (DPF DIFFERENTIAL PRESSURE)
-
In the snapshot recorded in Step 19, check the DPF Differential Pressure, MAF and Exhaust Temperature B1S2 values during regeneration (DPNR/DPF Status Reju (PM) is "Operate").
-
Check that "DPNR/DPF Status Reju (PM)" is "Compl" (Forced regeneration is complete).
-
Change the snapshot data to graph display.
-
Select from the parameter list "DPF Differential Pressure", "MAF" and "Exhaust Temperature B1S2".
-
Select graph type to be "Line" and select 2 sec/div for scale.
-
Read the DPF Differential Pressure value from a point during forced regeneration, as close as possible to completion, where the MAF has stabilized at a value of 30 gm/sec or more, and the Exhaust Temperature B1S2 value is approximately 610°C (1130°F).
-
Check that the DPF Differential Pressure value does not exceed the value in the table.
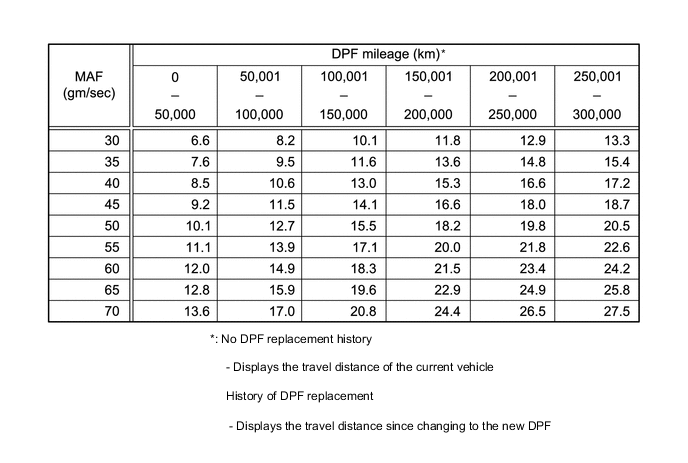
Tech Tips
Read the standard value for DPF Differential Pressure from DPF mileage and MAF values.
Standard DPF Differential Pressure value is less than or equal to the standard value. Result Proceed to OK NG
-
OK
GO TO STEP 23 Click here
NG
-
-
REPLACE NO. 2 EXHAUST MANIFOLD
-
Replace the No. 2 exhaust manifold.
Result Proceed to NEXT
NEXT
-
-
PERFORM INITIALIZATION
-
Clear the DPF deterioration record using the GTS.
Result Proceed to NEXT
NEXT
-
-
CONFIRM WHETHER MALFUNCTION HAS BEEN SUCCESSFULLY REPAIRED
-
Connect the GTS to the DLC3.
-
Turn the ignition switch to ON.
-
Turn the GTS on.
-
Clear the DTCs.
Powertrain > Engine and ECT > Clear DTCs -
Start the engine and warm it up until the engine coolant temperature reaches 75°C (167°F) or higher.
-
Drive the vehicle at a constant engine speed of 2000 rpm or more (shift position: 3rd gear) at a vehicle speed between 65 to 100 km/h (40 to 62 mph) for 5 minutes.
CAUTION:
When performing the confirmation driving pattern, obey all speed limits and traffic laws.
-
Enter the following menus: Powertrain / Engine and ECT / Trouble Codes.
-
Confirm that the DTC is not output again.
Powertrain > Engine and ECT > Trouble CodesResult Proceed to NEXT
NEXT
END
-