INSTRUMENT PANEL SPEAKER INSTALLATION
PROCEDURE
-
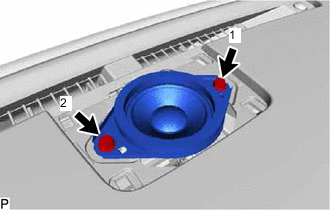
INSTALL FRONT NO. 3 SPEAKER ASSEMBLY
-
Connect the connector.
-
Align the guides of the speaker with the concave portions of the instrument panel and set the speaker on the panel.
-
Install the front No. 3 speaker assembly with the 2 screws.
Note
-
Do not touch the cone of the speaker.
-
When installing the speaker, make sure that the wire harness does not get caught between the speaker and instrument panel.
-
-
-
INSTALL NO. 1 SPEAKER OPENING COVER ASSEMBLY
-
INSTALL FRONT NO. 2 SPEAKER ASSEMBLY
-
Connect the connector.
-
Align the guides of the speaker with the concave portions of the instrument panel and set the speaker on the panel.
-
Install the front No. 2 speaker assembly with the 2 screws.
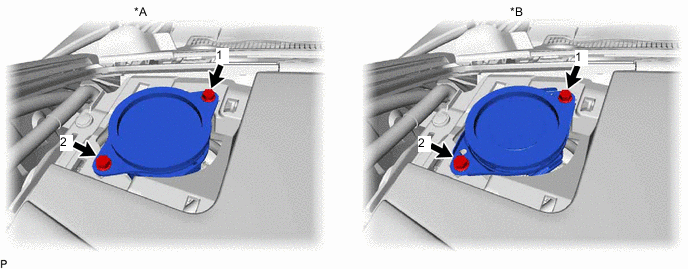
Text in Illustration *A w/o Mark Levinson Speaker System *B w/ Mark Levinson Speaker System Note
-
Do not touch the cone of the speaker.
-
When installing the speaker, make sure that the wire harness does not get caught between the speaker and instrument panel.
Tech Tips
-
Tighten the screws in the order shown in the illustration.
-
Use the same procedure for the RH and LH sides.
-
The procedure listed above is for the RH side.
-
-
-
INSTALL NO. 2 INSTRUMENT PANEL SPEAKER PANEL SUB-ASSEMBLY
-
INSTALL FRONT PILLAR GARNISH LH
-
INSTALL FRONT DOOR OPENING TRIM COVER LH
-
INSTALL REAR DOOR SCUFF PLATE LH
-
CONNECT CABLE TO NEGATIVE AUXILIARY BATTERY TERMINAL
Note
When disconnecting the cable, some systems need to be initialized after the cable is reconnected Click here.
-
INSTALL LUGGAGE COMPARTMENT TRIM COVER LH
-
INSTALL LUGGAGE COMPARTMENT FLOOR MAT