REAR SEAT INNER BELT ASSEMBLY INSTALLATION
PROCEDURE
-
INSTALL REAR SEAT INNER WITH CENTER BELT ASSEMBLY LH
-
Attach the guide.
-
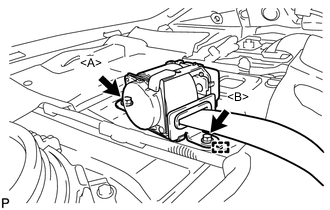
Temporarily install the rear seat inner with center belt assembly LH with the 2 bolts.
-
Fully tighten the bolt <A> first, then the bolt <B> to install the rear seat inner with center belt assembly LH.
- Torque:
- Bolt <A>
- 42 N*m { 428 kgf*cm, 31 ft.*lbf }
- Bolt <B>
- 7.5 N*m { 76 kgf*cm, 66 in.*lbf }
-
-
INSTALL REAR SEAT INNER WITH CENTER BELT ASSEMBLY RH
-
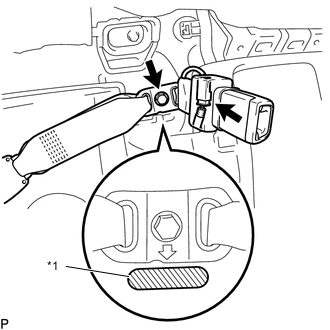
Text in Illustration *1 Protruding Part Install the rear seat inner with center belt assembly RH with the bolt.
- Torque:
- 42 N*m { 428 kgf*cm, 31 ft.*lbf }
Note
Do not allow the anchor part of the rear seat inner with center belt assembly RH to overlap onto the protruding parts of the floor panel.
-
-
INSTALL PACKAGE TRAY TRIM PANEL ASSEMBLY
-
w/o Rear Sunshade:
-
Pass the 3 rear seat belt floor anchors through the package tray trim panel assembly.
-
Insert the package tray trim panel assembly into the 5 guides and attach the 4 clips to install the package tray trim panel assembly.
-
Connect the center stop light assembly connector.
-
Attach the 4 claws to install the center stop light cover.
-
-
w/ Rear Sunshade:
-
Pass the 3 rear seat belt floor anchors through the package tray trim panel assembly.
-
Insert the package tray trim panel assembly into the rear window shade assembly and attach the 4 clips to install the package tray trim panel assembly.
-
-
Attach the 4 claws to install the belt guide of rear seat inner with center belt assembly LH to the package tray trim panel assembly.
-
Attach the 4 claws to install the 2 rear seat shoulder belt hole covers to the package tray trim panel assembly.
-
Attach the 4 claws to install the 3 child restraint tether anchor covers.
-
-
INSTALL INNER ROOF SIDE GARNISH LH
-
INSTALL INNER ROOF SIDE GARNISH RH
-
INSTALL REAR SEAT SIDE GARNISH LH
-
INSTALL REAR SEAT SIDE GARNISH RH
-
INSTALL REAR DOOR SCUFF PLATE LH
-
INSTALL REAR DOOR SCUFF PLATE RH
-
INSTALL BENCH TYPE REAR SEATBACK ASSEMBLY
-
INSTALL REAR SEAT CENTER HEADREST ASSEMBLY
-
INSTALL REAR SEAT HEADREST ASSEMBLY
-
INSTALL BENCH TYPE REAR SEAT CUSHION ASSEMBLY
-
CONNECT CABLE TO NEGATIVE AUXILIARY BATTERY TERMINAL
Note
When disconnecting the cable, some systems need to be initialized after the cable is reconnected Click here.
-
INSPECT SRS WARNING LIGHT
-
INSPECT REAR SEAT HEATER SYSTEM (w/ Seat Heater System)
-
INSTALL LUGGAGE COMPARTMENT TRIM COVER LH
-
INSTALL LUGGAGE COMPARTMENT FLOOR MAT