COMPRESSOR(for 2ZR-FXE) REMOVAL
PROCEDURE
-
PRECAUTION
Note
After turning the power switch off, waiting time may be required before disconnecting the cable from the negative (-) battery terminal. Therefore, make sure to read the disconnecting the cable from the negative (-) battery terminal notices before proceeding with work Click here.
-
RECOVER REFRIGERANT FROM AIR CONDITIONING SYSTEM (for HFC-134a(R134a))
-
RECOVER REFRIGERANT FROM AIR CONDITIONING SYSTEM (for HFO-1234yf(R1234yf))
-
REMOVE REAR NO. 2 FLOOR BOARD
-
REMOVE REAR DECK FLOOR BOX
-
REMOVE REAR NO. 3 FLOOR BOARD
-
REMOVE DECK FLOOR BOX RH
-
REMOVE REAR FLOOR BOARD UPPER NO. 3 PLATE
-
DISCONNECT CABLE FROM NEGATIVE BATTERY TERMINAL
Note
When disconnecting the cable, some systems need to be initialized after the cable is reconnected Click here.
-
REMOVE RADIATOR SUPPORT OPENING COVER
-
REMOVE SERVICE PLUG GRIP
-
REMOVE INVERTER COVER
-
CHECK TERMINAL VOLTAGE
-
INSTALL INVERTER COVER
-
REMOVE WATER HOSE HOSE CLAMP
-
REMOVE INLET AIR CLEANER
-
DISCONNECT COOLER REFRIGERANT DISCHARGE HOSE
-
Remove the bolt and disconnect the cooler refrigerant discharge hose from the electric inverter compressor.
-
Remove the O-ring from the cooler refrigerant discharge hose.
Note
Seal the openings of the disconnected parts using vinyl tape to prevent entry of moisture and foreign matter.
-
-
DISCONNECT COOLER REFRIGERANT SUCTION HOSE
-
Remove the bolt and disconnect the cooler refrigerant suction hose from the electric inverter compressor.
-
Remove the O-ring from the cooler refrigerant suction hose.
Note
Seal the openings of the disconnected parts using vinyl tape to prevent entry of moisture and foreign matter.
-
-
REMOVE ELECTRIC INVERTER COMPRESSOR
-

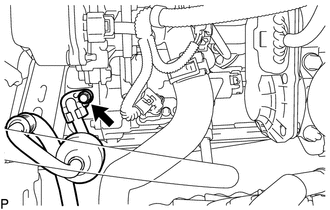
Text in Illustration *1 Green-colored Lock Using a screwdriver, slide the green-colored lock of the connector <A> in the direction indicated by the arrow in the illustration to release it and disconnect the connector.
CAUTION:
Make sure to wear insulating gloves.
Note
Insulate the removed terminals and connector with insulating tape.
-
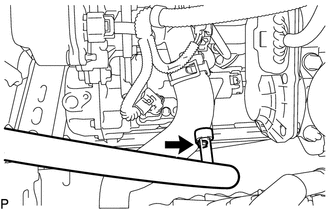
Disconnect the connector <B>.
-
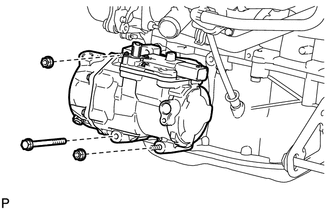
Remove the bolt and 2 nuts.
-

Using an E8 "TORX" socket wrench, remove the 2 stud bolts.
-
Remove the electric inverter compressor.
-