AIR CONDITIONING UNIT(for Rear Side) INSTALLATION
CAUTION / NOTICE / HINT
Tech Tips
A bolt without a torque specification is shown in the standard bolt chart Click here.
PROCEDURE
-
INSTALL REAR COOLING UNIT ASSEMBLY
-
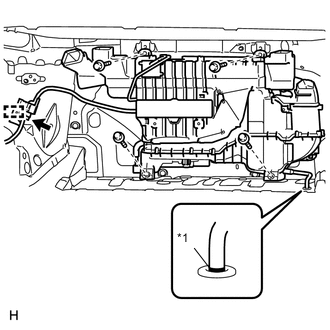
Text in Illustration *1 Marking Install the rear cooling unit assembly with the 4 bolts.
- Torque:
- 9.8 N*m { 100 kgf*cm, 87 in.*lbf }
Note
When installing the drain hose, make sure the marking is as shown in the illustration.
-
Connect the clamp and connector.
-
-
CONNECT AIR CONDITIONING TUBE AND ACCESSORY ASSEMBLY
-
Sufficiently apply compressor oil to 2 new O-rings and the fitting surface of the tube.
Compressor oil ND-OIL 8 or equivalent -
Install the 2 O-rings to the air conditioning tube and accessory assembly.
-
Connect the air conditioning tube and accessory with the 2 bolts.
- Torque:
- 9.8 N*m { 100 kgf*cm, 87 in.*lbf }
-
Attach the 3 claws to install the cover.
-
-
INSTALL NO. 2 COOLER AIR DUCT
-
Attach the 3 claws to install the No. 2 cooler air duct.
-
-
INSTALL NO. 1 COOLER AIR DUCT
-
Attach the 2 claws to install the No. 1 cooler air duct.
-
-
INSTALL REAR NO. 4 AIR DUCT
-
Attach the 4 claws to install the rear No. 4 air duct.
-
-
INSTALL REAR NO. 5 AIR DUCT
-
Attach the 4 claws to install the rear No. 5 air duct.
-
-
INSTALL ROOF SIDE NO. 2 AIR DUCT LH
-
Attach the 2 claws to install the roof side No. 2 air duct LH.
-
Install the clip.
-
-
INSTALL ROOF SIDE NO. 2 AIR DUCT RH
-
Attach the 2 claws to install the roof side No. 2 air duct RH.
-
Install the clip.
-
-
INSTALL LUGGAGE COMPARTMENT TRIM COVER ASSEMBLY LH
-
INSTALL LUGGAGE COMPARTMENT TRIM COVER ASSEMBLY RH
-
INSTALL REAR FLOOR FINISH PLATE
-
INSTALL FRONT LUGGAGE COMPARTMENT TRIM COVER
-
INSTALL NO. 1 LUGGAGE COMPARTMENT LIGHT ASSEMBLY
-
INSTALL DECK TRIM SIDE BOARD LH
-
INSTALL DECK TRIM SIDE BOARD RH
-
INSTALL ROPE HOOK
-
INSTALL ROPE HOOK ASSEMBLY
-
INSTALL LUGGAGE COMPARTMENT MAT SUB-ASSEMBLY
-
INSTALL NO. 1 COOLER COVER
-
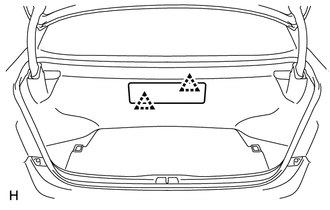
Attach the 2 clips to install the No. 1 cooler cover.
-
-
INSTALL PACKAGE TRAY TRIM PANEL ASSEMBLY
-
INSTALL INNER ROOF SIDE GARNISH LH
-
INSTALL INNER ROOF SIDE GARNISH RH
-
INSTALL REAR SEAT SIDE GARNISH LH
-
INSTALL REAR SEAT SIDE GARNISH RH
-
INSTALL REAR DOOR SCUFF PLATE LH
-
INSTALL REAR DOOR SCUFF PLATE RH
-
INSTALL REAR SEAT ASSEMBLY
for Power Seat: Click here
for Ottoman: Click here
-
CONNECT CABLE TO NEGATIVE BATTERY TERMINAL
Note
When disconnecting the cable, some systems need to be initialized after the cable is reconnected Click here.
-
INSTALL COWL TOP VENTILATOR LOUVER RH
-
ADD COMPRESSOR OIL
-
CHARGE REFRIGERANT
-
WARM UP ENGINE
-
CHECK FOR LEAKAGE OF REFRIGERANT
-
CHECK SRS WARNING LIGHT