REAR SEAT OUTER BELT ASSEMBLY REMOVAL

PROCEDURE
-
PRECAUTION
Note
After turning the engine switch off, waiting time may be required before disconnecting the cable from the battery terminal. Therefore, make sure to read the disconnecting the cable from the battery terminal notice before proceeding with work Click here.
-
REMOVE COWL TOP VENTILATOR LOUVER RH
-
DISCONNECT CABLE FROM NEGATIVE BATTERY TERMINAL
CAUTION:
Wait at least 90 seconds after disconnecting the cable from the negative (-) battery terminal to prevent airbag and seat belt pretensioner activation.
Note
When disconnecting the cable, some systems need to be initialized after the cable is reconnected Click here.
-
REMOVE REAR SEAT CUSHION ASSEMBLY LH
-
for Power Seat:
-
for Ottoman:
-
-
REMOVE REAR SEAT CUSHION ASSEMBLY RH
-
for Power Seat:
-
for Ottoman:
-
-
REMOVE REAR SEAT CUSHION ASSEMBLY (for Fixed Seat Type)
-
REMOVE REAR CENTER SEAT CUSHION ASSEMBLY
-
for Power Seat:
-
for 5-Passenger with Ottoman:
-
-
DISCONNECT REAR SEAT 3 POINT TYPE BELT ASSEMBLY LH
-
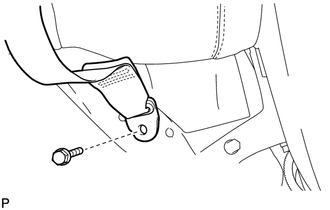
Remove the bolt and disconnect the anchor part of the rear seat 3 point type belt assembly LH.
-
-
DISCONNECT REAR SEAT 3 POINT TYPE BELT ASSEMBLY RH
Tech Tips
Use the same procedures described for the LH side
-
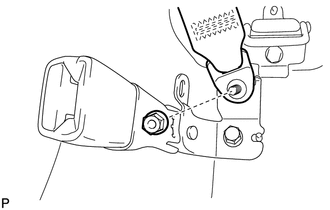
DISCONNECT REAR SEAT OUTER BELT ASSEMBLY CENTER

-
for Power Seat, 5-Passenger with Ottoman:
Remove the nut and disconnect the anchor part of the rear seat outer belt assembly center.
-
for Fixed Seat Type:
Remove the nut and disconnect the anchor part of the rear seat outer belt assembly center.
-
-
REMOVE REAR SEAT LOWER CONSOLE BOX COVER (for 4-Passenger with Ottoman)
-
REMOVE REAR SEAT CONSOLE BOX ASSEMBLY (for 4-Passenger with Ottoman)
-
REMOVE REAR SEATBACK ASSEMBLY LH
-
for Power Seat:
-
for Ottoman:
-
-
REMOVE REAR SEATBACK ASSEMBLY RH
-
for Power Seat:
-
for Ottoman:
-
-
REMOVE REAR SEATBACK ASSEMBLY (for Fixed Seat Type)
-
REMOVE REAR SEAT CENTER ARMREST ASSEMBLY
-
for Power Seat:
-
for 5-Passenger with Ottoman:
-
-
REMOVE REAR DOOR SCUFF PLATE LH
-
for Standard Body:
-
for Long Body:
-
-
REMOVE REAR DOOR SCUFF PLATE RH
-
for Standard Body:
-
for Long Body:
-
-
REMOVE REAR SEAT SIDE GARNISH LH
-
REMOVE REAR SEAT SIDE GARNISH RH
-
REMOVE INNER ROOF SIDE GARNISH LH
-
REMOVE INNER ROOF SIDE GARNISH RH
-
REMOVE PACKAGE TRAY TRIM PANEL ASSEMBLY
-
REMOVE ROOF SIDE NO. 2 AIR DUCT LH (w/ Rear Cooler)
-
REMOVE ROOF SIDE NO. 2 AIR DUCT RH (w/ Rear Cooler)
-
REMOVE NO. 4 AIR DUCT REAR (w/ Rear Cooler)
-
REMOVE NO. 5 AIR DUCT REAR (w/ Rear Cooler)
-
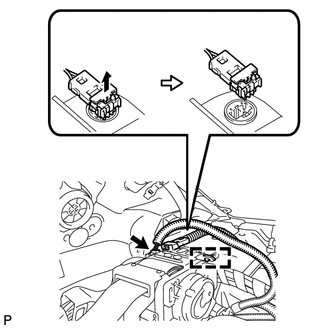
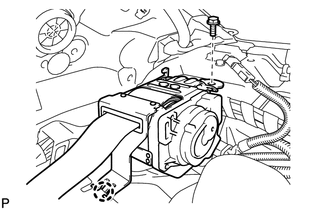
REMOVE REAR SEAT 3 POINT TYPE BELT ASSEMBLY LH
-
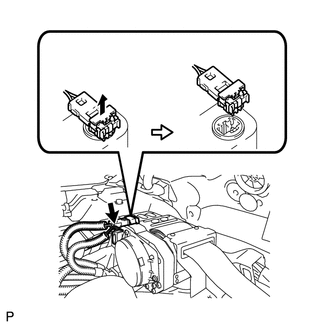
Using a screwdriver, pull out the locking button in the direction shown by the arrow in the illustration to release the lock, and disconnect the pretensioner connector as shown in the illustration.
Tech Tips
Tape the screwdriver tip before use.
-
w/ Tension Reducer System:
Disconnect the tension reducer connector.
-
Remove the bolt.
-
Detach the claw and remove the rear seat 3 point type belt assembly LH.
-
-
REMOVE REAR SEAT 3 POINT TYPE BELT ASSEMBLY RH
-
Using a screwdriver, pull out the locking button in the direction shown by the arrow in the illustration to release the lock, and disconnect the pretensioner connector as shown in the illustration.
Tech Tips
Tape the screwdriver tip before use.
-
Detach the wire harness clamp.
-
w/ Tension Reducer System:
Disconnect the tension reducer connector.
-
Remove the bolt.
-
Detach the claw and remove the rear seat 3 point type belt assembly RH.
-
-
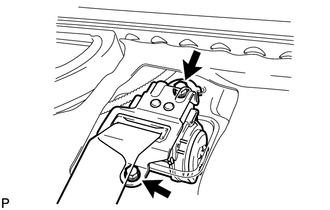
REMOVE REAR SEAT OUTER BELT ASSEMBLY CENTER
-
Remove the 2 bolts and rear seat outer belt assembly center.
-