MULTI-DISPLAY INSTALLATION
CAUTION / NOTICE / HINT
Tech Tips
-
Use the same procedure for RHD and LHD vehicles.
-
The procedure listed below is for LHD vehicles.
-
A bolt without a torque specification is shown in the standard bolt chart Click here.
PROCEDURE
-
INSTALL NO. 1 COMBINATION METER BRACKET
-
Install the accessory meter bracket with the 2 bolts.
-
-
INSTALL ACCESSORY METER ASSEMBLY
-
Connect all the connectors.
-
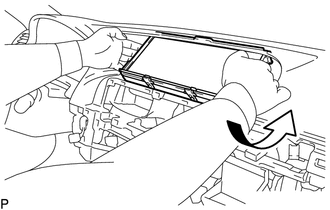
Move the accessory meter assembly in the direction of the arrow in the illustration to temporarily install it.
-
Install the accessory meter assembly with the 4 bolts.
-
-
INSTALL INSTRUMENT PANEL FINISH PANEL SUB-ASSEMBLY
-
INSTALL INSTRUMENT CLUSTER FINISH PANEL GARNISH ASSEMBLY
-
INSTALL MULTI-MEDIA MODULE RECEIVER ASSEMBLY
-
INSTALL LOWER NO. 1 INSTRUMENT PANEL FINISH PANEL
-
INSTALL LOWER NO. 2 INSTRUMENT PANEL FINISH PANEL
-
INSTALL UPPER CONSOLE PANEL SUB-ASSEMBLY
-
INSTALL UPPER INSTRUMENT CLUSTER FINISH PANEL
-
INSTALL UPPER REAR CONSOLE PANEL SUB-ASSEMBLY
-
INSTALL NO. 3 BOX PANEL
-
INSTALL SHIFT LEVER KNOB SUB-ASSEMBLY
-
INSTALL INSTRUMENT PANEL FINISH PANEL END RH
-
INSTALL INSTRUMENT PANEL FINISH PANEL END LH
-
CONNECT CABLE TO NEGATIVE BATTERY TERMINAL
Note
When disconnecting the cable, some systems need to be initialized after the cable is reconnected Click here
-
INSTALL COWL TOP VENTILATOR LOUVER RH