REAR SHOCK ABSORBER INSTALLATION

CAUTION / NOTICE / HINT
Tech Tips
-
Use the same procedures for the RH side and LH side.
-
The procedures listed below are for the LH side.
-
A bolt without a torque specification is shown in the standard bolt chart Click here.
PROCEDURE
-
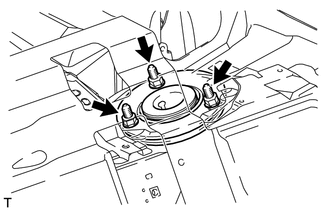
TEMPORARILY INSTALL REAR SHOCK ABSORBER ASSEMBLY LH
-
Install the rear shock absorber on the vehicle by installing the 3 nuts on the suspension support side.
- Torque:
- 64 N*m { 653 kgf*cm, 47 ft.*lbf }
Note
When installing the shock absorber, make sure the lower coil spring bottom tip is on the vehicle's front side.
-
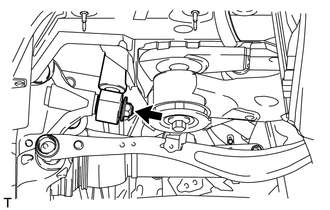
Temporarily install the rear shock absorber lower side with a new nut and washer to the axle carrier.
-
Tighten the new lock nut.
- Torque:
- 27 N*m { 275 kgf*cm, 20 ft.*lbf }
-
-
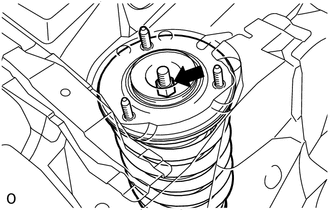
INSTALL REAR SHOCK ABSORBER CAP LH
-
Install the cap with the 3 nuts to the shock absorber.
- Torque:
- 14 N*m { 143 kgf*cm, 10 ft.*lbf }
-
-
CONNECT TOE CONTROL LINK SUB-ASSEMBLY LH
-
CONNECT REAR UPPER NO. 2 CONTROL ARM ASSEMBLY LH
-
CONNECT REAR UPPER NO. 1 CONTROL ARM ASSEMBLY LH
-
STAKE REAR AXLE SHAFT NUT LH
-
INSTALL LOAD SENSING VALVE SENSOR BRACKET
-
INSTALL REAR SPEED SENSOR LH
-
INSTALL PACKAGE TRAY TRIM PANEL ASSEMBLY
-
INSTALL REAR WHEEL HOUSE LINER LH
-
Install the liner with the 3 screws, 11 nuts, 2 clips to the vehicle side.
-
-
INSTALL NO. 6 ROCKER PANEL MOULDING PROTECTOR
-
INSTALL REAR SEAT ASSEMBLY
-
for Power Seat:
-
for Ottoman:
-
for Fixed Seat Type:
-
-
STABILIZE SUSPENSION
-
Install the rear tires.
- Torque:
- 140 N*m { 1428 kgf*cm, 103 ft.*lbf }
-
Lower the vehicle and bounce it up and down several times to stabilize the rear suspension.
-
Remove the rear tires.
-
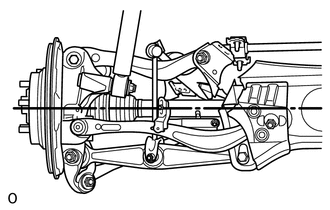
Jack up the axle carrier with a wooden block between the jack and axle carrier. Apply a load to the rear suspension so that the rear drive shaft assembly becomes level.
-
-
TIGHTEN REAR SHOCK ABSORBER ASSEMBLY LH
-
Tighten the nut on the axle carrier.
- Torque:
- 80 N*m { 816 kgf*cm, 59 ft.*lbf }
-
-
INSTALL REAR WHEEL
- Torque:
- 140 N*m { 1428 kgf*cm, 103 ft.*lbf }
-
INSPECT AND ADJUST REAR WHEEL ALIGNMENT
-
Inspect and adjust the rear wheel alignment Click here.
-
-
CHECK SPEED SENSOR SIGNAL
-
Check the speed sensor signal Click here.
-
-
ADJUST HEADLIGHT ASSEMBLY
-
ADJUST OBJECT RECOGNITION CAMERA