DIFFERENTIAL CARRIER ASSEMBLY INSTALLATION

PROCEDURE
-
INSTALL REAR DIFFERENTIAL CARRIER ASSEMBLY
-
Place the rear differential carrier assembly on a transmission jack.
CAUTION:
-
As the rear differential carrier assembly is very heavy, securely support it with the transmission jack.
-
Perform this procedure with several people supporting the rear differential carrier assembly so that it does not tilt or fall.
-
-
Slowly raise the transmission jack so that the rear differential carrier is at its installation position.
Note
When installing the rear differential carrier assembly, do not damage the installation surface.
-
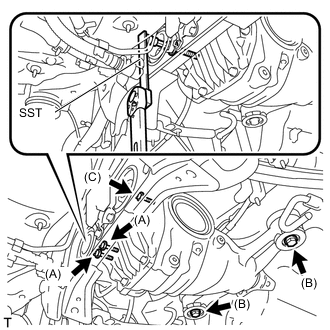
Temporarily install the mount stopper upper and lower with 2 new bolts (B).
-
Temporarily install 2 new bolts (A).
-
Temporarily install a new bolt (C).
-
Using SST and a 12 mm socket hexagon wrench, tighten the 2 bolts (A).
- SST
- 09249-63010
- Torque:
- without SST
- 103 N*m { 1050 kgf*cm, 76 ft.*lbf }
- with SST
- 75 N*m { 764 kgf*cm, 55 ft.*lbf }
Note
-
Use a torque wrench with a fulcrum length of 400 mm (16 in.). When using a torque wrench with a fulcrum length that is not 400 mm (16 in.), calculate the torque specification for the torque wrench and SST based on the "without SST" torque specification Click here.
-
Make sure SST and the wrench are connected in a straight line.
-
Tighten the bolts so that they do not interfere with the bolt holes of the mount cushions.
-
Using SST and a 12 mm socket hexagon wrench, tighten the bolt (C).
- SST
- 09249-63010
- Torque:
- without SST
- 103 N*m { 1050 kgf*cm, 76 ft.*lbf }
- with SST
- 75 N*m { 764 kgf*cm, 55 ft.*lbf }
Note
-
Use a torque wrench with a fulcrum length of 400 mm (16 in.). When using a torque wrench with a fulcrum length that is not 400 mm (16 in.), calculate the torque specification for the torque wrench and SST based on the "without SST" torque specification Click here.
-
Make sure SST and the wrench are connected in a straight line.
-
Tighten the bolts so that they do not interfere with the bolt holes of the mount cushions.
-
Tighten the 2 bolts (B).
- Torque:
- 105 N*m { 107 kgf*cm, 77 ft.*lbf }
Note
Make sure that the mount stop upper and lower are not shifted or tilted.
-
-
INSTALL REAR DRIVE SHAFT ASSEMBLY RH
-
INSTALL PROPELLER WITH CENTER BEARING SHAFT ASSEMBLY
-
ADD DIFFERENTIAL OIL
-
CHECK DIFFERENTIAL OIL
-
INSTALL REAR WHEEL
- Torque:
- 140 N*m { 1428 kgf*cm, 103 ft.*lbf }
-
CONNECT CABLE TO NEGATIVE BATTERY TERMINAL
-
INSTALL COWL TOP VENTILATOR LOUVER
-
for 1UR-FSE:
-
for 1UR-FE:
-
-
CHECK SUSPENSION CONTROL SYSTEM (for Air Suspension)
-
INSPECT AND ADJUST REAR WHEEL ALIGNMENT
-
CHECK ABS SPEED SENSOR SIGNAL
-
PERFORM INITIALIZATION
Note
Certain systems need to be initialized after disconnecting and reconnecting the cable from the negative (-) battery terminal Click here.
-
VEHICLE PREPARATION FOR HEADLIGHT AIMING ADJUSTMENT
-
PREPARATION FOR HEADLIGHT AIMING (Using a screen)
-
HEADLIGHT AIMING INSPECTION
-
HEADLIGHT AIMING ADJUSTMENT
-
ADJUST OBJECT RECOGNITION CAMERA