ELECTRIC PARKING BRAKE ACTUATOR INSTALLATION
PROCEDURE
-
INSTALL PARKING BRAKE ACTUATOR SUPPORT BRACKET
-
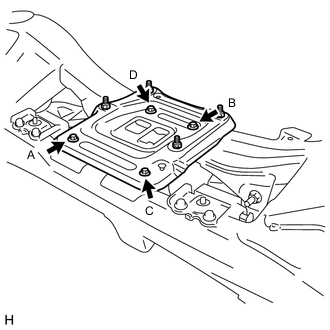
Install the parking brake actuator support bracket with the 4 bolts. Tighten the 4 bolts uniformly in alphabetical order.
- Torque:
- 35 N*m { 357 kgf*cm, 26 ft.*lbf }
-
-
INSTALL PARKING BRAKE WITH CABLE ACTUATOR ASSEMBLY
-

Install the actuator with the 4 nuts. Tighten the 4 nuts uniformly in alphabetical order.
- Torque:
- 25 N*m { 255 kgf*cm, 18 ft.*lbf }
Note
When handling the parking brake cable or emergency release cable, do not excessively bend or twist them. Be careful not to damage the cable or boot when installing the actuator.
-
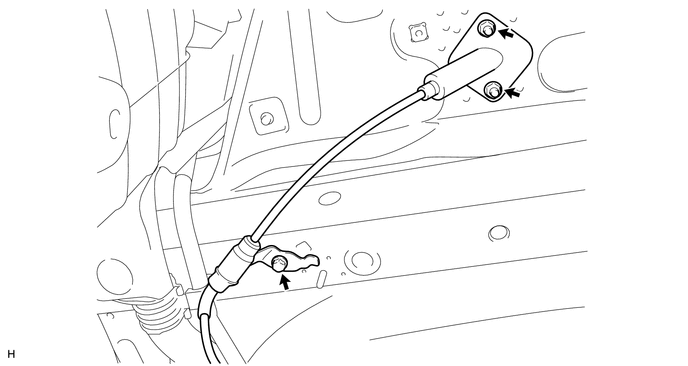
Install the 2 clamps with the 2 bolts.
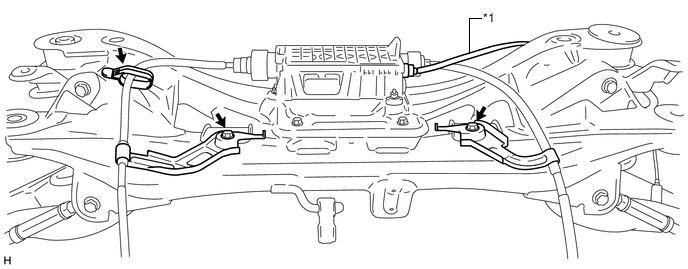
Text in Illustration *1 Emergency Release Cable - - - Torque:
- 35 N*m { 357 kgf*cm, 26 ft.*lbf }
Note
Make sure the emergency release cable is above the cable LH as shown in the illustration when installing the clamp to the suspension member.
-
Connect the clamp to the rear suspension member.
-
-
INSTALL REAR SUSPENSION MEMBER SUB-ASSEMBLY
-
Install the rear suspension member sub-assembly Click here.
-
-
CONNECT PARKING BRAKE CABLE AND EMERGENCY RELEASE CABLE
-
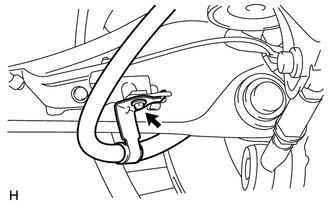
Install the clamp to the trailing arm RH with the bolt.
- Torque:
- 6.0 N*m { 61 kgf*cm, 53 in.*lbf }
-
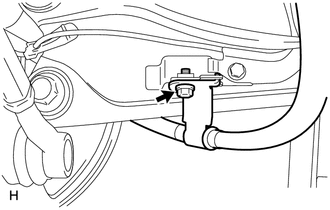
Install the clamp to the trailing arm LH with the bolt.
- Torque:
- 6.0 N*m { 61 kgf*cm, 53 in.*lbf }
-
Install the casing cap with the 2 nuts.
- Torque:
- 9.0 N*m { 92 kgf*cm, 80 in.*lbf }
Note
Be careful not to damage the casing cap gasket when installing the casing cap.
-
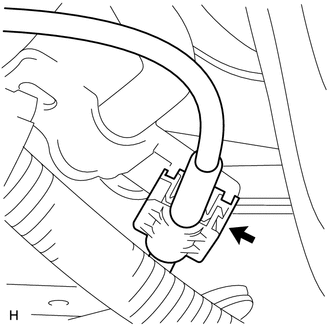
Install the clamp with the bolt.
- Torque:
- 6.0 N*m { 61 kgf*cm, 53 in.*lbf }
-
Install a new clamp.
Note
Make sure that the clamp contacts the clamp ring on the cable.
-
-
INSTALL REAR DISC LH
-
Install the rear disc LH Click here.
-
-
INSTALL REAR DISC RH
Tech Tips
Use the same procedure described for the LH side.
-
INSTALL NO. 2 UNDER FLOOR COVER
-
CONNECT CABLE TO NEGATIVE BATTERY TERMINAL
Note
When disconnecting the cable, some systems need to be initialized after the cable is reconnected Click here.
-
ADJUST BUILT-IN CLEARANCE
-
CANCEL PARKING BRAKE FULL RELEASE MODE
-
Turn the ignition switch to ON.
-
Press and hold the electric parking brake switch for 5 seconds to cancel parking brake full release mode.
-
-
INSTALL REAR WHEEL
- Torque:
- 103 N*m { 1050 kgf*cm, 76 ft.*lbf }
-
INSPECT FOR EXHAUST GAS LEAK (for 1AD-FTV)
-
INSPECT FOR EXHAUST GAS LEAK (for 2AD-FHV)
-
INSPECT FOR EXHAUST GAS LEAK (for 2AD-FTV)
-
INSPECT AND ADJUST REAR WHEEL ALIGNMENT
-
Inspect and adjust the rear wheel alignment Click here.
-
-
INSPECT SPEED SENSOR SIGNAL
-
Inspect the speed sensor signal Click here.
-
-
PERFORM CALIBRATION
-
Clear the electric parking brake ECU memory and perform yaw rate sensor and brake pedal stroke sensor (clutch pedal stroke sensor) zero point calibration Click here.
-
-
ADJUST HEADLIGHT ASSEMBLY
-
for Halogen Headlight:
Adjust headlight assembly Click here.
-
for HID Headlight:
Adjust headlight assembly Click here.
-