REAR DOOR SUNSHADE ASSEMBLY REMOVAL

Tech Tips
-
Use the same procedure for RHD and LHD vehicles.
-
The procedure listed below is for LHD vehicles.
-
Use the same procedure for the RH and LH sides.
-
The procedure listed below is for the LH side.
-
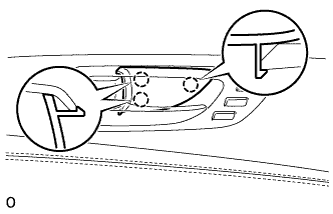
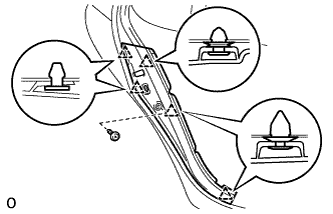
REMOVE COWL TOP VENTILATOR LOUVER
-

for LHD:
Remove the 6 clips and cowl top ventilator louver RH.
-

for RHD:
Remove the 6 clips and cowl top ventilator louver LH.
-
-
PRECAUTION
Note
After turning the engine switch off, waiting time may be required before disconnecting the cable from the negative (-) battery terminal. Therefore, make sure to read the disconnecting the cable from the negative (-) battery terminal notices before proceeding with work Click here.
-
DISCONNECT CABLE FROM NEGATIVE BATTERY TERMINAL
Note
When disconnecting the cable, some systems need to be initialized after the cable is reconnected Click here.
-
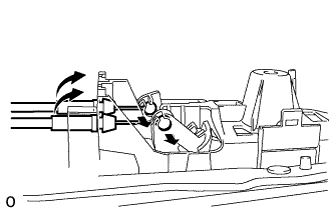
REMOVE REAR DOOR INSIDE HANDLE BEZEL PLUG LH
-
Using a screwdriver, detach the 3 claws and remove the rear door inside handle bezel plug LH.
Tech Tips
Tape the screwdriver tip before use.
-
-
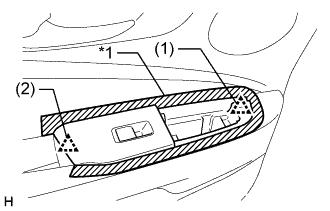
REMOVE REAR POWER WINDOW REGULATOR SWITCH ASSEMBLY LH
-
Apply protective tape to the area around the rear rear power window regulator switch assembly with rear door armrest base panel.
-
Using a clip remover, detach the 2 clips in the order shown in the illustration.
Text in Illustration *1 Protective Tape -
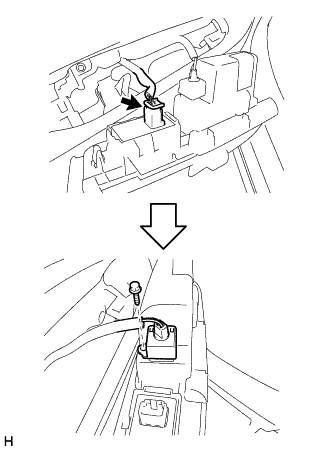
Disconnect the connector.
-
Remove the screw and illumination light.
-
Remove the rear rear power window regulator switch assembly with rear door armrest base panel.
-
-
REMOVE REAR DOOR TRIM BOARD SUB-ASSEMBLY LH
-
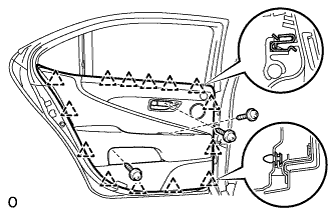
for Long Body:
-
Remove the 3 screws.
-
Detach the 14 clips.
Note
Do not use a tool to detach the clips of the rear door trim board sub-assembly LH.
-
Disconnect the 2 cables from the inside handle.
-
Disconnect the connectors and remove the rear door trim board sub-assembly LH.
-
-

for Standard Body:
-
Remove the 3 screws.
-
Detach the 12 clips.
Note
Do not use a tool to detach the clips of the rear door trim board sub-assembly LH.
-
Disconnect the 2 cables from the inside handle.
-
Disconnect the connectors and remove the rear door trim board sub-assembly LH.
-
-
-
REMOVE REAR DOOR TRIM COVER LH
-
Remove the cushion.
-
Using a clip remover, detach the 5 clips and remove the rear door trim cover LH.
-
-
REMOVE REAR DOOR FRAME GARNISH LH
-
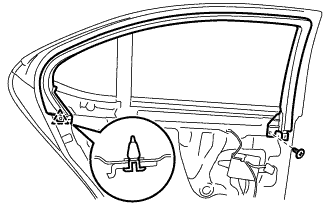
w/o Rear Door Sunshade:
-
Remove the screw and detach the clip.
-
Detach the claws and remove the rear door frame garnish LH.
-
-
w/ Rear Door Sunshade:
-
Detach the 2 clips.
-
Detach the claws and remove the rear door frame garnish LH.
-
-
-
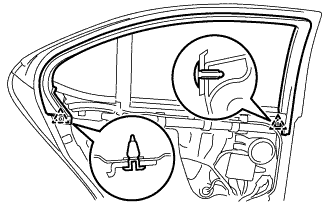
REMOVE REAR DOOR NO. 2 FRAME GARNISH LH
-

Text in Illustration *A w/o Rear Door Sunshade *B w/ Rear Door Sunshade Detach the claws and remove the rear door No. 2 frame garnish LH.
-
-
REMOVE REAR CURTAIN SUB-ASSEMBLY LH
-
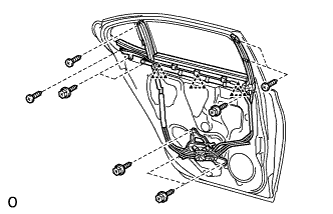
for Standard Body:
-
Remove the 10 screws.
-
Detach the 3 clips and remove the rear curtain sub-assembly LH.
-
Disconnect the connector
-
-
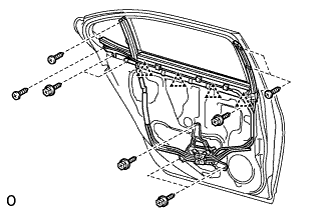
for Long Body:
-
Remove the 10 screws.
-
Detach the 4 clips and remove the rear curtain sub-assembly LH.
-
Disconnect the connector
-
-