AMPLIFIER ANTENNA INSTALLATION

-
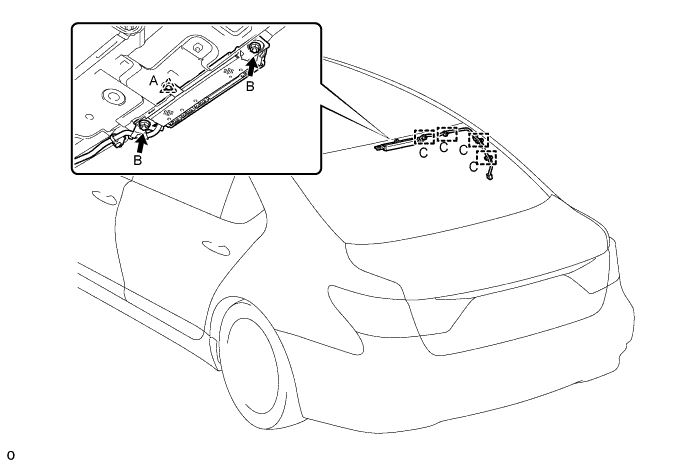
INSTALL AMPLIFIER ANTENNA ASSEMBLY NO.1
-
Use non-residue solvent to clean the area on the glass where the antenna will be installed.
Note
Do not use non-residue solvent to clean the antenna's contact points. Doing so may cause improper contact between the antenna and glass.
-
Install the antenna with the 2 nuts labeled B.
- Torque:
- 14 N*m { 143 kgf*cm, 10 ft.*lbf }
Note
-
Just before installing the antenna to the glass, remove the protective cover of the antenna's contact points.
-
When removing the protective cover of the antenna's contact points, make sure the cover does not touch the contact points.
-
Never touch the contact points after removing the protective cover.
Tech Tips
-
Remove the clip if it is damaged.
-
The clip is used when the vehicle is assembled at the factory and is not needed for the reinstallation.
-
Attach the 4 clamps labeled C.
-
Connect each connector.
-
-
INSTALL ROOF HEADLINING
-
Return the roof headlining to its original position.
for Standard Body:
Refer to the following procedures Click here.
for Long Body:
Refer to the following procedures Click here.
-
-
INSTALL REAR SEAT ASSEMBLY
-
for Power Seat:
-
for 4-Passenger with Ottoman:
-
for 5-Passenger with Ottoman:
-
for Fixed seat:
-
-
CONNECT CABLE TO NEGATIVE BATTERY TERMINAL
Note
When disconnecting the cable, some systems need to be initialized after the cable is reconnected Click here.
-
INSTALL COWL TOP VENTILATOR LOUVER RH
-

Install the 6 clips and cowl top ventilator louver RH.
Note
If the cowl top ventilator louver RH is not properly installed, water may leak into the engine room and cause malfunctions. Therefore, make sure the cowl top ventilator louver RH is installed properly.
-