HIGH INTENSITY DISCHARGE HEADLIGHT BULB INSTALLATION

Tech Tips
-
Use the same procedure for the RH side and LH side.
-
The procedure listed below is for the LH side.
-
INSTALL DISCHARGE HEADLIGHT BULB
-
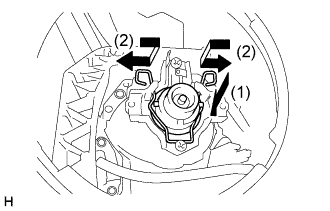
Set the discharge headlight bulb to the headlight unit.
-
Lock the set spring in the order shown in the illustration to install the discharge headlight bulb to the headlight unit.
Note
Do not touch the discharge headlight bulb glass.
-
-
INSTALL HEADLIGHT GASKET
-
Install a new headlight gasket to the headlight light control ECU sub-assembly.
-
-
INSTALL HEADLIGHT LIGHT CONTROL ECU SUB-ASSEMBLY
-
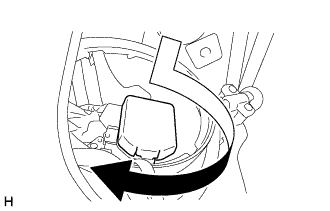
Turn the headlight light control ECU sub-assembly socket in the direction indicated by the arrow in the illustration to connect the headlight light control ECU sub-assembly socket.
Note
-
Check that the headlight gasket is installed on the headlight light control ECU sub-assembly.
-
Check that the headlight gasket is not damaged or contaminated with foreign matter. If there is any damage, replace the headlight gasket with a new one.
-
Do not pull the headlight light control ECU sub-assembly with the socket connected.
-
-
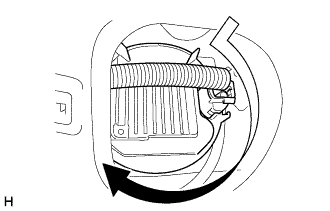
Turn the headlight light control ECU sub-assembly in the direction indicated by the arrow in the illustration to install the headlight light control ECU sub-assembly to the headlight unit.
-
Connect the connector.
-
Install the front fender liner LH with the 7 screws, 5 clips and 2 pin hold clips.
-
-
INSTALL FRONT FENDER WHEEL OPENING MOULDING LH
-
Attach the clip to install the moulding.
-
Install the 5 screws.
-
-
INSTALL FRONT WHEEL
- Torque:
- 140 N*m { 1428 kgf*cm, 103 ft.*lbf }
-
CONNECT CABLE TO NEGATIVE BATTERY TERMINAL
Note
When disconnecting the cable, some systems need to be initialized after the cable is reconnected Click here.
-
INSTALL COWL TOP VENTILATOR LOUVER RH
-

Install the 6 clips and cowl top ventilator louver RH.
Note
Be sure to install the cowl top ventilator louver RH properly. If it is not installed properly, water may enter the engine room and cause malfunctions.
-