CAMSHAFT TIMING CONTROL MOTOR INSTALLATION

-
INSTALL CAMSHAFT TIMING CONTROL WITH EDU MOTOR ASSEMBLY LH
-
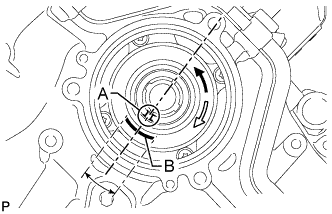
Turn the camshaft timing gear's eccentric shaft keyway part counterclockwise by hand and set it to the maximum retard angle.
Tech Tips
-
When the cam of the camshaft lifts the valve, the eccentric shaft becomes difficult to turn.
-
The position where the eccentric shaft stops is the maximum retard angle.
Note
When turning the eccentric shaft keyway part, do not use any tools as the keyway part may be damaged.
-
-
Turn the eccentric shaft clockwise until the groove labeled A and mark labeled B are aligned as shown in the illustration.
Tech Tips
Make sure that the groove labeled A is positioned as close as possible to the center of the mark labeled B.
-
Install a new O-ring to the timing chain cover.
-
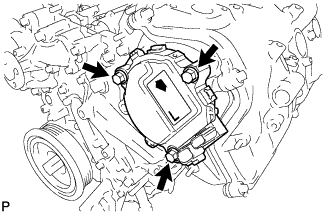
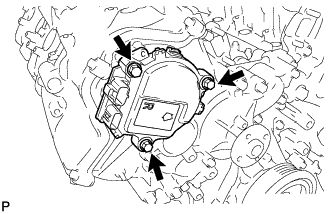
Align the joint of the camshaft timing control with EDU motor assembly LH and the keyway of the camshaft timing gear assembly, and install the camshaft timing control with EDU motor assembly LH with the 3 bolts.
- Torque:
- 21 N*m { 214 kgf*cm, 15 ft.*lbf }
Note
-
Do not allow foreign matter to contact the oil seal face of the camshaft timing control with EDU motor assembly LH (connecting surface with timing chain cover).
-
When installing the camshaft timing control with EDU motor assembly LH, do not use excessive force.
-
Do not drop the camshaft timing control with EDU motor assembly LH. If dropped, replace it.
-
Do not disassemble the camshaft timing control with EDU motor assembly LH. If disassembled, replace it.
Tech Tips
-
Check that [L] is printed on the label of the camshaft timing control with EDU motor assembly LH.
-
When installing the camshaft timing control with EDU motor assembly LH, be sure to align the timing chain cover knock pin with the camshaft timing control with EDU motor assembly LH pin hole.
-
Install the camshaft timing control with EDU motor assembly LH with the arrow facing upward.
-
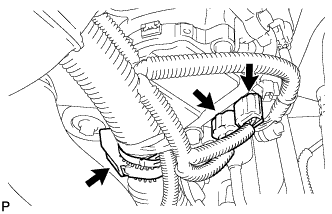
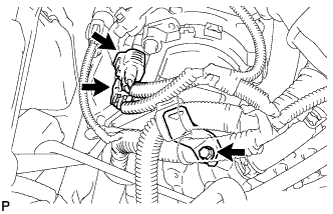
Connect the 2 camshaft timing control with EDU motor assembly LH connectors and engine wire clamp.
-
-
INSTALL CAMSHAFT TIMING CONTROL WITH EDU MOTOR ASSEMBLY RH
-
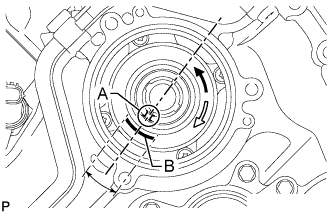
Turn the camshaft timing gear's eccentric shaft keyway part counterclockwise by hand and set it to the maximum retard angle.
Tech Tips
-
When the cam of the camshaft lifts the valve, the eccentric shaft becomes difficult to turn.
-
The position where the eccentric shaft stops is the maximum retard angle.
Note
When turning the eccentric shaft keyway part, do not use any tools as the keyway part may be damaged.
-
-
Turn the eccentric shaft clockwise until the groove labeled A and mark labeled B are aligned as shown in the illustration.
Tech Tips
Make sure that the groove labeled A is positioned as close as possible to the center of the mark labeled B.
-
Install a new O-ring to the timing chain cover.
-
Align the joint of the camshaft timing control with EDU motor assembly RH and the keyway of the camshaft timing gear assembly, and install the camshaft timing control with EDU motor assembly RH with the 3 bolts.
- Torque:
- 21 N*m { 214 kgf*cm, 15 ft.*lbf }
Note
-
Do not allow foreign matter to contact the oil seal face of the camshaft timing control with EDU motor assembly RH (connecting surface with timing chain cover).
-
When installing the camshaft timing control with EDU motor assembly RH, do not use excessive force.
-
Do not drop the camshaft timing control with EDU motor assembly RH. If dropped, replace it.
-
Do not disassemble the camshaft timing control with EDU motor assembly RH. If disassembled, replace it.
Tech Tips
-
Check that [R] is printed on the label of the camshaft timing control with EDU motor assembly RH.
-
When installing the camshaft timing control with EDU motor assembly RH, be sure to align the timing chain cover knock pin with the camshaft timing control with EDU motor assembly RH pin hole.
-
Install the camshaft timing control with EDU motor assembly RH with the arrow facing upward.
-
Install the engine wire bracket with the bolt.
- Torque:
- 12 N*m { 122 kgf*cm, 9 ft.*lbf }
-
Connect the 2 camshaft timing control with EDU motor assembly RH connectors.
-
-
INSTALL INTAKE AIR CONNECTOR PIPE
-
REMOVE COWL TOP VENTILATOR LOUVER
-

for LHD:
Remove the 6 clips and cowl top ventilator louver RH.
-

for RHD:
Remove the 6 clips and cowl top ventilator louver LH.
-
-
PRECAUTION
Note
After turning the engine switch off, waiting time may be required before disconnecting the cable from the battery terminal. Therefore, make sure to read the disconnecting the cable from the battery terminal notice before proceeding with work Click here.
-
DISCONNECT CABLE FROM NEGATIVE BATTERY TERMINAL
Note
When disconnecting the cable, some systems need to be initialized after the cable is reconnected Click here.
Tech Tips
Disconnect the cable from the negative (-) battery terminal so that the maximum retard angle of the camshaft timing control with EDU motor assembly will be learned.
-
CONNECT CABLE TO NEGATIVE BATTERY TERMINAL
Note
When disconnecting the cable, some systems need to be initialized after the cable is reconnected Click here.
-
INSTALL COWL TOP VENTILATOR LOUVER
-
for LHD:
Install the 6 clips and cowl top ventilator louver RH.
Note
If the cowl top ventilator louver RH is not properly installed, water may leak into the engine room and cause malfunctions. Therefore, make sure the cowl top ventilator louver RH is installed properly.
-
for RHD:
Install the 6 clips and cowl top ventilator louver LH.
Note
If the cowl top ventilator louver LH is not properly installed, water may leak into the engine room and cause malfunctions. Therefore, make sure the cowl top ventilator louver LH is installed properly.
-