FRONT SEAT OUTER BELT ASSEMBLY INSTALLATION

Tech Tips
-
Use the same procedure for the RH and LH sides.
-
The procedure listed below is for the LH side.
-
INSTALL FRONT SHOULDER BELT ANCHOR ADJUSTER ASSEMBLY
-
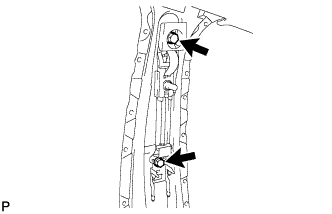
Install the front shoulder belt anchor adjuster assembly with the 2 bolts. First install the upper bolt, and then install the lower bolt.
- Torque:
- 42 N*m { 428 kgf*cm, 31 ft.*lbf }
-
-
INSTALL HEIGHT ADJUSTABLE ANCHOR MOTOR LH
-
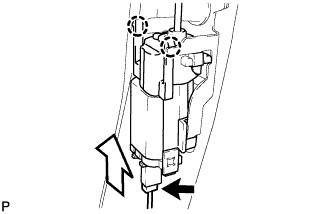
Insert the height adjustable anchor motor LH into the front shoulder belt anchor adjuster assembly and attach the 2 claws as shown in the illustration .
-
Connect the connector.
-
-
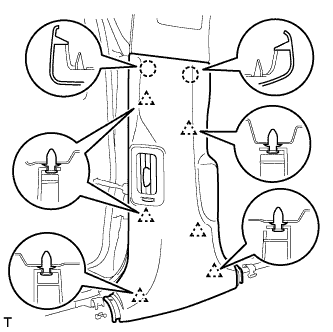
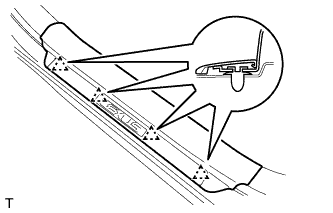
INSTALL FRONT SEAT OUTER BELT ASSEMBLY LH
Note
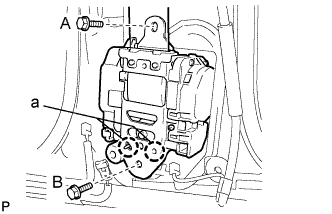
When installing the retractor, make sure the vehicle's claws (labeled "a" in the illustration) only contact the installation areas of the retractor.
-
Align the vehicle's claws with the seat belt retractor positioning holes.
-
Install the front seat outer belt assembly LH with the 2 bolts. First install the upper bolt, and then install the lower bolt.
- Torque:
- for bolt A
- 7.5 N*m { 76 kgf*cm, 66 in.*lbf }
- for bolt B
- 42 N*m { 428 kgf*cm, 31 ft.*lbf }
-
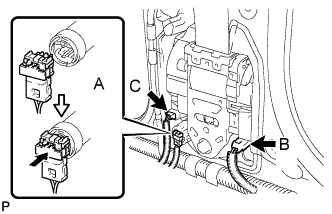
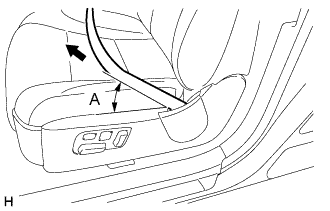
Connect the pretensioner connector labeled A, and lock the locking button as shown in the illustration.
-
w/ Tension Reducer System:
Connect the tension reducer connector labeled B.
-
w/ Pre-crash Safety System:
Connect the pre-crash safety connector labeled C.
-
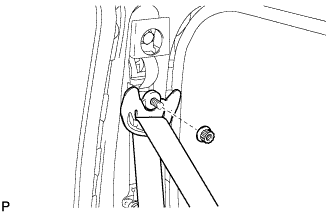
Install the shoulder anchor of the front seat outer belt assembly LH to the front shoulder belt anchor adjuster assembly with the nut.
- Torque:
- 42 N*m { 428 kgf*cm, 31 ft.*lbf }
-
-
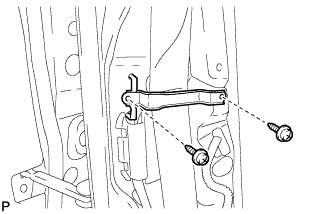
INSTALL FRONT SEAT SHOULDER BELT GUIDE
-
Install the front seat shoulder belt guide with the 2 screws.
Note
Make sure the belt is not pinched as this may damage the belt.
-
-
INSTALL CENTER UPPER PILLAR GARNISH LH
-
Pass the front seat outer belt floor anchor through the center upper pillar garnish LH.
-
Attach the guide and claw to install the center upper pillar garnish LH.
-
Install the 2 screws.
-
-
INSTALL CENTER LOWER PILLAR GARNISH LH
-
Attach the 2 claws and 6 clips to install the center lower pillar garnish LH.
-
-
INSTALL REAR DOOR SCUFF PLATE LH
-
for Standard Body:
-
for Long Body:
-
-
INSTALL FRONT DOOR SCUFF PLATE LH
-
Attach the 4 clips.
-
Attach the 7 claws to install the front door scuff plate LH.
-
-
INSTALL FRONT SEAT ASSEMBLY
-
CONNECT FRONT SEAT OUTER BELT ASSEMBLY LH
-
Connect the anchor part of the front seat outer belt assembly LH with the bolt.
- Torque:
- 42 N*m { 428 kgf*cm, 31 ft.*lbf }
-
-
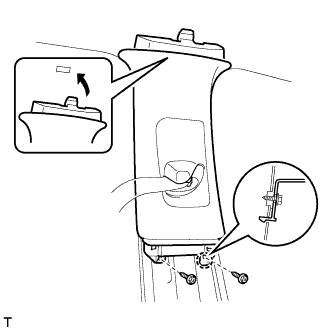
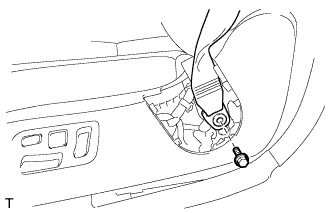
INSTALL SEAT BELT ANCHOR COVER CAP LH
-
Attach the guide and 4 claws to install the seat belt anchor cover cap LH by pushing it in the direction indicated by the arrow in the illustration.
-
After installing the seat belt anchor cover cap LH, pull out the seat belt toward the front as shown in the illustration.
Note
When installing the seat belt anchor cover cap LH, the seat belt will get pushed in and shorten. Therefore, perform the above to return the seat belt to the proper position.
Specification Position Angle A 35°
-
-
CONNECT CABLE TO NEGATIVE BATTERY TERMINAL
Note
When disconnecting the cable, some systems need to be initialized after the cable is reconnected Click here.
-
INSTALL COWL TOP VENTILATOR LOUVER RH
-

for LHD:
Install the 6 clips and cowl top ventilator louver RH.
Note
If the cowl top ventilator louver RH is not properly installed, water may leak into the engine room and cause malfunctions. Therefore, make sure the cowl top ventilator louver RH is installed properly.
-

for RHD:
Install the 6 clips and cowl top ventilator louver LH.
Note
If the cowl top ventilator louver LH is not properly installed, water may leak into the engine room and cause malfunctions. Therefore, make sure the cowl top ventilator louver LH is installed properly.
-
-
CHECK SRS WARNING LIGHT