CURTAIN SHIELD AIRBAG ASSEMBLY REMOVAL

Tech Tips
-
Use the same procedure for the RH and LH sides.
-
The procedure listed below is for the LH side.
-
PRECAUTION
CAUTION:
Be sure to read Precaution thoroughly before servicing Click here.
Note
After turning the engine switch off, waiting time may be required before disconnecting the cable from the negative (-) battery terminal. Therefore, make sure to read the disconnecting the cable from the negative (- ) battery terminal notices before proceeding with work Click here.
-
REMOVE COWL TOP VENTILATOR LOUVER RH
-

Remove the 6 clips and cowl top ventilator louver RH.
-
-
DISCONNECT CABLE FROM NEGATIVE BATTERY TERMINAL
CAUTION:
Wait at least 90 seconds after disconnecting the cable from the negative (-) battery terminal to disable the SRS system.
Note
When disconnecting the cable, some systems need to be initialized after the cable is reconnected Click here.
-
REMOVE ROOF HEADLINING ASSEMBLY
-
for Standard Body:
-
for Long Body:
-
-
REMOVE CURTAIN SHIELD AIRBAG ASSEMBLY LH (for Standard Body)
CAUTION:
When storing the curtain shield airbag assembly LH, keep the airbag deployment side facing upward.
-
Check that the engine switch is off.
-
Check that the cable is disconnected from the negative (-) battery terminal.
CAUTION:
Wait at least 90 seconds after disconnecting the cable from the negative (-) battery terminal to disable the SRS system.
-

Text in Illustration *1 Clip *2 Pin Using needle-nose pliers, release the lock by pinching the 2 locks of the pin, and raise the pin from the clip.
Tech Tips
Use the same procedure for the other clips as well.
-
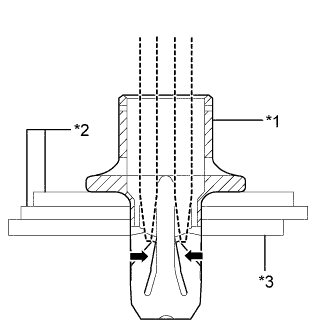
Text in Illustration *1 Clip *2 Curtain Shield Airbag Assembly LH *3 Body Using 2 screwdrivers, detach the 2 clips by inserting the screwdrivers into the grooves of the clips as shown in the illustration, and then remove the clips from the vehicle body.
Tech Tips
-
The clip will remain installed to the curtain shield airbag assembly LH.
-
Use the same procedure for the other clips as well.
-
-
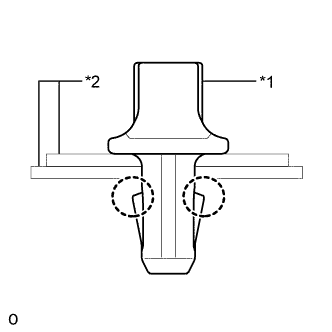
Text in Illustration *1 Clip *2 Curtain Shield Airbag Assembly LH Detach the 2 claws and remove the clip from the curtain shield airbag assembly LH.
Note
The clips must not be reused.
Tech Tips
Use the same procedure for the other clips as well.
-
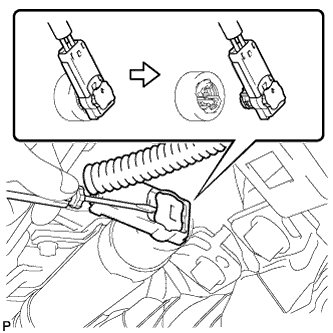
Using a screwdriver release the connector lock.
-
Using a screwdriver release the connector lock.
-
Using a screwdriver, disconnect the connector.
Note
When handling the airbag connector, take care not to damage the airbag wire harness.
-
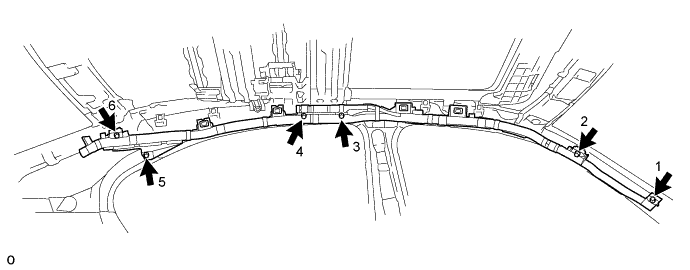
Remove the 6 bolts in the order shown in the illustration to remove the curtain shield airbag assembly LH.
Note
The bolts must not be reused.
-
-
REMOVE CURTAIN SHIELD AIRBAG ASSEMBLY LH (for Long Body)
CAUTION:
When storing the curtain shield airbag assembly LH, keep the airbag deployment side facing upward.
-
Check that the engine switch is off.
-
Check that the cable is disconnected from the negative (-) battery terminal.
CAUTION:
Wait at least 90 seconds after disconnecting the cable from the negative (-) battery terminal to disable the SRS system.
-
Text in Illustration *1 Clip *2 Pin Using needle-nose pliers, release the lock by pinching the 2 locks of the pin, and raise the pin from the clip.
Tech Tips
Use the same procedure for the other clips as well.
-
Text in Illustration *1 Clip *2 Curtain Shield Airbag Assembly LH :3 Body Using 2 screwdrivers, detach the 2 clips by inserting the screwdrivers into the grooves of the clips as shown in the illustration, and then remove the clips from the vehicle body.
Tech Tips
-
The clip will remain installed to the curtain shield airbag assembly LH.
-
Use the same procedure for the other clips as well.
-
-
Text in Illustration *1 Clip *2 Curtain Shield Airbag Assembly LH Detach the 2 claws and remove the clip from the curtain shield airbag assembly LH.
Note
The clips must not be reused.
Tech Tips
Use the same procedure for the other clips as well.
-
Using a screwdriver, disconnect the connector.
Note
When handling the airbag connector, take care not to damage the airbag wire harness.
-
Remove the 6 bolts in the order shown to remove the the illustration and curtain shield airbag assembly LH.
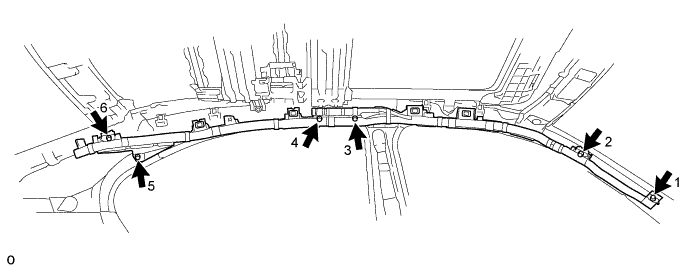
Note
The bolts must not be reused.
-