КОНТАКТНЫЙ ДАТЧИК ДАВЛЕНИЯ МАСЛА УСТАНОВКА
-
INSTALL ENGINE OIL PRESSURE SWITCH ASSEMBLY
-
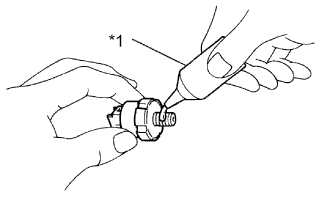
Text in Illustration *1 Adhesive Apply adhesive to 2 or 3 threads of the oil pressure switch assembly.
Adhesive Toyota Genuine Adhesive 1344, Three Bond 1344 or equivalent -
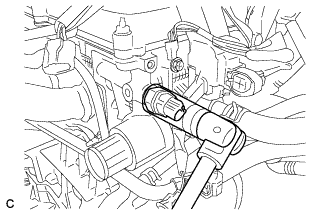
Using a 24 mm deep socket wrench, install the oil pressure switch assembly.
- Torque:
- 15 N*m { 153 kgf*cm, 11 ft.*lbf }
Note
Do not start the engine within 1 hour of installation.
-
Connect the oil pressure switch connector.
-
-
INSTALL BATTERY TRAY
-
Установите лоток аккумуляторной батареи.
-
-
INSTALL BATTERY
-
Установите аккумуляторную батарею и изолятор аккумуляторной батареи.
-
Установите прижимную планку аккумуляторной батареи и закрепите ее болтом и гайкой.
- Torque:
- Болт
- 46 Н*м { 469 кгс*см, 34 фунт-сила-фута }
- Гайка
- 4,9 Н*м { 50 кгс*см, 43 фунт-сила-дюйма }
-
Подсоедините 2 зажима жгута проводов.
-
Подсоедините положительный провод (+) к положительному (+) выводу аккумуляторной батареи.
- Torque:
- 5,4 Н*м { 55 кгс*см, 48 фунт-сила-дюймов }
-
-
CONNECT CABLE TO NEGATIVE BATTERY TERMINAL
Note
When disconnecting the cable, some systems need to be initialized after the cable is reconnected Click here.
-
INSTALL RADIATOR COVER SUB-ASSEMBLY
-
Закрепите крышку радиатора в сборе 4 фиксаторами.
-
-
INSPECT FOR OIL LEAK